
Hollow Knight Silksong: Deep Docks walkthrough (Part 5)
Hollow Knight Silksong walkthrough: Part 5 (Deep Docks)


Trying to make your way through the Deep Docks region in Hollow Knight: Silksong? The Deep Docks represents a noticeable step up in difficulty from the early regions of Hollow Knight: Silksong. It may not be an overly large region, but there are some real challenges awaiting you here - not to mention a few well-hidden collectibles, a handy NPC to meet, and one of my favourite boss fights of the game.
In Part 5 of our Silksong walkthrough, we'll guide you all the way through the vast majority of the Deep Docks, showing you the ideal progression path through this region - and how to unlock the all-important dash skill!
Want the walkthrough for a different area of the game? Check out our Hollow Knight: Silksong walkthrough hub!
Deep Docks walkthrough steps:
- Unlock the starting Bench, Map, and Fast Travel.
- Rescue the Flea behind the Bellway.
- Explore North.
- Dip into Hunter's March.
- Unlock Swift Step to sprint and dash.
- Rescue your third Flea.
- Unlock the nearby shortcut to the Bench.
- Explore South.
- Brave the hot coals for a Spool Fragment.
- Explore further South for a chest.
- Enter the gauntlet to find Forge Daughter.
- Use Swift Step to unlock the path to Lace.
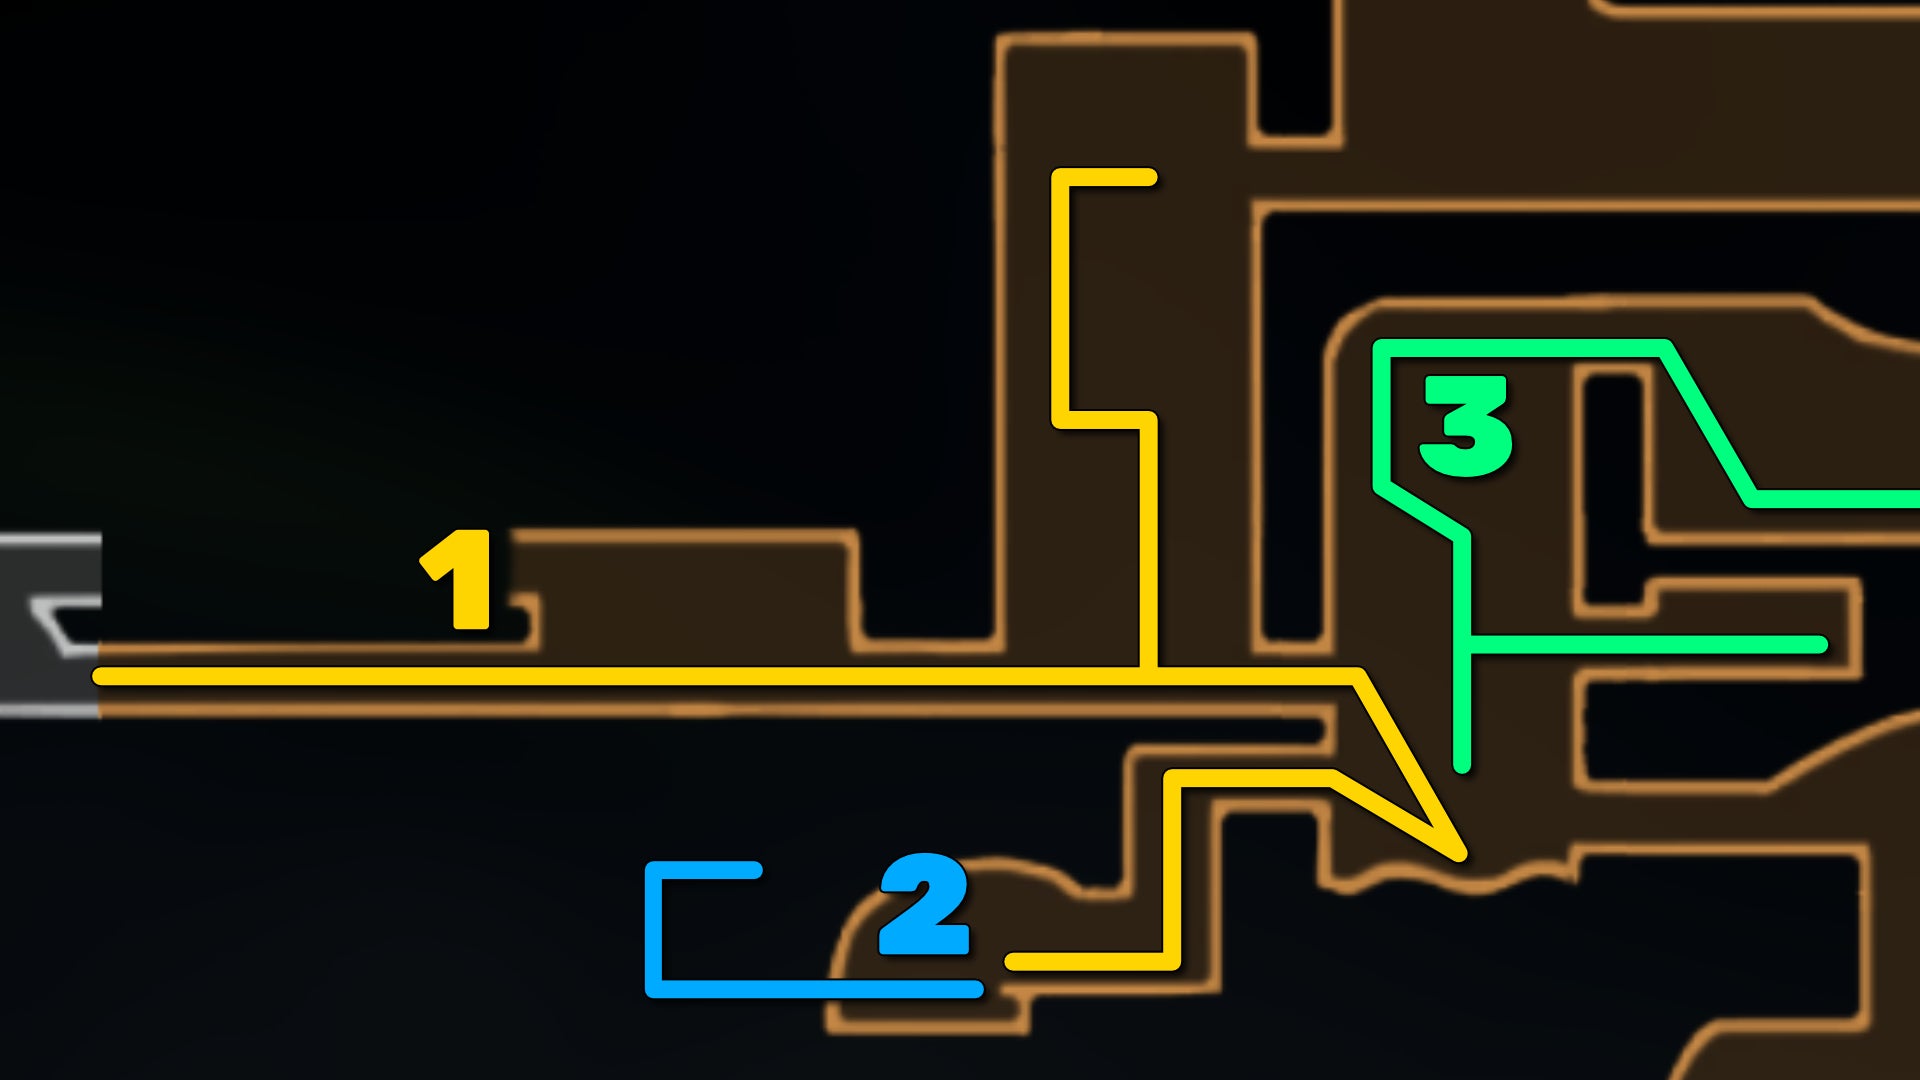
1. Unlock the starting Bench, Map, and Fast Travel.
From the Deep Docks entrance, plow onward to the right until you pass over an elevator. Ride it to the top, then ride the second elevator to the top. Here you can insert 30 Rosaries for a handy starting Bench for this region.


That done, descend the elevators and continue right into the next room, where you'll immediately hear the singing of Shakra, the map-maker. She's right below you, so drop down and speak with her. If you have the 50 Rosaries on you, buy the Deep Docks map immediately - it always helps to have an in-game map of a new area as early as possible.


The final part of your "setting up" phase of Deep Docks is to exit through the doorway immediately above and to the left of Shakra's location. It's the doorway with the signpost pointing towards it. Head down there, and pay 50 Rosaries (if you have them) to open up the Bellway to Fast Travel to and from this location.
If you're too low on Rosary Beads to afford all three of these things, then it might be best to spend a few minutes killing Pilgrims back in Mosshome until you have enough.
2. Rescue the Flea behind the Bellway.

Before you move on, jump over the Bell Beast and attack the left-hand wall of the Bellway room to reveal a secret passage. Inside is a fairly simple platforming puzzle where you have to time your jumps to avoid the falling streams of lava.

At the end of the path in the top-right corner is a poor scared little Flea - the second Lost Flea of your playthrough. Attack it to wake it from its terrified reverie, and allow it to fly safely home. Then retrace your steps out of the lava platforming puzzle.
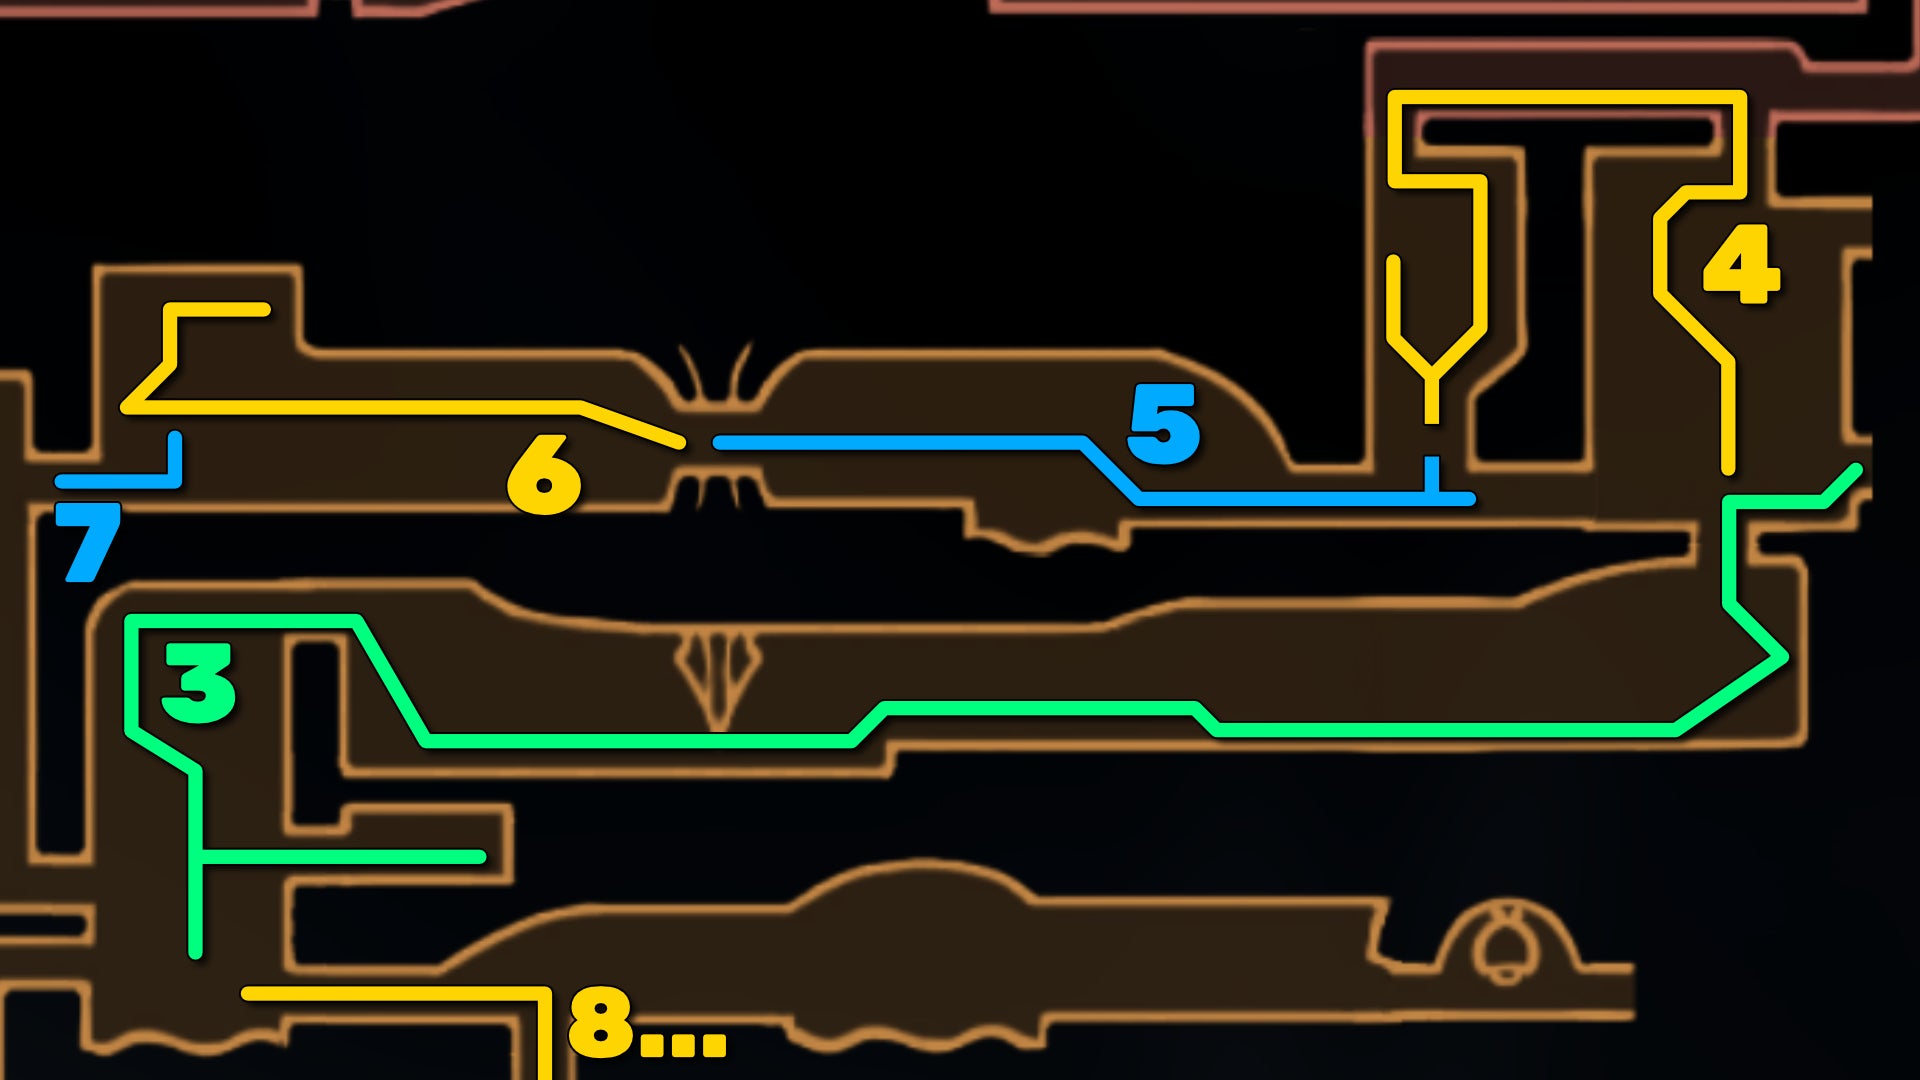
3. Explore North.
Back in the room where you found Shakra, scale the various ledges to climb higher up, and jump over to the right-hand side when possible. You should see a doorway to the right about halfway up, along with a ledge below it with a lever.


Pull the lever to raise the nearby platform, which just makes it a bit easier to get over to the doorway. Through the doorway you'll find a small room containing nothing but a couple of Bell-helmet enemies. Kill them, and exit.
Keep climbing the main room, and on the left side you'll find another lever to pull, allowing you to reach the top level. Exit through the top-right doorway.

This next room is fairly straightforward - just carefully make your way past all the enemies and all the lava, a bit at a time, until you reach the very far top-right corner. Above the highest platform you'll see an orange rock in the ceiling; hit it to explode open a passage north.

Head right from this point, and you'll find another Bench you can unlock for another 30 Rosaries. Probably a good idea at this point.
4. Dip into Hunter's March.
Your goal is even higher up. Climb the ledges, and be wary of the little ant enemies you encounter, because they're very brave in the face of Hornet's needle and may sneak in a hit regardless of knockback.

Climb to the very top, and you'll exit off-screen into a new and uncharted biome. This is technically Hunter's March, but it's closed off from the rest of the region, and our stay here is only temporary.
Head left once you're up there, and you'll have to defeat a gauntlet of ant enemies to proceed. Once they're all dead, drop down the hole beyond the arena, and carefully make your way down the passage below. Halfway down you'll see a ledge on your left guarded by flying ants, with a narrow passage upwards. Follow this path for a Frayed Rosary String at the top, then keep heading downward.

5. Unlock Swift Step to sprint and dash.
Once you reach the ground level by the spikes, hit the orange rock at the end of the path on your right to unlock a shortcut back near the last Bench. But then keep heading left over the spikes.


In the next room, just keep heading left and you'll soon find another monument, just like the one which gave you your Silkspear skill. Interact with it, and Bind when prompted to unlock your next (and in some ways, best) skill: Swift Step.

Swift Step is your dodge skill, allowing you not only to evade attacks but also reach far further than before while jumping. Not only that, but holding down Swift Step allows Hornet to sprint very fast. It's a real game-changer, and you'll be glad you got it this early on.
6. Rescue your third Flea.
With your newfound dodge, parkour over to the high up metal ledges on your left. By the wall there's a lever you should attack to allow you passage further up. At the top of this path is another little Flea, trapped inside one of those rocky eggs. Attack it to free the Flea.


7. Unlock the nearby shortcut to the Bench.

A quick step before we continue - just drop down to the bottom of the room, and hit the lever above the doorway to open it. This doorway leads right back to that first Bench at the start of the Deep Docks, so you can rest there if needed before soldiering on.
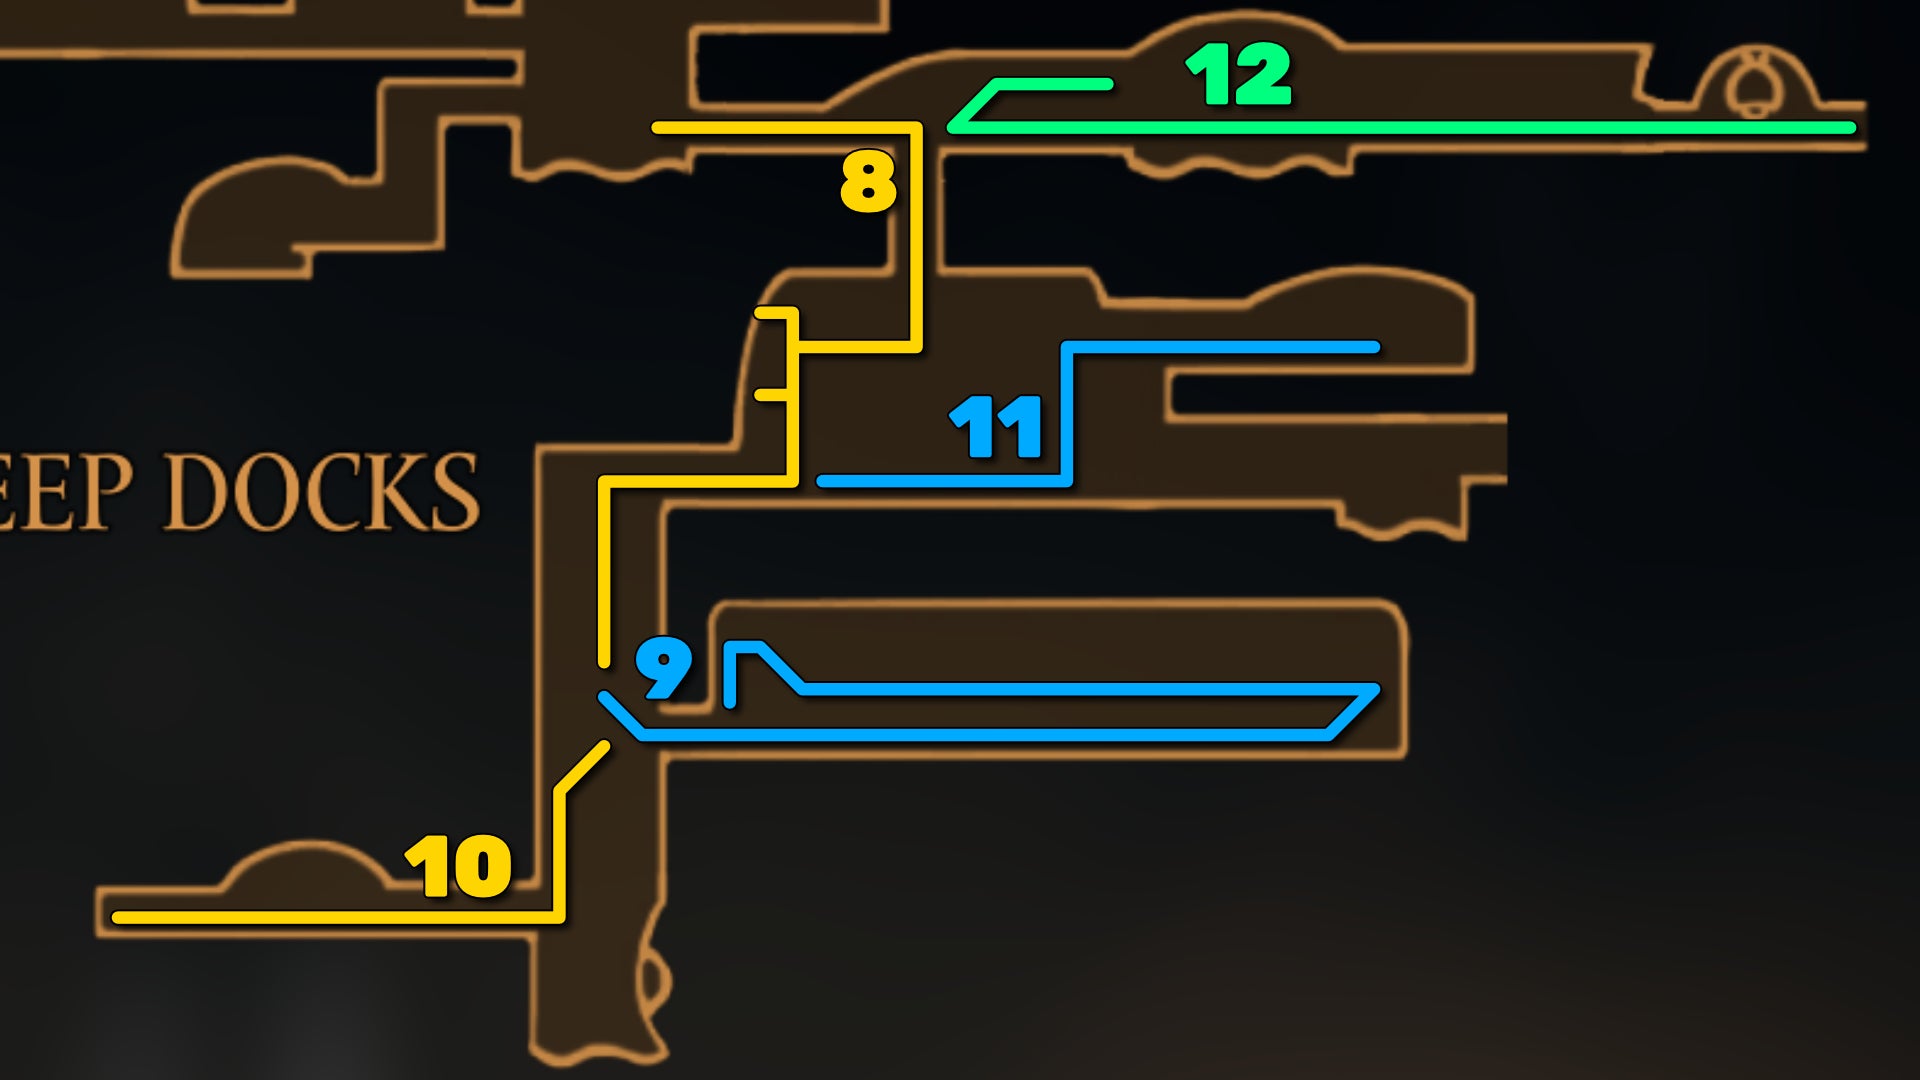
8. Explore South.
Retrace your steps until you're back where you found Shakra, and this time exit to the right. In the next room you'll hear singing coming from the right, but ignore it for now and hit the lever on the ground in the centre of the room to explore further south.

Drop down and venture left. Jump up onto the higher ledge on the left-hand wall, and walk through the wall for a tiny hidden compartment where you can loot a Shard Bundle. Then ride the elevator down, and get off at the first stop on the left for a cache of Shards.


Now follow the elevator all the way down, and exit to the left. You'll emerge at the top of one of those large vertical connecting rooms, but this one is filled with black slimes that explode powerfully at you the moment you approach. For double damage. So be careful.

Carefully descend the platforms, and exit via the first doorway you see on the right.
9. Brave the hot coals for a Spool Fragment.
Nearly every surface in this next room is covered in hot coals which will damage you if you stay on them for more than a moment. But keep jumping, and you'll be fine.

Use the hanging platforms to reach the upper-right ledge, and hit the lever to reposition all the ledges. Then make your way back along them, and you'll be able to reach an upper ledge on the left with a Spool Fragment. Together with the one you collected back in Mosshome, this will permanently increase your max Silk for the rest of your playthrough.


10. Explore further South for a chest.

Return to the vertical room of black slimes, and descend a little further down, hanging a left as you go. You'll quickly see another doorway leading left. Head through it and defeat the three enemies in this room to loot a chest of Shell Shards at the end.

Going back out into the vertical room, you're basically at the bottom now. There's a locked door on your right, but that's about it. Time to head back upwards.
11. Enter the gauntlet to find Forge Daughter.
Head back up to the very top of the vertical room and exit. This time, head across the elevator and to the right. There's a little section above you where you can open a door to read a bit of lore. When you're ready, duck back down and head further right into a gauntlet arena.


In this gauntlet you'll be faced with a succession of those bell-helmet enemies, as well as a new variant of enemy which uses a bell as a shield, and is quite handy at deflecting your Pogo attacks from above.

When the gauntlet is cleared, two ways out will appear - one above you, and one to the right. The way to the right leads only to a large padlocked door which you currently can't open, so head upwards from the gauntlet. On your left is a Bench you can rest at. You should also flick the lever next to it to unlock easy access back upwards.

Don't head upwards yet though. Instead, walk to the right and you'll find a new NPC: Forge Daughter.

She and her companion (who you can also speak with) are smiths, and speaking with Forge Daughter allows you to access her shop of handy tools and weapons. If you have the Rosaries to spare, you can purchase a Crafting Kit for 180 Rosary Beads. Crafting Kits will increase the damage you deal with your tools (such as the Straight Pin you found in Grindle's cell back in The Marrow).
12. Use Swift Step to unlock the path to Lace.
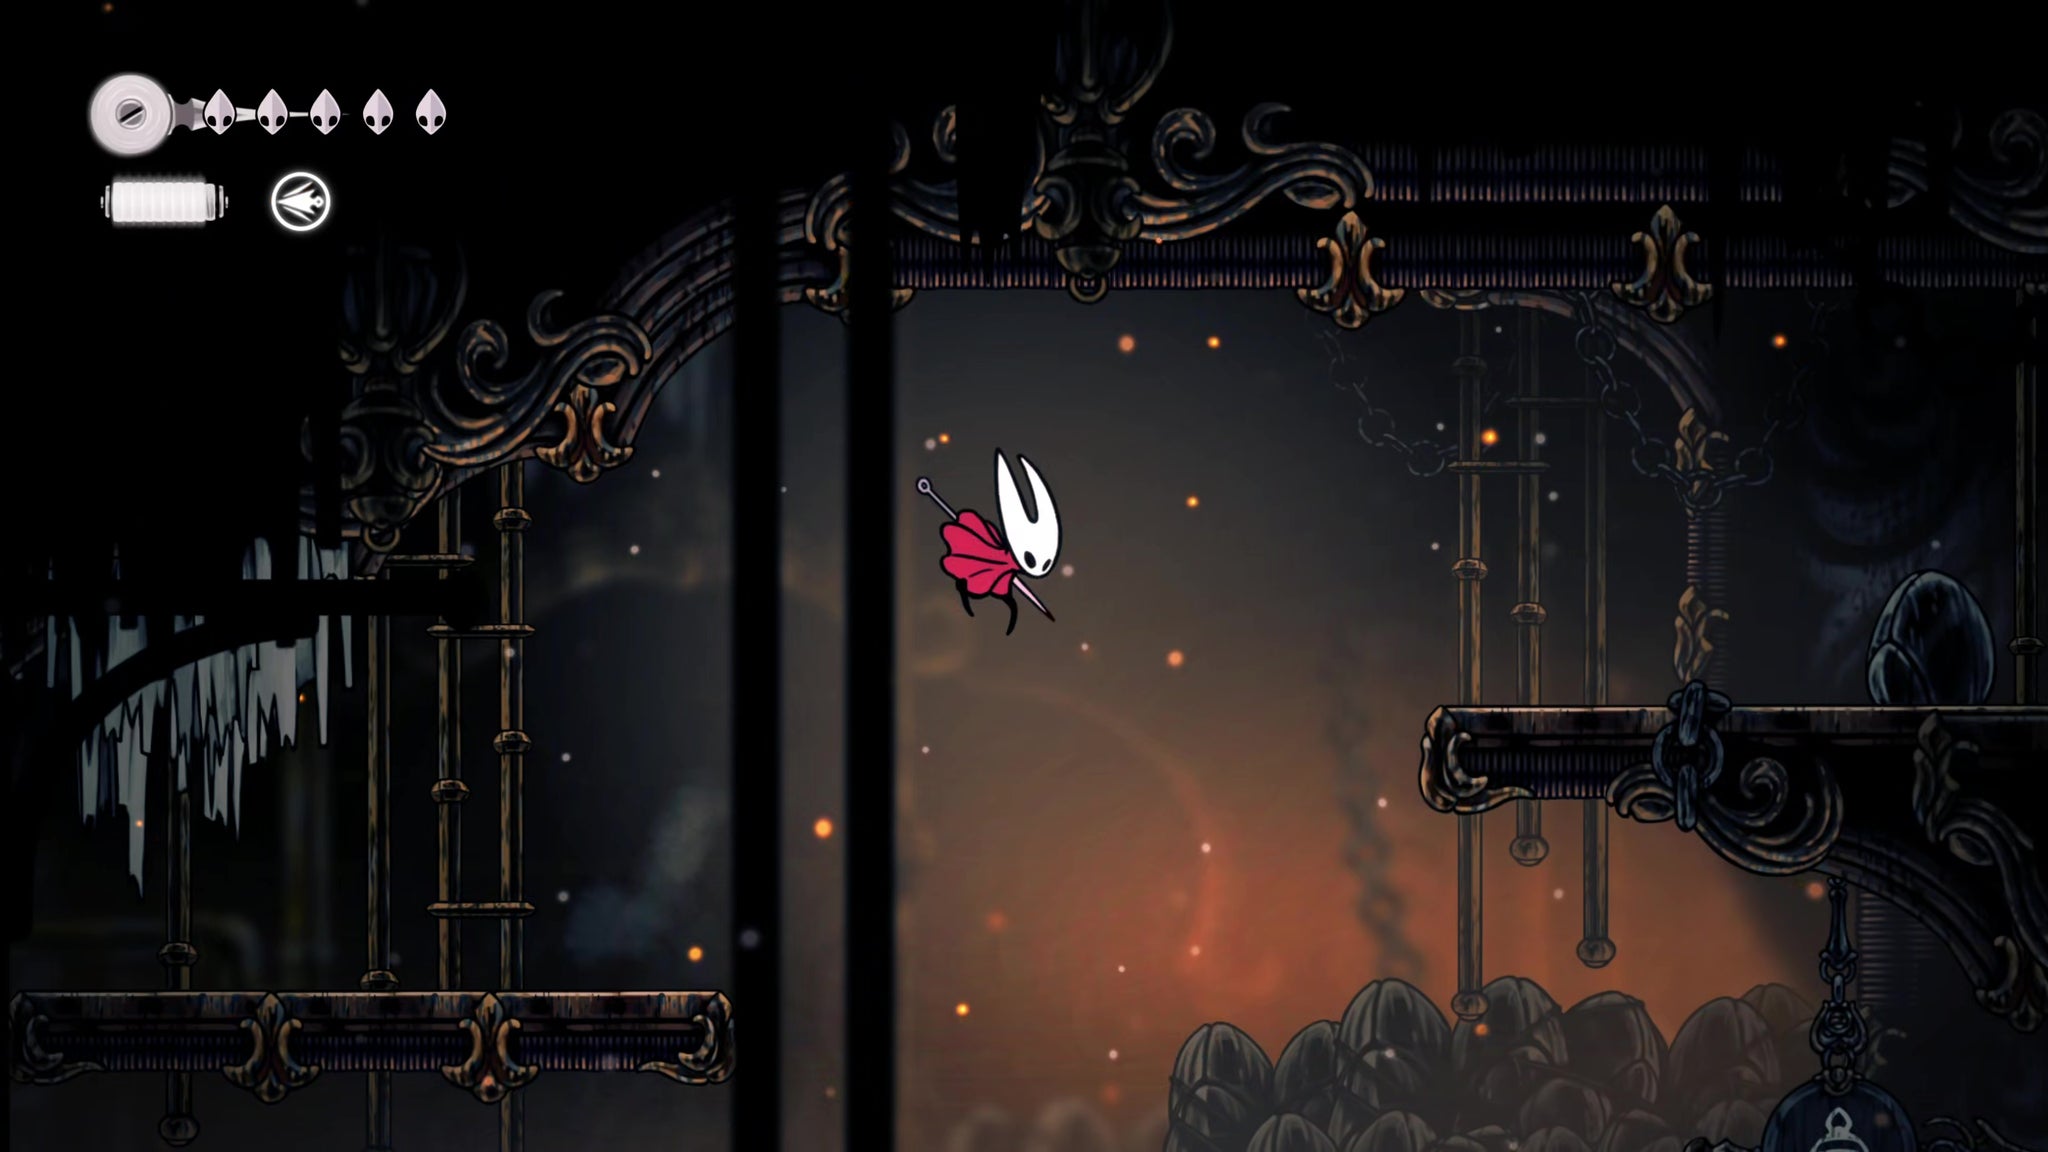

Now you've done everything else there is to do in this region, it's time to face the main boss of the Deep Docks. Head upwards via the shortcut you unlocked, and in the upper room with the eerie singing, Swift Step up to the upper-right ledge. Hit the lever, and the gate below you will unlock, allowing you to find the source of the singing.

Get ready for a fast, tough, and very enjoyable boss fight. This white-clad character is Lace, and she's just as quick and handy a swordmaster as Hornet - but much more evil. Lace is built to counter Pogo attacks, thanks to her deflect-and-flurry move, which all but guarantees two points of damage to you.

It may take you several attempts to beat Lace, but I found that quickly and carefully punishing her thrust attacks (with just one strike; don't get greedy) wore her down without too much effort. In her second phase, she'll start pulling out crazy dash attacks around a central point of light, so whenever you see that light, just get far away from it.

Once Lace is defeated, she'll disappear (to be seen again, it seems), leaving you free to venture to the right. Hit the lever in the next room to sound a bell of victory and unlock a new Bench and the way forward into a brand new region - the Far Fields.
That's it for this stage of our walkthrough, but if you're hankering to explore what lies beyond, look no further than our Silksong Part 6 walkthrough!
Read this next
- Ahead of Hollow Knight: Silksong's Sea of Sorrow expansion, Team Cherry have gotten their Traditional Chinese and German translation ducks in a row
- We may have glimpsed Silksong's Sea of Sorrow expansion in a six-year-old trailer
- Hollow Knight: Silksong's first big expansion, Sea of Sorrow, flows into our lives for free next year
