
Hollow Knight Silksong walkthrough: Part 20 (Cogwork Core)
Plus, how to solve the pillar puzzle at the top of the Core


Trying to make your way through the Cogwork Core of the Citadel in Hollow Knight: Silksong? Defeating the Cogwork Dancers at the top of the Choral Chambers allows you to enter the Cogwork Core, a place of machinery, intense platforming, and some really excellent music. It's also home to one of the three pieces of the Threefold Melody which allows you access to the final region of Act 2.
In Part 20 of our Silksong walkthrough, I'll guide you through the entirety of the Cogwork Core, starting with the lower section and all its paths out to areas both new and old; and then working our way to the pillar puzzle at the very top so you can unlock the Architect's Melody.
Want the walkthrough for a different area of the game? Check out our Hollow Knight: Silksong walkthrough hub!
Cogwork Core walkthrough steps:
- Obtain the Cogwork Core Map.
- Complete the west gauntlet for a Mask Shard.
- Obtain the Spool Fragment to the southeast.
- Unlock the central gate.
- Reach the top of the Cogwork Core.
- Solve the puzzle to learn the Architect's Melody.
- Reach the Whispering Vaults.
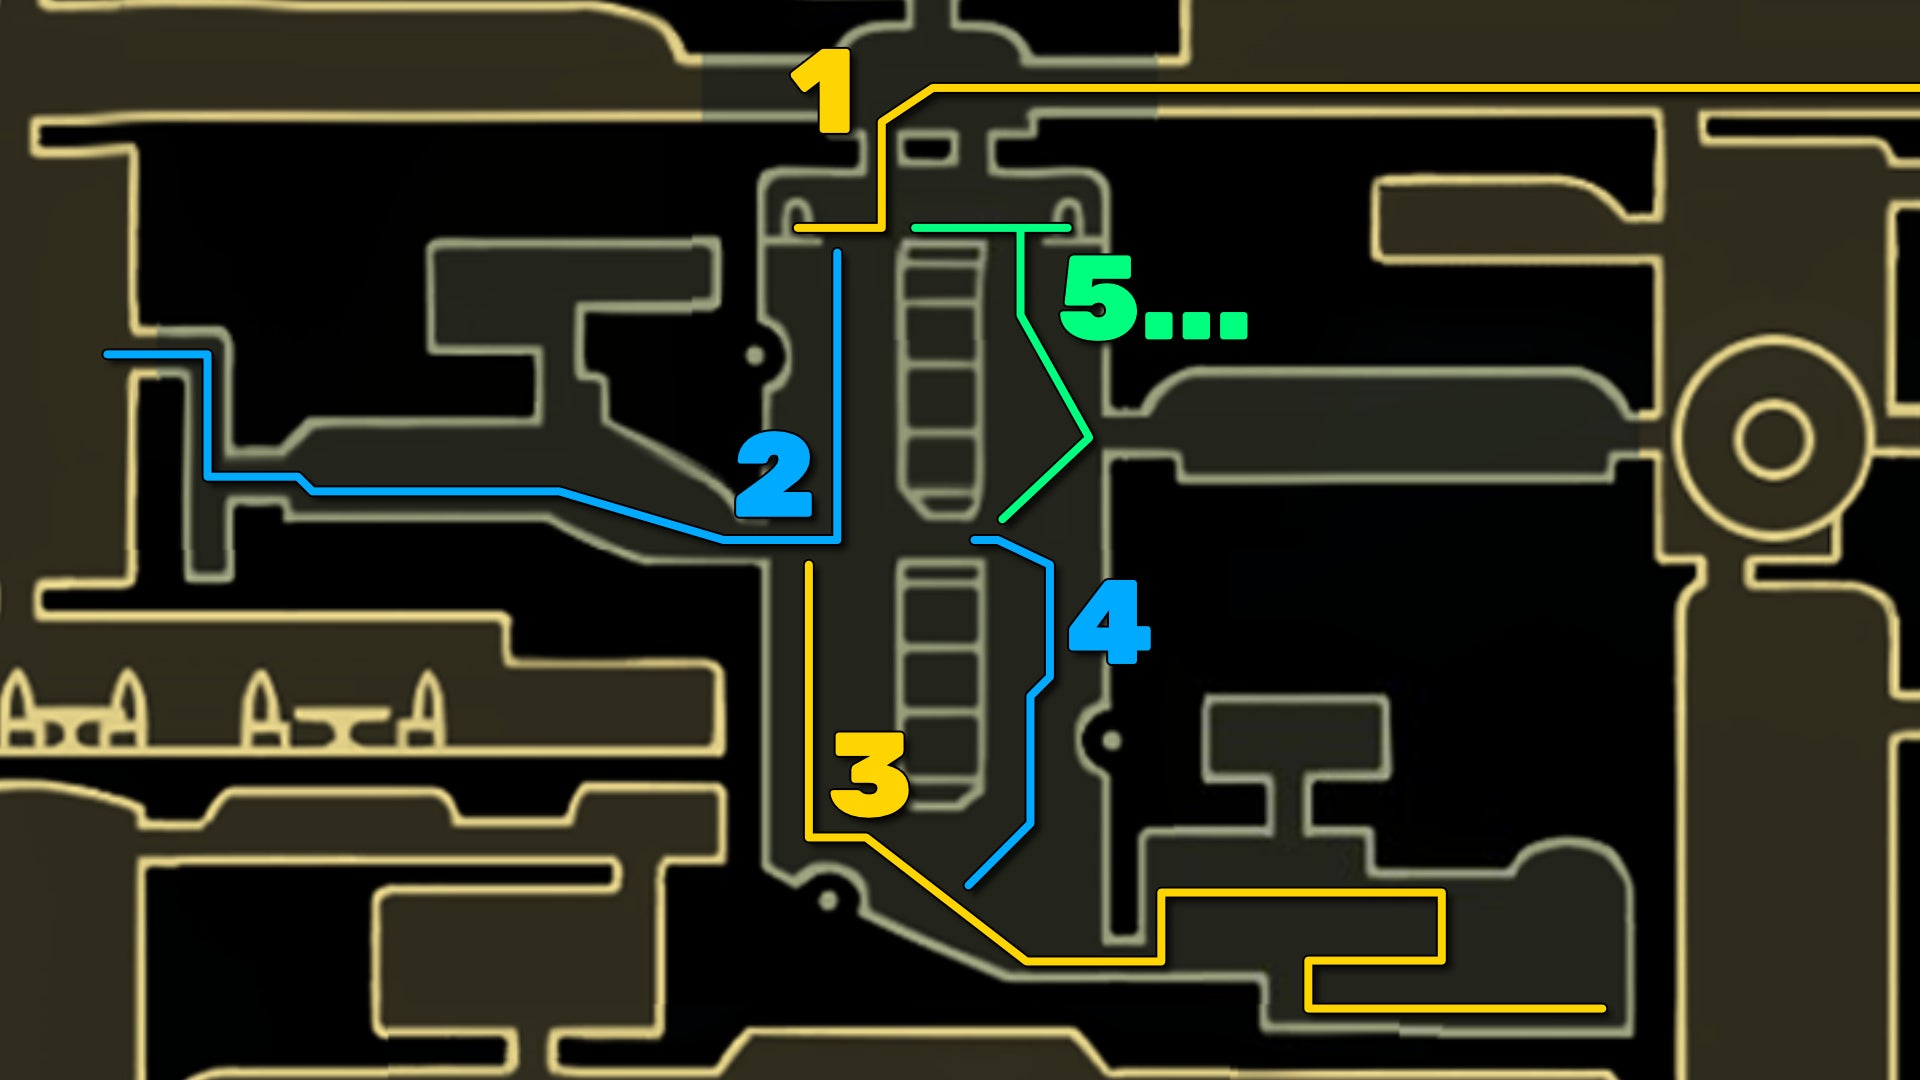
1. Obtain the Cogwork Core Map.
Where we last left off, you'd just emerged from the Underworks into the southwest section of the Choral Chambers. Head to the Choral Chambers Ventrica nearby, and fast travel to the First Shrine. Then make your way to the Cogwork Dancers arena, and drop down either of the holes in the floor.


Head to the left, and enter the building of white light on the ledge in front of you. Hit the wheel above you repeatedly, until a Bench appears that you can rest at. That done, climb up the wall to your left (the enemy up there is a fake, don't worry). Stand on the pressure plate to unlock the Cogwork Core map nice and early.


2. Complete the west gauntlet for a Mask Shard.
Exit the building, and carefully drop down to the lower levels beneath you. Every surface you can imagine down in the Cogwork Core is covered in circular saws, so floating with the Drifter's Cloak is your best friend here.

Head down the left side of the ledge patrolled by the lone Cogwork Choirbug, and kill the second Choirbug below. Then drop down to the two lower ledges, and take the exit on your left.
Kill the two spikey Cogwork Spines flying around the next room, and make your way into the arena beyond, where you'll have to face off against a number of Cogwork enemies in a gauntlet. Sections of floor will rearrange themselves between the different waves, so be prepared to do a lot of jumping, dashing, and floating to avoid the saws below.


Once the gauntlet is conquered, head out the left door, and up the little shaft beyond. This will take you to a small area of the adjoining room where you can pick up a Mask Shard, and press down the pressure plate for a shortcut back into the west side of the Choral Chambers.
3. Obtain the Spool Fragment to the southeast.

Retrace your steps back into the main part of the Cogwork Core, and continue to descend the various platforms below. Kill the two patrolling Cogwork Choirbugs on the lower ledge, and then drop off the left side and float down between the saw below and the ledge patrolled by a new enemy (Cogwork Cleanser).

Slide down the glass and metal wall to your left, and then jump over the moving saws as you head down to the exit in the lower-right corner. In this next room, climb upwards to the main part of the room, and you'll see a wheel to spin up in the top-right corner. Spinning this wheel will open the gate beyond, but it will also let loose from the ceiling a big round miniboss enemy - a Cogwork Clapper.

Clappers are nasty - they bounce around in zig-zag patterns to hit you for double damage, and also send out little grenade projectiles at you while you're attempting to dodge. If you can manage to spin up the wheel all the way, then you can use the corridor beyond as protection from most of the Clapper's attacks, making the fight much more straightforward.
Beyond the Cogwork Clapper room, hit the lever on the ground and enter the hole below. Head left past the steam vent and the Drapemite that spawns, and drop down the next hole, sliding down the right-hand side to avoid the saws at the bottom.


Dodge past the next section of steam vents, and in the room beyond you'll be able to loot a Spool Fragment. There's nothing else of value in this whole room, so make your way back up and out via the lefthand lever (a shortcut back out of the room).
4. Unlock the central gate.
Back out in the main shaft, it's time to scale up the right-hand side. To do this, jump three platforms to the left, and then do a running jump and dash to the right to reach the upper ledge patrolled by the Choirbug. Kill the bug, then start climbing upwards from here, Pogo-ing off the saws above to reach the walls on either side.

Once you're past the first four saws, you'll be able to Pogo off the final one to reach a ledge with a wheel above you. Attack the wheel repeatedly to open the central gate, allowing far easier passage between the left and right sides of the shaft.
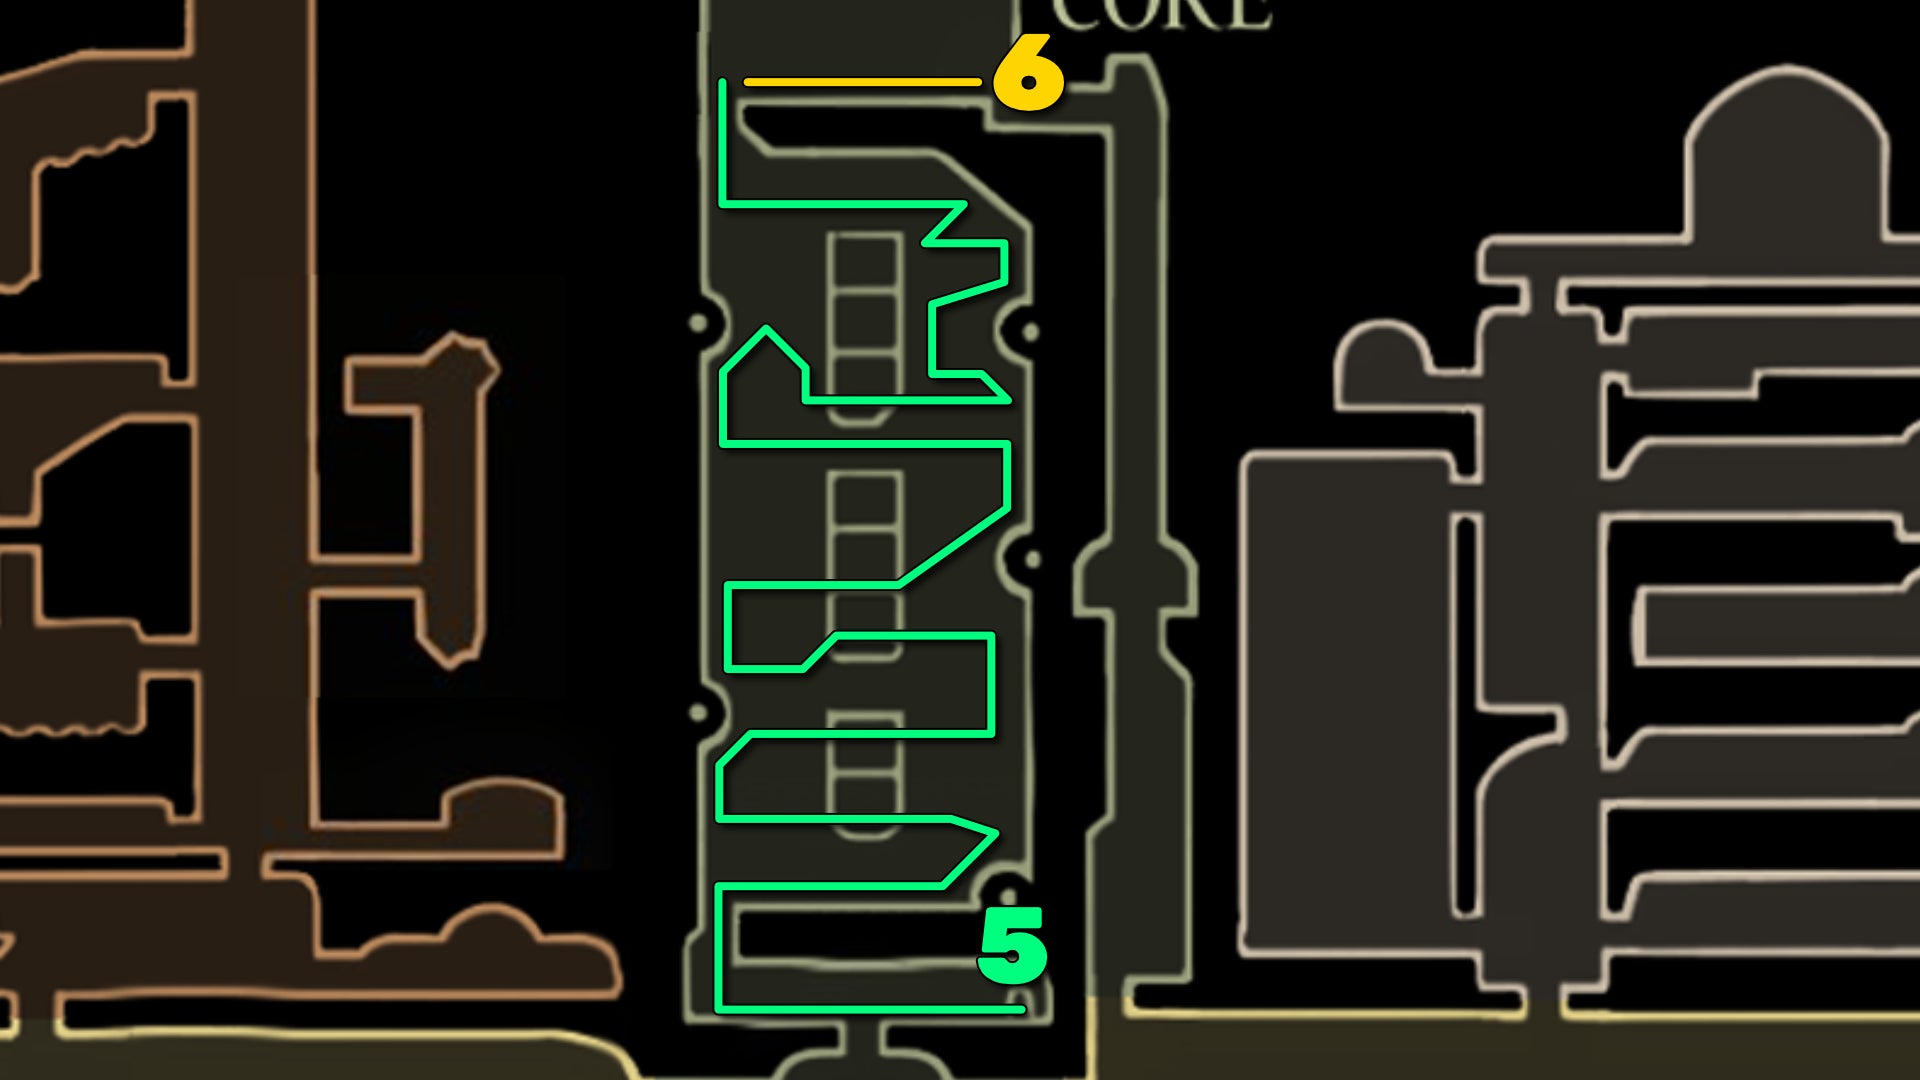
5. Reach the top of the Cogwork Core.
There's a lot more of the Core still to climb yet. Pogo off the next two saws, and you'll reach a doorway that takes you to the right - but we're not going there yet. That's the last thing we'll do in the Core. For now, launch yourself higher off this ledge and Pogo further up off the saws.


Further up, you'll reach another white doorway. Before you go through it, hit the wheel beside it to unlock another gate right back where you entered the Cogwork Core. Take this moment to head to the opposite side and rest at the Bench once again if you need it. Then go through the new white doorway.
This simple wall-climbing path gets you into the upper half of the Cogwork Core, above the Cogwork Dancers arena. Once you're at the top, step through out of a different white doorway. Jump the gap, and strike the wheel on the ceiling to drop a Clawline hook down through the floor, into the centre of the Dancers arena. This is just a handy shortcut which allows you to get up here more easily from the Choral Chambers.

Jump over to the left-hand side, and Clawline onto the ring beyond to activate a trapdoor leading upwards into the large room beyond. This whole next room is an elaborate platforming puzzle, where the key gimmick is Clawline-ing onto hooks which will move along tracks while you're holding on. At times you'll need to jump off the moving Clawline to avoid an obstacle (like a saw), and then reattach yourself in mid-air to the same hook to keep going. It's tricky, but it feels great when you get it right. Just take your time.
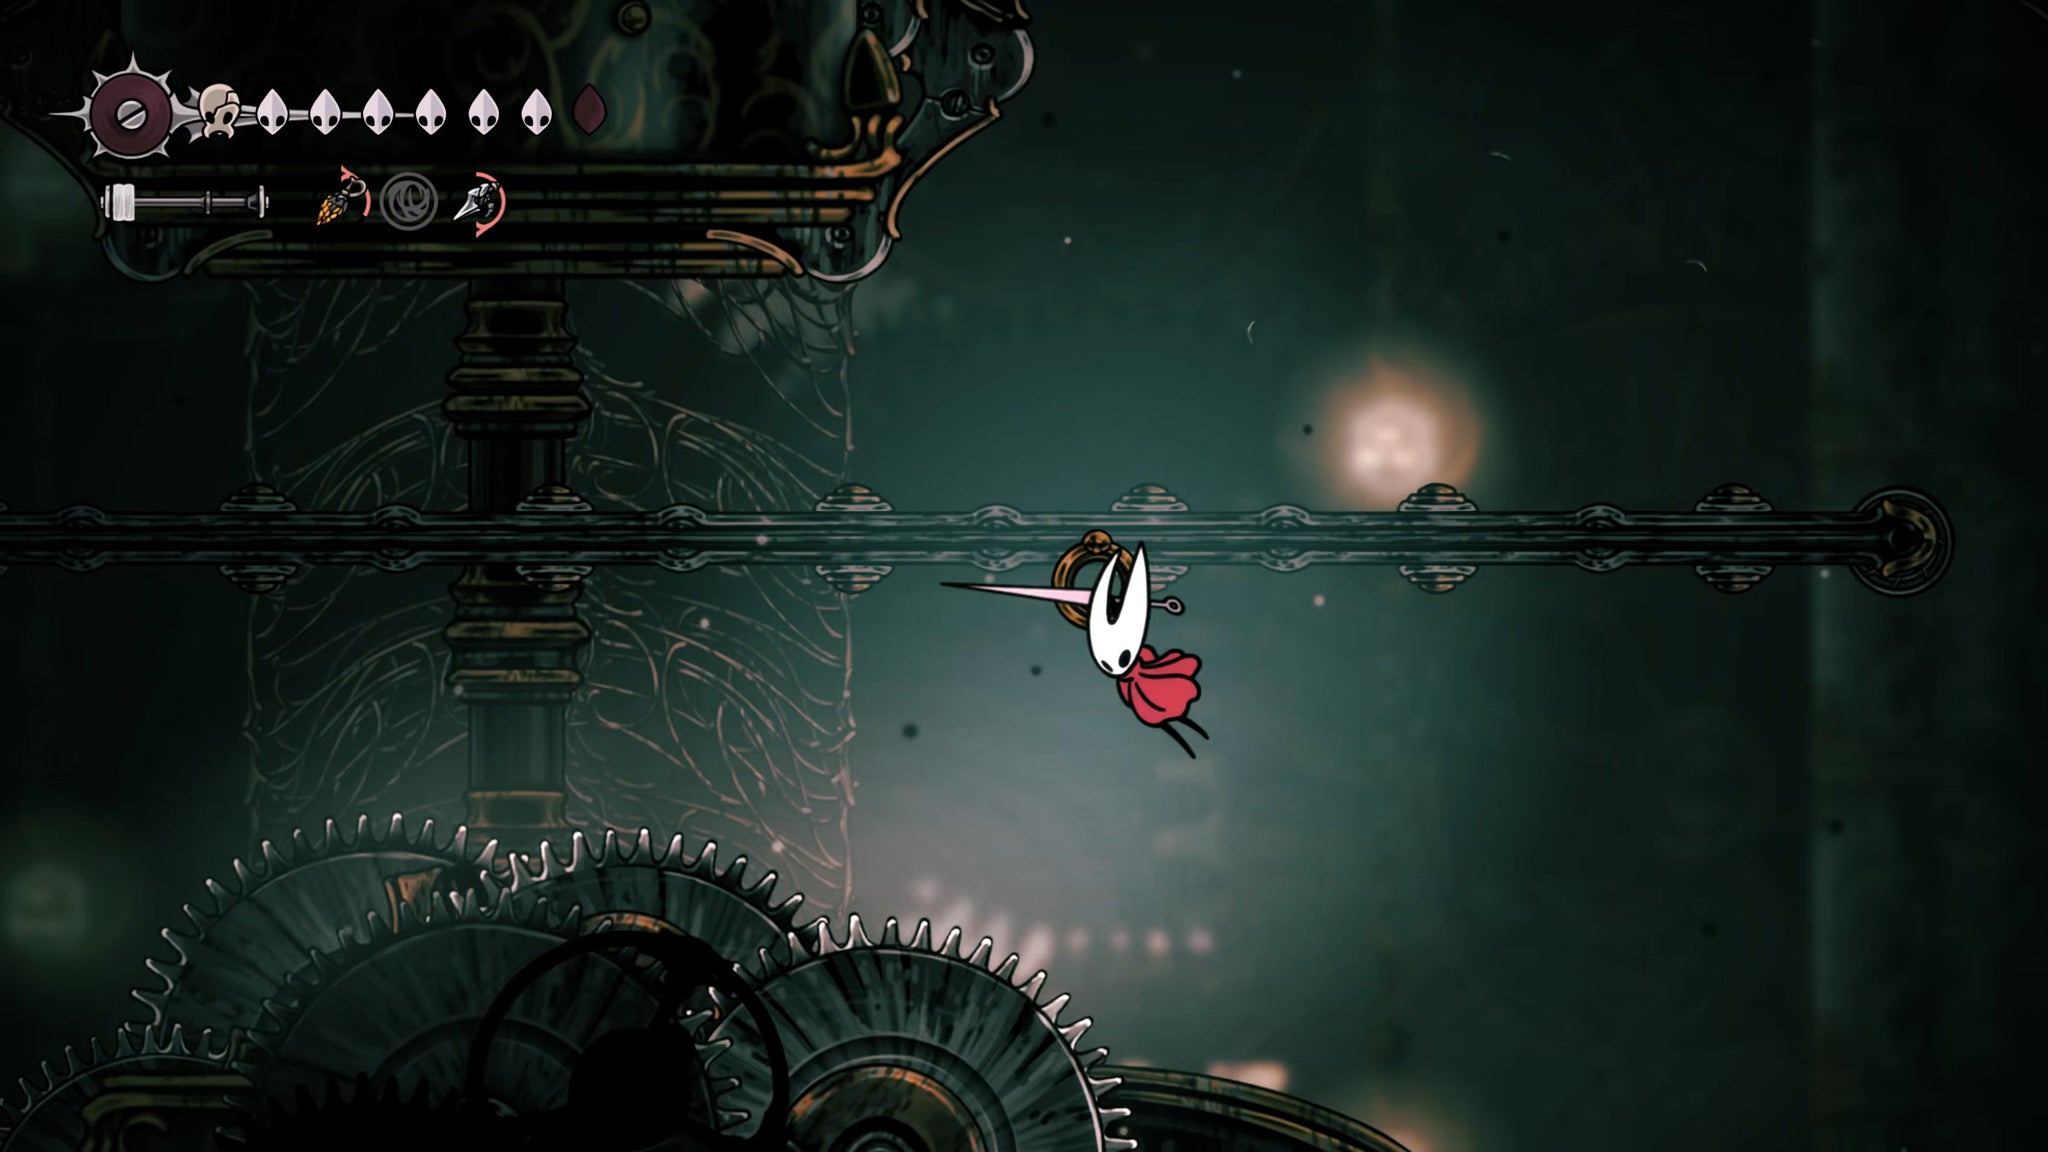
Halfway up, you'll find a ledge patrolled by a Cleanser and a taller shield-wielding bug, a Cogwork Defender. An easy way to kill them safely is to stand on the ledge just below them and slash up through the floor. Once they're dealt with, spin up the wheel above this platform to open a gate to keep ascending.
Eventually, you'll reach the exit through the ceiling in the top-left corner of the room. Climb the wall to reach the hole immediately above you. Congratulations - you've reached the top of the Cogwork Core at last!

6. Solve the puzzle to learn the Architect's Melody.
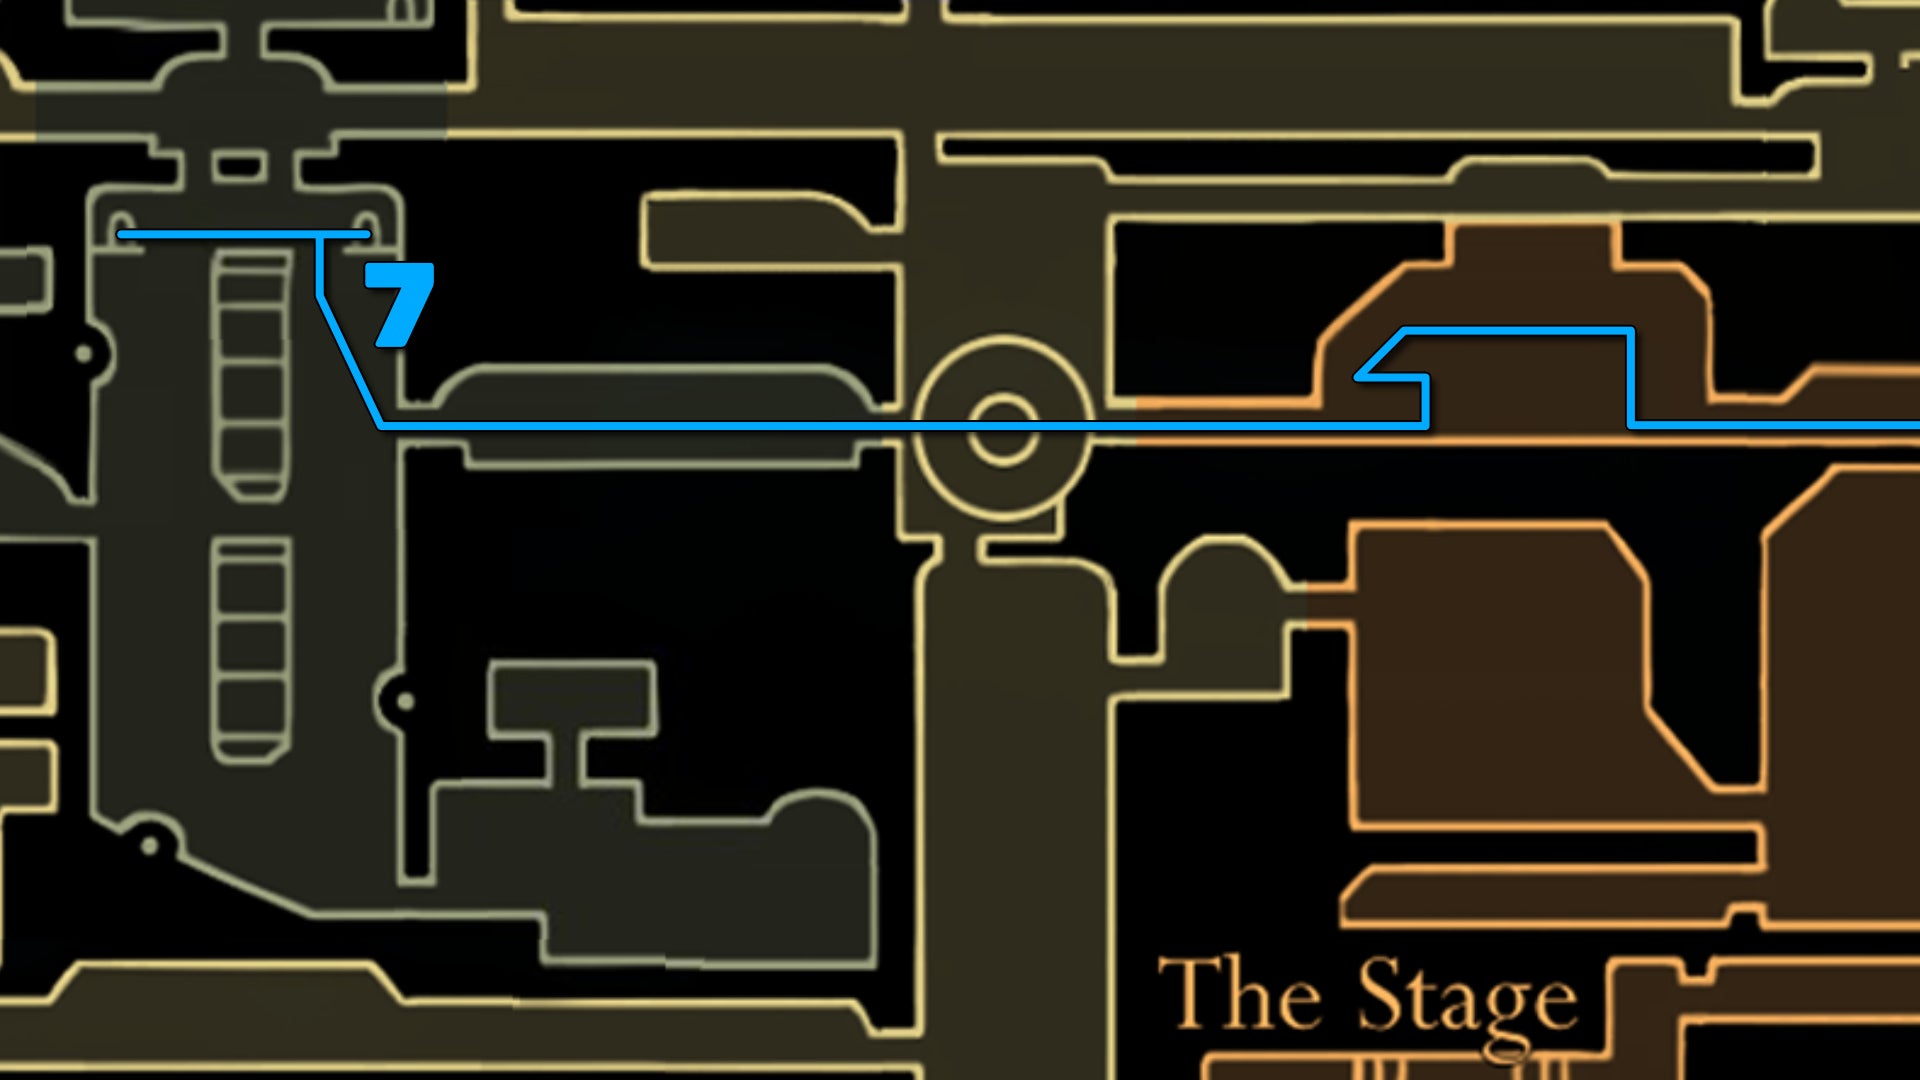
At the top of the Cogwork Core, there are four pillars, each split into four pieces stacked atop one another. You can hit the levers to change around the patterns on these pieces, and to solve the puzzle you need to get the entire pillar's pattern to line up perfectly, for all four pillars.
Let's not waste time - here's the exact solution to the pillar puzzle, so just systematically switch the patterns until you have exactly this:
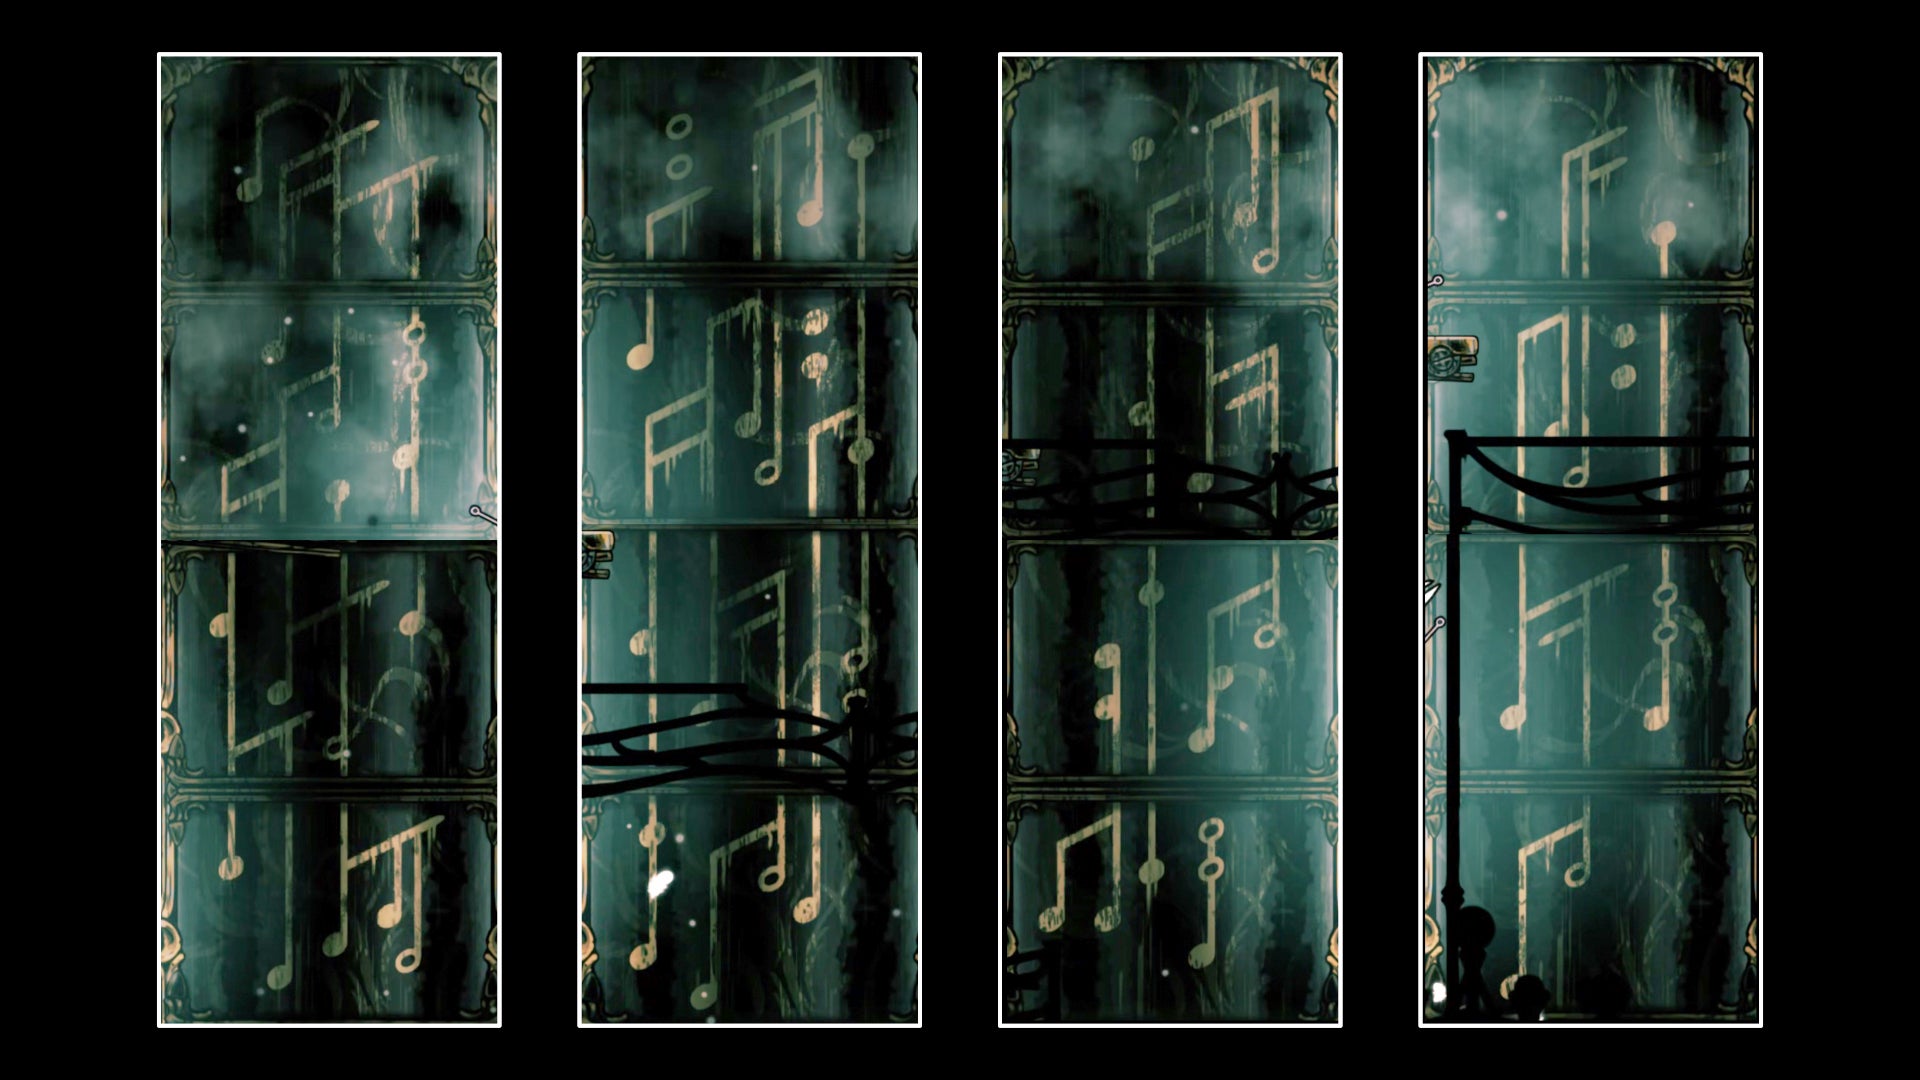
You'll know when you've got a pillar right because it will descend into the floor. Once all four pillars have descended, a big pressure plate will appear in the floor. Press down on it, then use your Needolin when prompted to learn the Architect's Melody - the first of the three melodies you need to collect to reach the end of Act 2.
7. Reach the Whispering Vaults.
That's the Cogwork Core pretty much entirely explored. Make your way down all the platforming segments until you're back at the Bench, and rest there if you need to. Then cross over to the other side, and drop down to that lower right-hand exit that you skipped earlier.

Dodge the moving saws in the next room, and kill the Defender on the central platform. Make your way to the end and spin the wheel to unlock the doorway.
You should recognise the room beyond. Remember that giant wheel you climbed through in the Choral Chambers, from bottom to top? Now you're on the left-hand side of it. Spin the wheel using the lever so that you can pass through it and reach the right-hand side.

Follow the path until you reach the upper ledge, and then attack the giant block in your way to send it flying to the left. You can now climb up into the larger area above - whereupon another fairly tricky arena fight gauntlet will begin, against various Choral Chambers enemies.
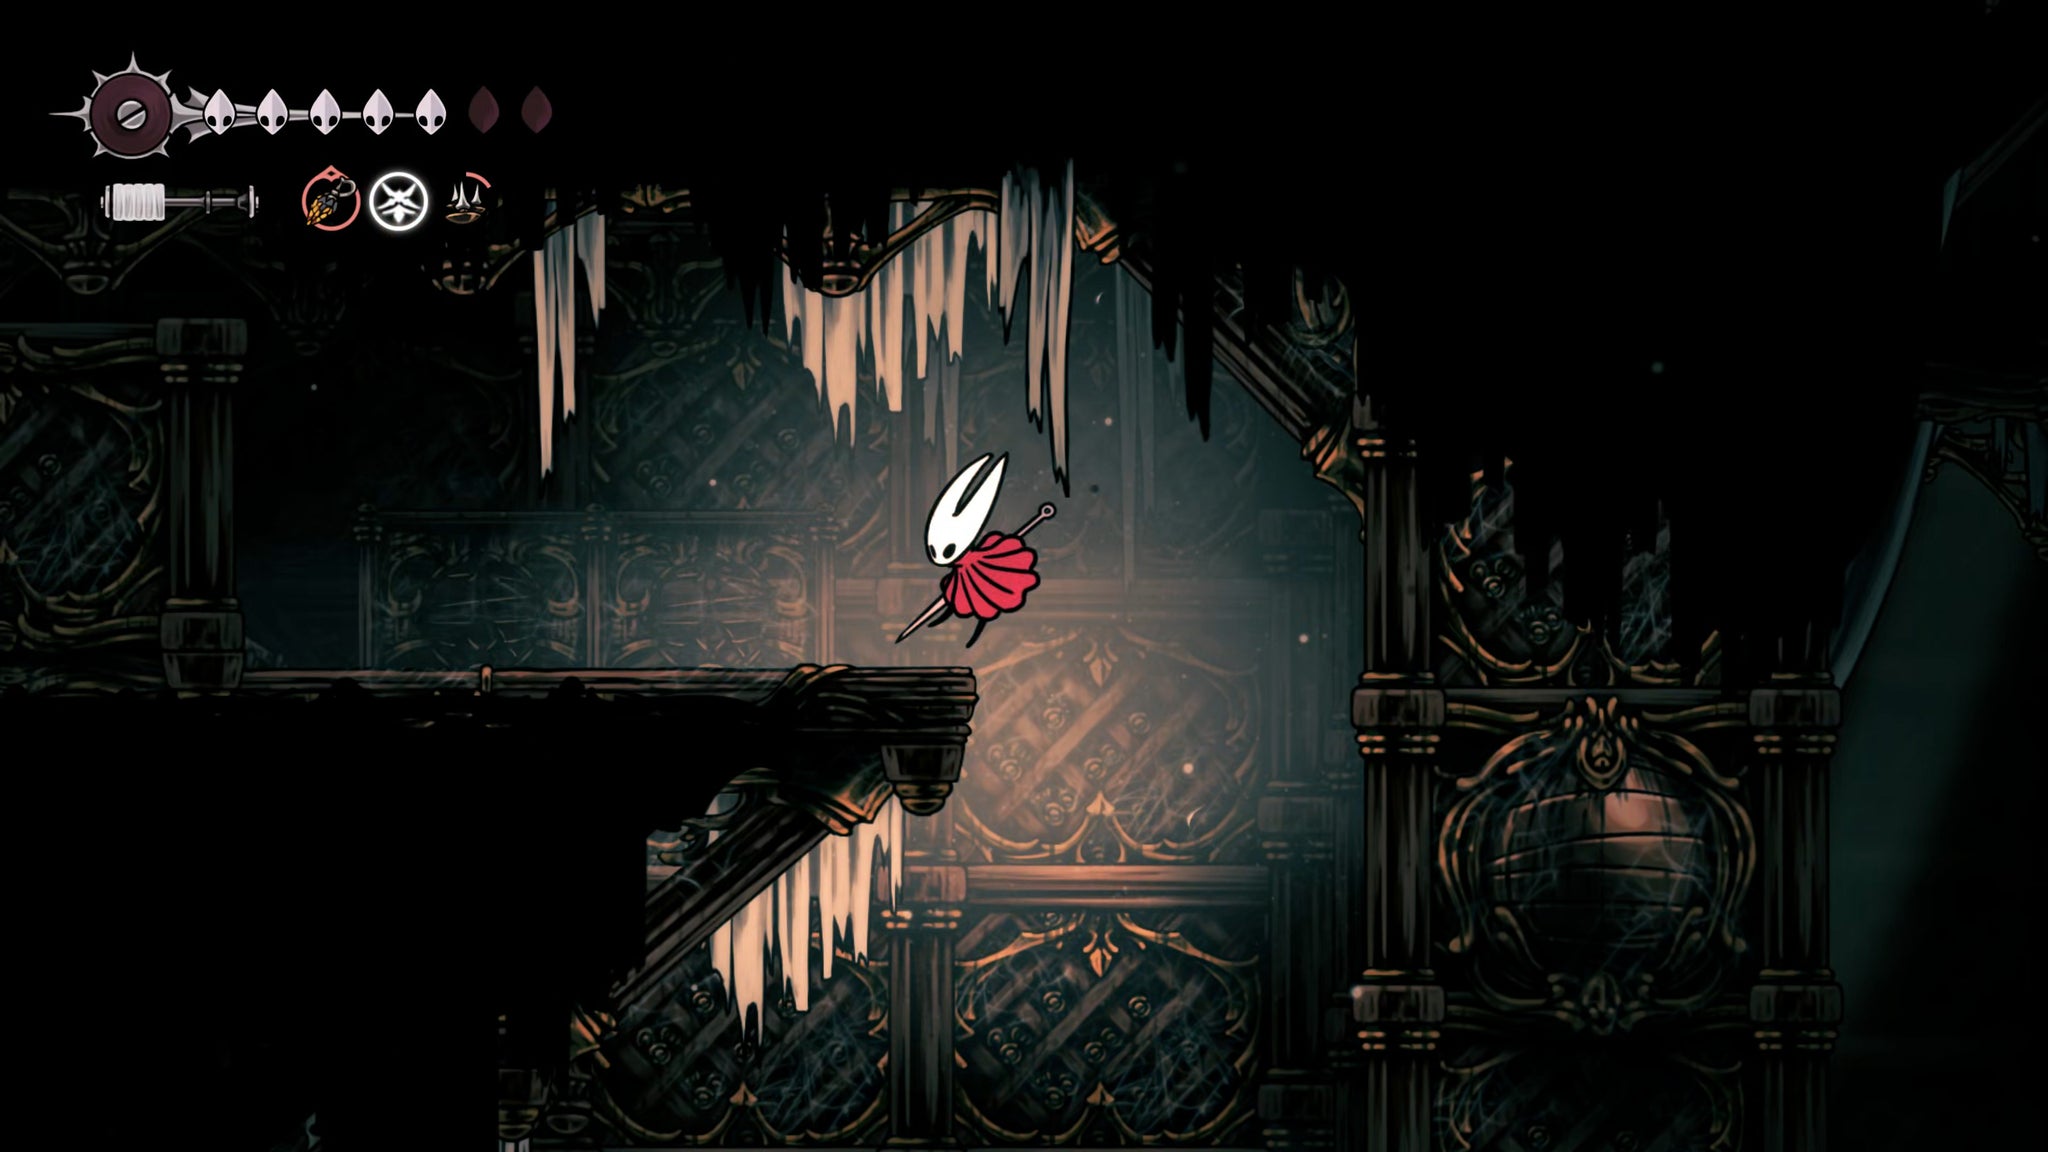

Once the fight is won, drop down the right-hand side, and hit the lowest of the blocks to your left for easy access back where you came. Then forge on to the right, where you'll enter a new region of the Citadel - the Whispering Vaults.

That's all for this section of our walkthrough - follow along with Part 21 of our Silksong walkthrough to find your way through the Whispering Vaults and find all its hidden secrets.
Read this next
- Ahead of Hollow Knight: Silksong's Sea of Sorrow expansion, Team Cherry have gotten their Traditional Chinese and German translation ducks in a row
- We may have glimpsed Silksong's Sea of Sorrow expansion in a six-year-old trailer
- Hollow Knight: Silksong's first big expansion, Sea of Sorrow, flows into our lives for free next year
