
Hollow Knight Silksong walkthrough: Part 24 (Deep Docks 2)
Delving deeper than ever before in Silksong


Want to make your way to the lower unexplored areas of Deep Docks in Hollow Knight: Silksong? Now that you've progressed far enough to rescue Jubilana and acquire the Clawline movement skill, it's time at last to fully conquer the early-game Deep Docks region. Fair warning, however - the lower sections of Deep Docks are far tougher than the upper levels you faced in your opening few hours of Silksong!
In Part 24 of our Silksong walkthrough, I'll guide you through the rest of Deep Docks, showing you exactly where to go to discover everything of value - including lost Fleas, Memory Lockets, new shortcuts, and a brand new boss fight against the leaders of the Deep Docks.
Want the walkthrough for a different area of the game? Check out our Hollow Knight: Silksong walkthrough hub!
Deep Docks 2 walkthrough steps:
- Purchase Jubilana's Simple Key.
- Obtain the Flintslate and head towards Far Fields.
- Collect the Spool Fragment through the door below.
- Complete the arena fight to rescue the Flea.
- Unlock the two shortcuts.
- Defeat Forebrothers Signis and Gron.
- Collect the Memory Locket below.
- Reach the Diving Bell.
1. Purchase Jubilana's Simple Key.
Before you do anything in Deep Docks, fast travel to the First Shrine Ventrica, and head into Songclave. Speak with Jubilana, and purchase her Simple Key for 650 Rosaries.
Not enough Rosaries?
Once you've done that, you can fast travel to Deep Docks and use the Simple Key on the door just below the Forge Daughter's location, to access a new section of this early-game region.


I'd also recommend at this point you visit the Forge Daughter and purchase (and equip) the Magma Bell if you haven't already done so. There's lots of fire damage awaiting you in these lower levels of Deep Docks!

2. Obtain the Flintslate and head towards Far Fields.

Once you're beyond the Simple Key door, head over to the ledges on your right, and carefully descend to the lava level at the bottom. Jump over to the left-hand ledge for a body with a Shard Bundle on it. Then make your way back up to the top-right exit, minding the lava-spewing Lavalugs as you climb.
In this next room is a hulking new enemy called a Deep Diver, which can burrow through floors to follow you. Otherwise, it's not too tricky to dodge its charges and punish it with attacks until it expires. After that, climb up the wall above you to reach the upper-left ledge.
At the end of this ledge you can loot the Flintslate - one of the very best tools in Silksong, which temporarily (and dramatically) increases your weapon damage.


Once you've picked up the Flintslate, head across to the right-hand side and into the next room.
After another encounter with a Deep Diver, you'll be able to flick the lever at the end of the path to open a gate into a more familiar part of Deep Docks; this is the area you previously found by taking the secret passageway in Far Fields.

3. Collect the Spool Fragment through the door below.

Now, however, you can drop to the bottom-right doorway and open it by using your clawline on the hook above. This place is much more dangerous, mainly because of the heavily armoured Flintflame Flyers constantly throwing explosive rocks at you. That Magma Bell will save you many headaches here.
Make your way down and to the left, where you'll find another series of small ledges heading down the shaft. Descend to the right-most of the lowest level of ledges right above the lava, then jump and clawline over to the wall on your right.


From there, attack the explosive rock above you and follow the (difficult) path it reveals. You'll have to do lots of quick acrobatics work to destroy more explosive rocks and avoid falling boulders along the way, but you'll be rewarded at the end with another Spool Fragment and a shortcut back to the start of this new area.
4. Complete the arena fight to rescue the Flea.

Now head back down and this time take the left-hand route near lava-level. You'll need to clawline over to the hooks above (it's best to avoid the Flintflame Flyer buzzing around here), after which you can head over to the far left side and climb upwards into a difficult gauntlet arena fight featuring quite a few of those same nasty explosive-throwing Flintflame Flyers.
In a confined space like this, it's best to take things very cautiously, and focus on batting back the explosives as they arrive, and keeping distance between yourself and the Flyers as much as possible.

Unlock the gate at the right-hand side after the battle for a shortcut into the arena, and then climb up to the top-left exit. Follow the path to the end, and you'll find a Flea that needs rescuing.

5. Unlock the two shortcuts.

After rescuing the Flea, drop back down into the arena, and then drop off the left-hand side and make your way to the far-left exit.
In the next room, you'll be hounded by a very nasty flying enemy, throwing explosive arrows at you; just dodge the arrows and ignore him (you can't hurt him meaningfully anyway), and make your way to the end of the room.
Climb up the next room and take the right-hand exit. Climb up the narrow shaft (do it quickly, to avoid the boulder above dropping on you); then make your way to the end and flick the lever, unlocking a path from the upper section to the lower section for easier movement through this part of the Deep Docks.


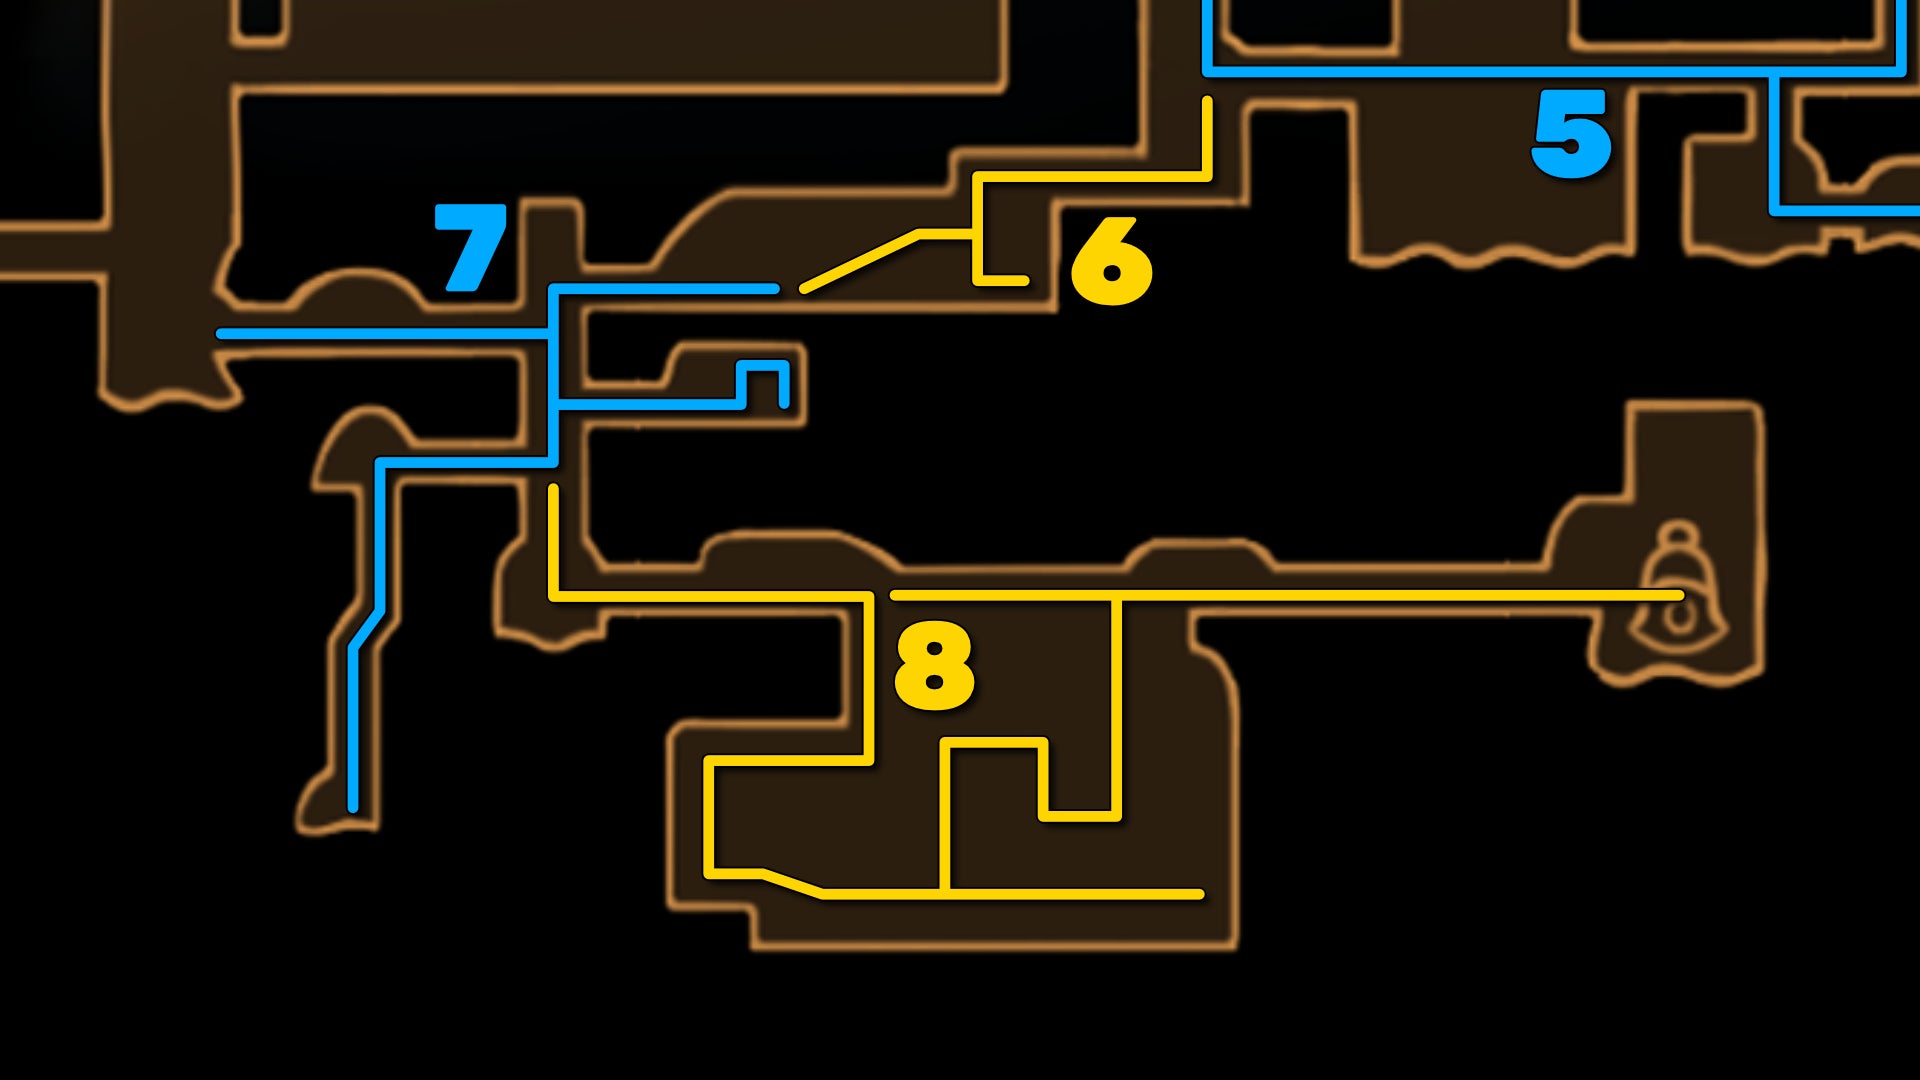
Backtrack into the previous room and take the left path now. Hit the lever to activate a walkway across. Once you reach the hot coals, climb upwards and break the ceiling for an easy shortcut back to the Simple Key door you opened. You should go back to the Bench by the Forge Daughter now and rest, because the next step of this journey is a boss fight.
6. Defeat Forebrothers Signis and Gron.
Head back down the hole you just opened, and keep going down. At the bottom you can investigate the pile of Flintstone if you like; after which, exit to the left and follow the path to a duo boss battle against Forebrothers Signis and Gron.

The latter will join the fight later on - he's the arrow-throwing maniac you saw earlier on the path here. Both enemies thankfully have fairly simple attack patterns; I'd advise using your Flintslate weapon-tool to increase your damage at key moments, and focus purely on Signis until he's dead so that you can face Gron one-on-one.
7. Collect the Memory Locket below.


Exit to the left after defeating the Forebrothers, and drop down onto the pressure plate in front of the door to your lower-left. Head through the door for a rather ornate-looking Bench, and then move to the left of the Bench and destroy the doodad in front of the door to unlock a shortcut back into one of the early areas of Deep Docks.
We're not leaving quite yet though, so turn around and head back into the shaft to your right. Drop down one level and enter the room to your right for a Silkeater; after which you can drop to the next level down and hit the breakable wall on your left for a secret passage.

In this secret room, just drift down the spike-covered hole to the very bottom, where a single rocky platform is floating in the lava. Loot the Pilgrim's body on the platform for a Memory Locket; then climb back up and exit.
8. Reach the Diving Bell.
This final part is optional, because you can't actually do anything further down yet. But for those who want to see what's down at the very bottom of Deep Docks: drop to the bottom of the shaft, and float to the right to avoid the lava; then exit off-screen.

This next large room is filled with Lavalargas - even larger versions of the Lavalugs you've previously encountered and grown to despise. They will shoot a strong jet of lava out of their tops as well as spewing lava in all directions when they detect you, so it's best to sprint right past them wherever possible.


Drop down the hole past the first Lavalarga and head across the hot coals to the left, over the second Lavalarga. Head down through the brief platforming segment beyond, and attack the explosive rock on the right-hand wall to open a path to a Beast Shard.
Once that's done, head back out of that side passage and start climbing upwards. This part is the trickiest, because there are two Lavalargas on the walls waiting to spew lava at you as you try to bypass them; it's best to carefully take them out one at a time first with jump-attacks from the wall.

Eventually you'll make your way to the very top. Hit the lever on your left, and then the second lever beyond that to open an easier passageway here for the next time (and there will be a next time). Then head all the way to the right, into the next room. Here is where our Deep Docks journey ends for the time being; this room contains nothing except a large and mysterious Diving Bell, which we can't currently get inside.

Act 3 will bring us back to this spot; for now, it's time to exit Deep Docks and explore new territories once more.
And with that, Deep Docks is finally fully conquered! Make your way back out to more temperate regions at your leisure, and when you're ready, join us in Part 25 of our Silksong walkthrough to explore the brand new Wisp Thicket region.
Read this next
- Ahead of Hollow Knight: Silksong's Sea of Sorrow expansion, Team Cherry have gotten their Traditional Chinese and German translation ducks in a row
- We may have glimpsed Silksong's Sea of Sorrow expansion in a six-year-old trailer
- Hollow Knight: Silksong's first big expansion, Sea of Sorrow, flows into our lives for free next year
