
Hollow Knight Silksong walkthrough: Part 32 (Misc Quests 3)
Here's what to do before you finish Act 2 of Silksong


What should you do before ascending the elevator at the end of Act 2 in Hollow Knight: Silksong? We're nearing the end credits of Silksong at this point. Don't worry, an entire (hidden) third Act is awaiting us afterwards, but it's still a good time to go back over the world of Pharloom and tie off any loose ends before we play the Threefold Melody and reach Pharloom's highest point for the finale.
In Part 32 of our Hollow Knight: Silksong walkthrough, I'll guide you step by step through a handy checklist of quests, collectibles, and side activities to ensure that you're as strong as you can possibly be before ascending to the Cradle.
Want the walkthrough for a different area of the game? Check out our Hollow Knight: Silksong walkthrough hub!
Misc Quests 3 walkthrough steps:
- Complete the Second Sentinel's questline.
- Complete the Broodfeast quest.
- Complete the Couriers' quests.
- Finish Great Taste Of Pharloom.
- Unlock your Bellhome.
- Complete all Wishwall quests.
- Purchase every item from every shop.
- Bind Eva.
- Complete Loddie's challenge.
- Fill out your Hunter's Journal.
- Hand in all your collectibles.
- Duel with Shakra.
1. Complete the Second Sentinel's questline.
If you've been following along with this walkthrough, then by now you've collected all three Cogheart Pieces in the Citadel, and assembled them into a single Cogheart. In case you missed any, here are the three locations again:
- Cogheart Piece 1: In the Choral Chambers, in a left-hand room above the Citadel Spa.
- Cogheart Piece 2: In the Whispering Vaults, below the path leading to The Stage.
- Cogheart Piece 3: In the Memorium, just above the map room on the east side.
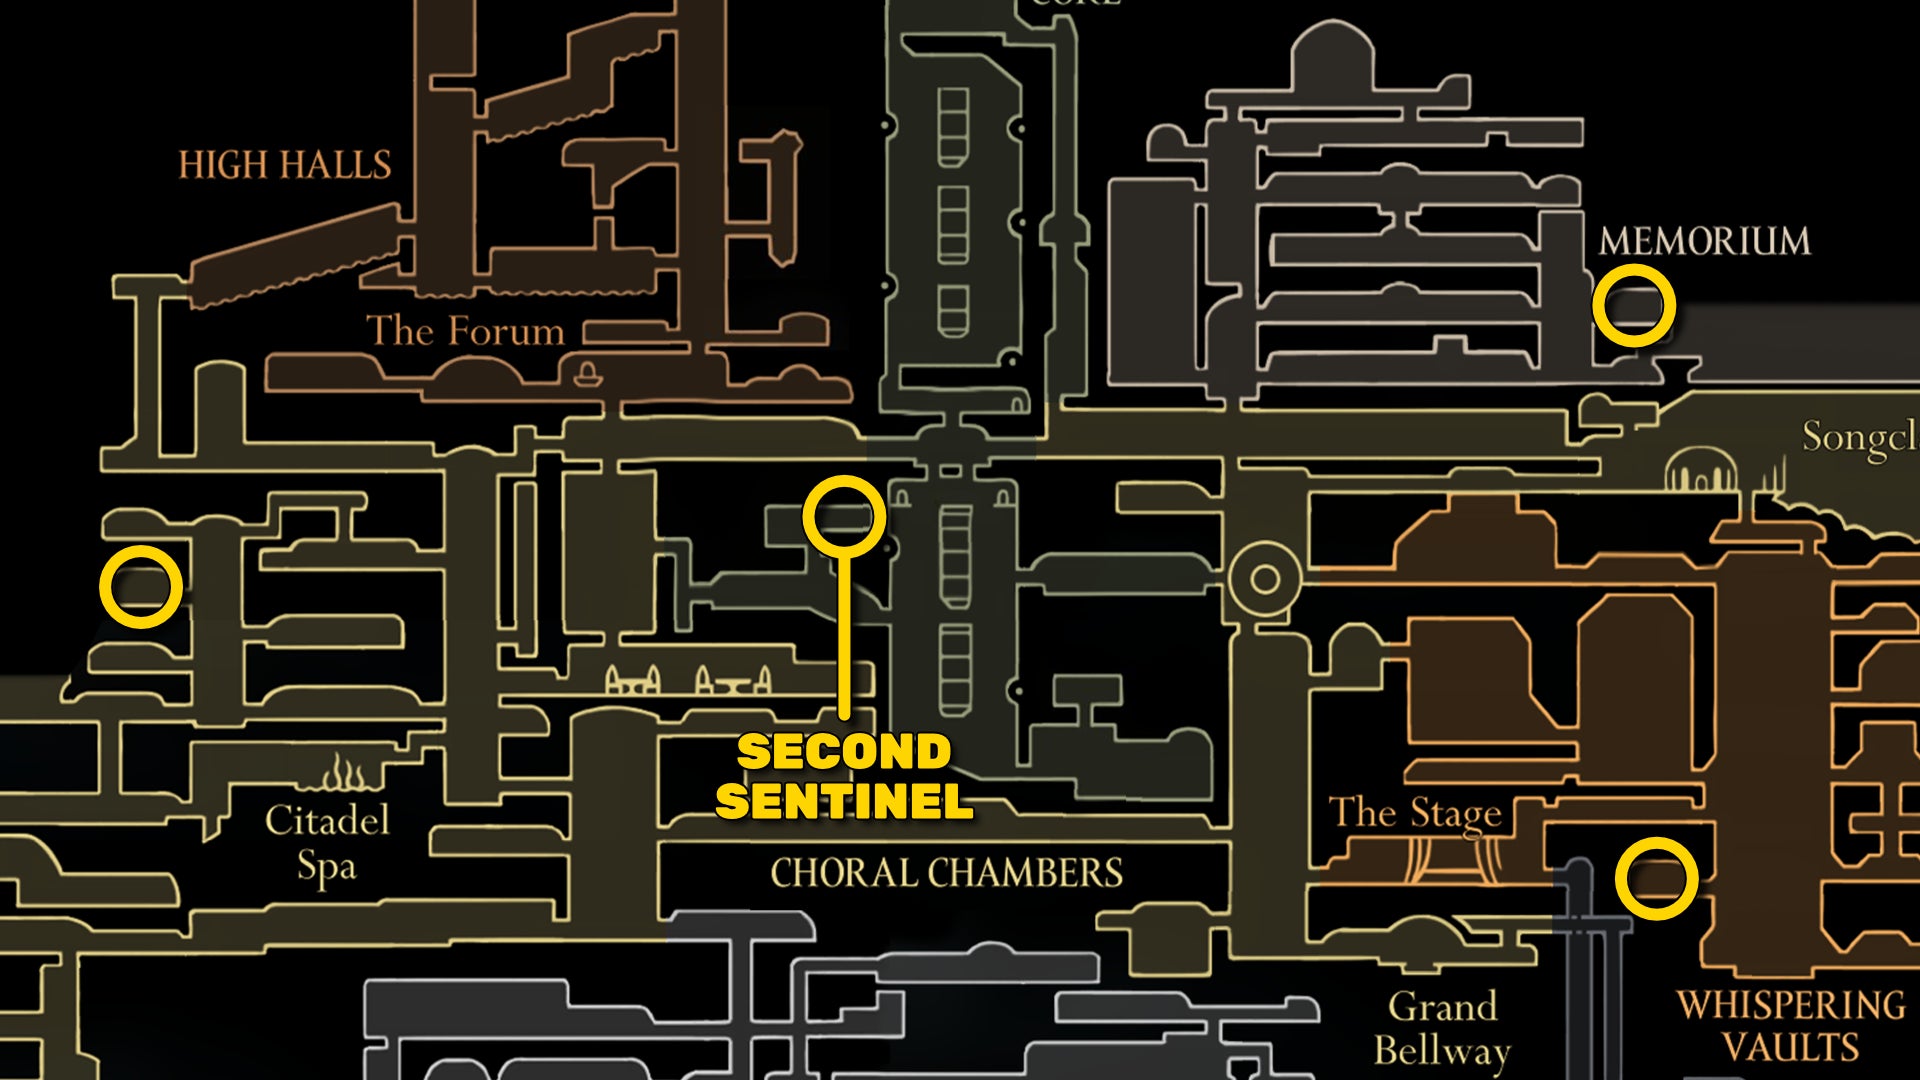
With all three Cogheart Pieces collected, head down into the lower section of the Cogwork Core, and take the only left-hand exit. In the next room, you can double-jump up through the hole in the ceiling and break the wall on your right to find a compartment containing an automaton: the Second Sentinel.
Break the glass and insert the Cogheart into the Second Sentinel to awaken it. It will then disappear.

Now, you should explore the marked places on the map below in order to find the Second Sentinel again, fighting alongside you much like Garmond and Zaza did before now. After each fight, the Second Sentinel will zoom away before you get a chance to speak with it, but that's fine. Just make sure you find him at least twice at any of the below locations.

Once that's done, head to the Songclave Wishwall and you should find the Final Audience Wish, left behind by the Second Sentinel. Head up to the High Halls through the shortcut to the east, and climb upwards outside the Bellway room. You'll find a new pathway heading out to the right.


Speak with the Second Sentinel, and he will wordlessly challenge you to a duel. It's a fun fight, this one. The Sentinel takes after the likes of Lace and Phantom, with quick flurries and the ability to block and counterattack.

A lot of this fight is down to correctly distancing yourself from the Sentinel. Keep half the arena's width away from him, and you'll have time to respond to any of his attacks. The trick after that is finding the moments where you can dash in and punish him before retreating once more.
Pogo attacks are effective as long as he's already in the middle of an attack. Don't continue to Pogo after he's finished, because he can very quickly jump upwards and hit you if you dawdle.

Once you defeat him, he will deem you as pure and innocent, and the quest will be completed. Your reward: the Reserve Bind tool, a very handy item in difficult fights which allows you to heal once even if you don't have enough Silk to do so.
2. Complete the Broodfeast quest.
The Broodfeast quest is up next. Really you can just quietly get on with this quest while doing other things, which is why I'm mentioning it early on. The Huntress in the Putrified Ducts gave you this quest, and tasked you with collecting Seared Organs, Shredded Organs, and Skewered Organs.

This quest is all about killing enemies using tools (or very specific attacks). The key to this quest is that killing enemies with different types of tools will force them to drop different types of organs. Here are the tools you must use for each organ type:
- Seared Organs:
- Flintslate (Recommended)
- Pimpillo
- Voltvessels
- Wispfire Lantern
- Shredded Organs:
- Delver's Drill (Recommended)
- Conchcutter
- Sawtooth Circlet
- Cogwork Wheel
- Architect Crust's charge attacks
- Beast Crest's downward attacks
- Skewered Organs:
- Longpin (Recommended)
- Sting Shard
Once you have all the required organs, return at any point to the Huntress in her cave in the Putrified Ducts, and exhaust her dialogue to complete the Broodfeast quest. As a reward, she'll bequeath to you the Longclaw - a tool which slightly (but noticeably) increases the reach of all your melee attacks.
3. Complete the Couriers' quests.
If you've been doing some Wishwall quests on the side while following this walkthrough, you might've already partially (or fully) completed this next step. Ever since you defeated Widow and freed Bellhart, a questline has been available starting with the "My Missing Courier" quest.
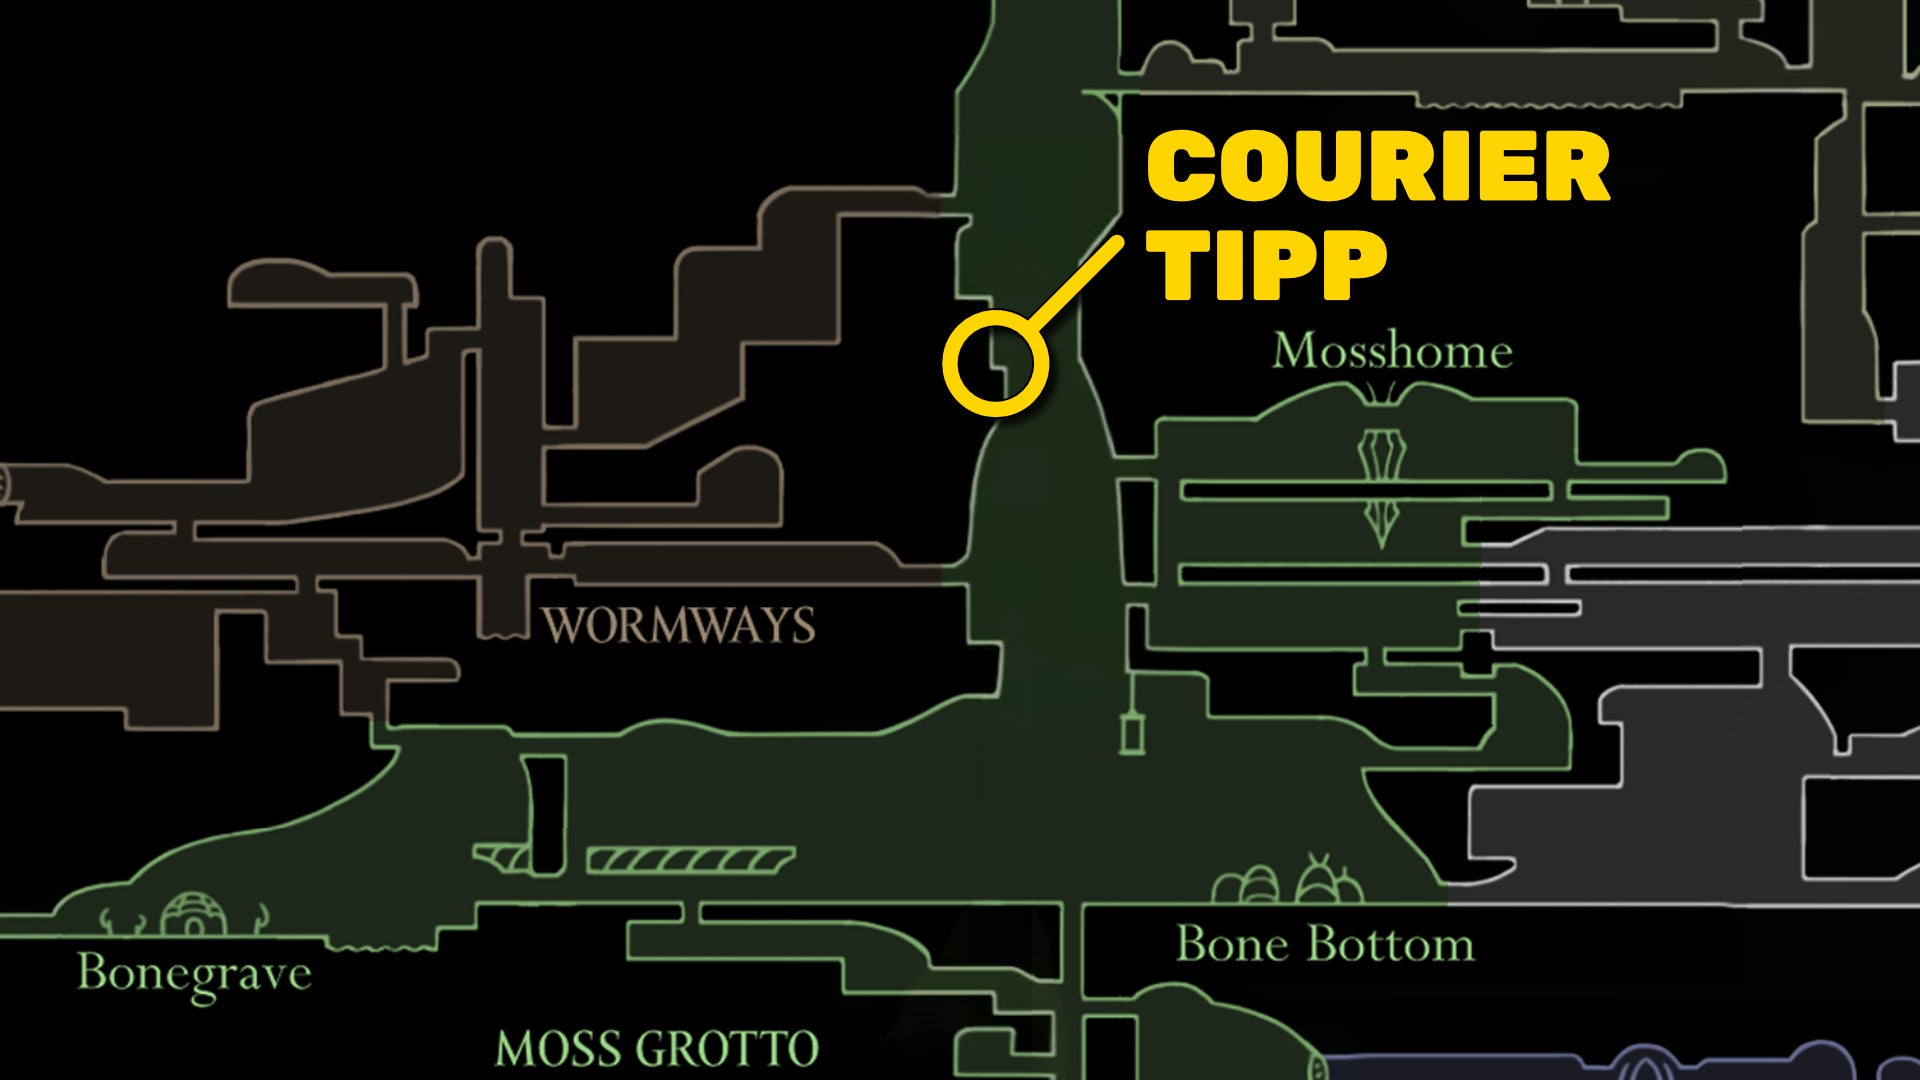
The "missing courier" in question is Tipp, and he can be found on the left-hand side of the massive outside shaft above Bone Bottom, about halfway between the two entrances to the Wormways. Drop down from above to reach them, and kill the creatures hounding them.

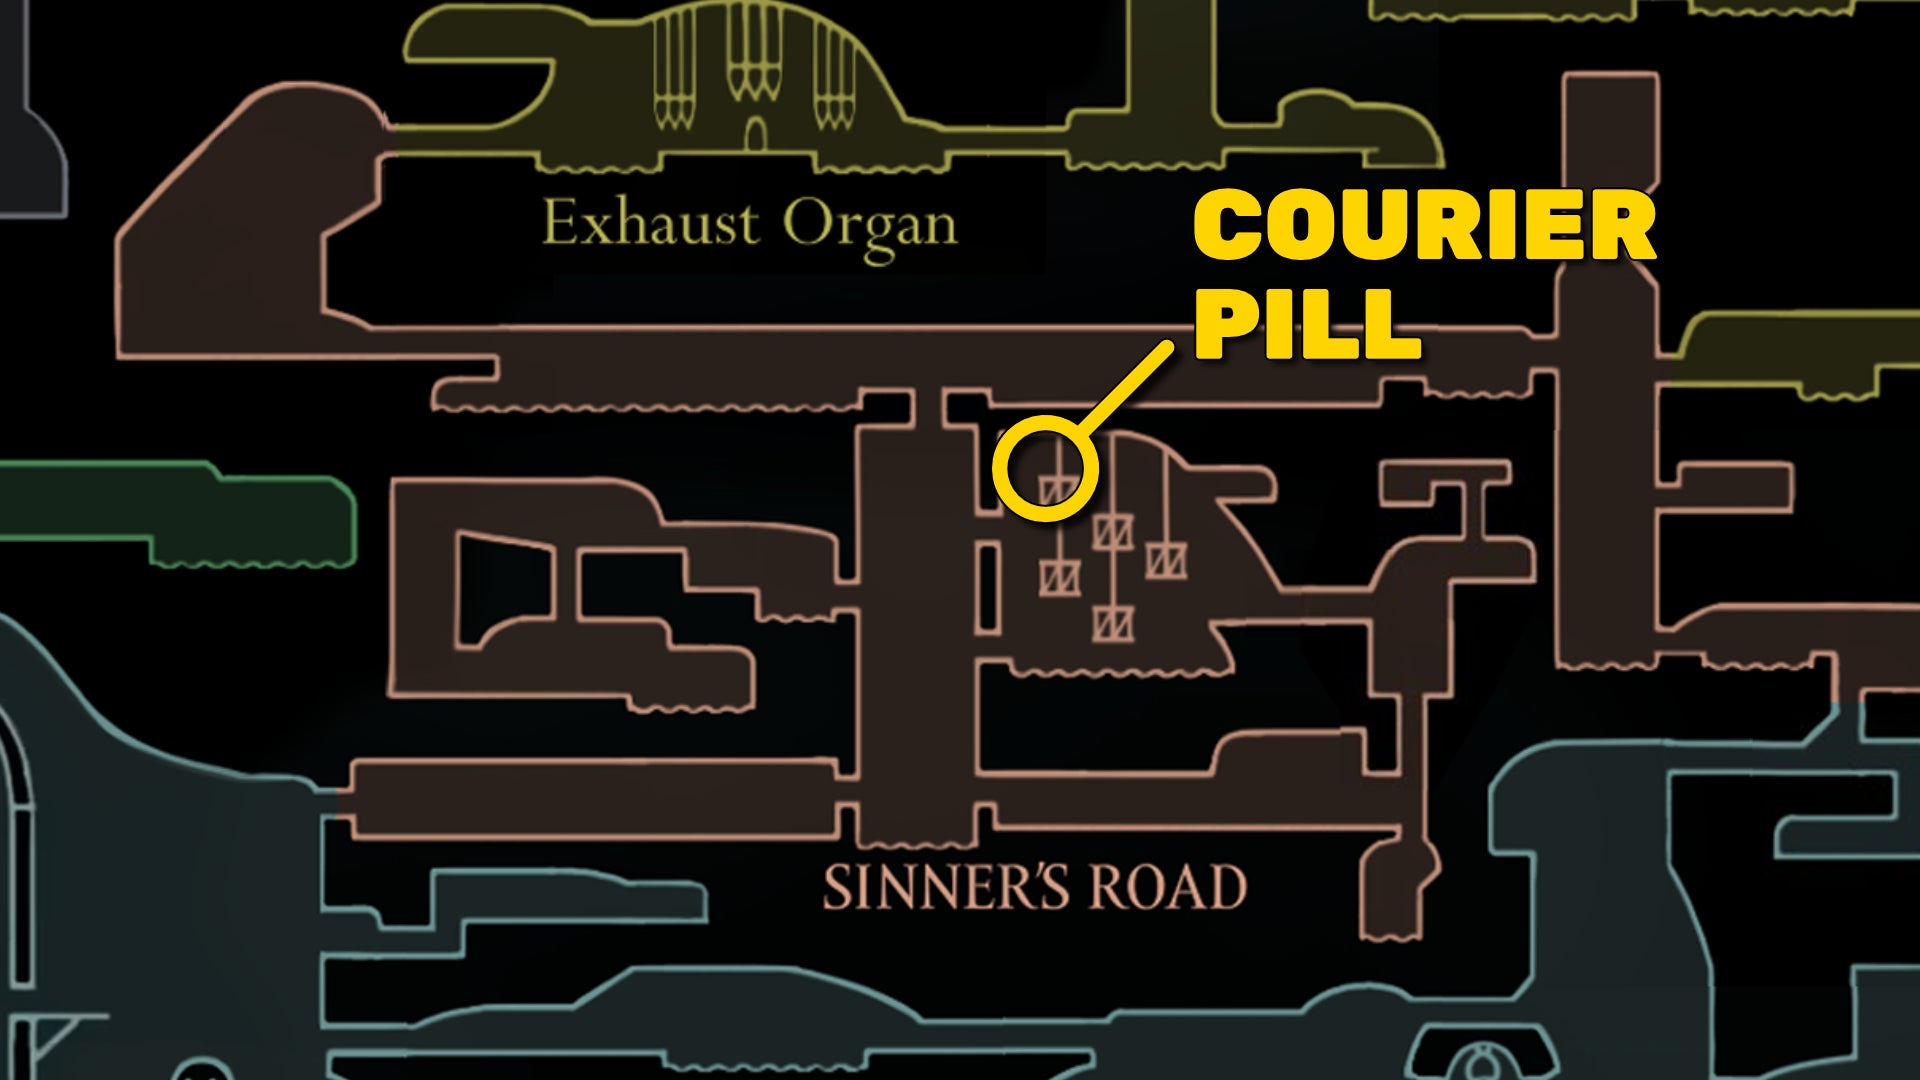
Once you've done this, you'll find another Wish on the Bellhart Wishwall - "My Missing Brother". Tipp has a brother called Pill, who is also missing. To find them, head into Sinner's Road. You know the large room with all the crates, where you can find Crull and Benjin on the right-hand side? Head to the top-left of that large room and you'll be able to save Pill from the enemies attacking them.

With both couriers saved, you can speak with them on the upper level of Bellhart. They'll offer you various repeatable courier quests where you must safely transport cargo to different places without using any fast travel, and without taking too much damage (or the cargo breaks). A couple of these quests are one-off, however, and involve other NPCs and their quests - for example, the quest to deliver the Queen's Egg to Styx in Sinner's Road. And another delivery, which ties in with the next step...
4. Finish Great Taste Of Pharloom.
It's now time to finish the Great Taste Of Pharloom quest, and retrieve the Pale Oil that Loyal Mergwin has been keeping under lock and key all this time. If you've been following this walkthrough, you already have the Pickled Muckmaggot and the Crustnut, two of the five ingredients required. The others are fairly easy to obtain, so let's deal with them now.


To get the Mossberry Stew, head to The Marrow Bellway, and then ascend a little higher to visit the Moss Druid. She'll give you the Mossberry Stew free of charge.
Next, head to the Halfway Home in Greymoor, and speak with Creige. Ask him for the Vintage Nectar, and pay him 480 Rosaries for it. He'll open the way down into the cellar below. Be warned - this is actually an arena fight in disguise. As you descend and go to pick up the Nectar, you'll be attacked by waves of ant enemies, including a Skarrgard near the end. By this point in the game they shouldn't pose much of an issue to you though.
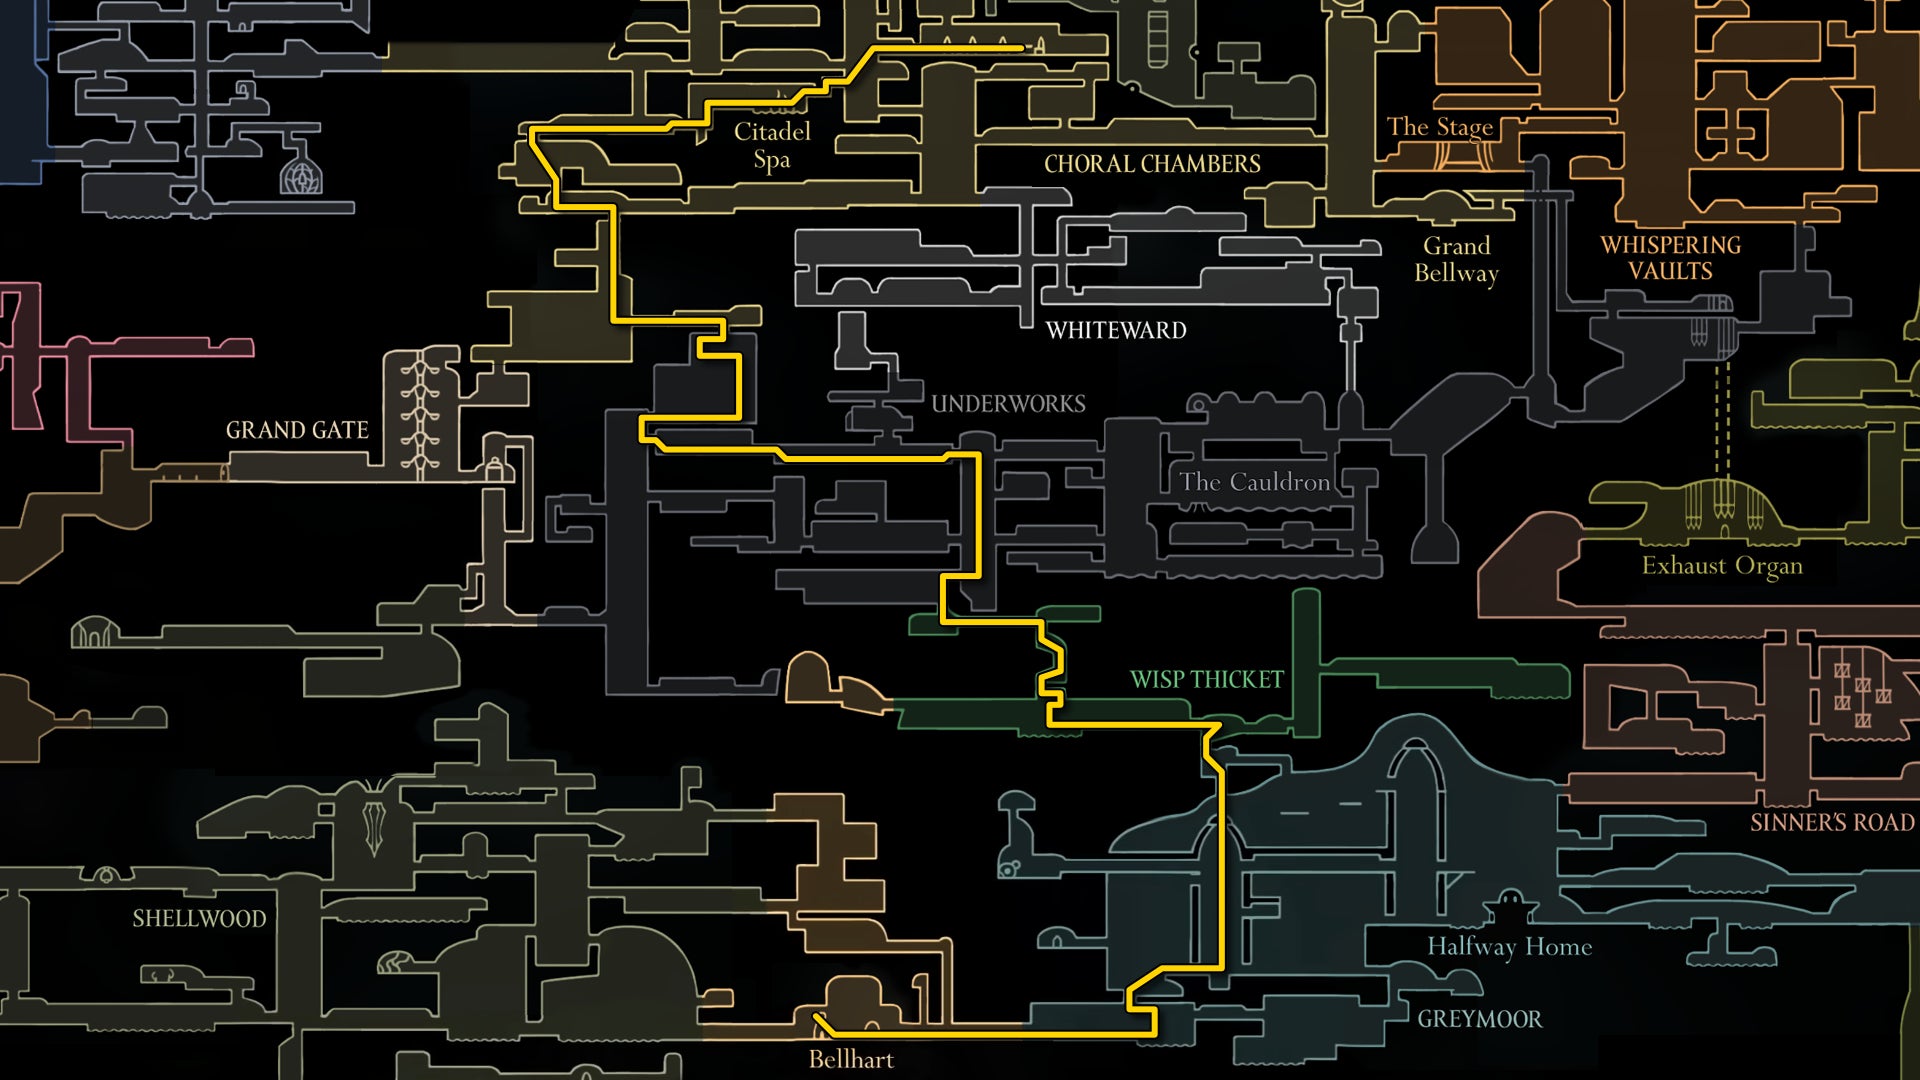
Finally, you need to speak with Couriers Tipp and Pill in Bellhart, and ask for a Courier's Rasher. This acts as one of Tipp and Pill's courier quests - you need to very quickly make your way up to Loyal Mergwin in the Choral Chambers from Bellhart, without using fast travel or taking too much damage. You're also on a tough time limit based on the meat's "freshness". Here's the best route to take:
Once you've reached Loyal Mergwin with the Rasher intact, present all your ingredients to him there and then, and he'll create a meal for his master, the Grand Gourmand. Afterwards, he'll allow you to take the Pale Oil - after which you should immediately head back to Plinney and get another weapon upgrade for the low low price of 450 Rosaries.
5. Unlock your Bellhome.

While you're in Bellhart, it's about time you got yourself a permanent place of residence here (if you haven't already). To do this, you need to complete both Bellhart's donation Wishes ("Restoration Of Bellhart", and "Bellhart's Glory").
The first donation quest appears as soon as you defeat Widow, give Scrounge any relic, and receive your first damage upgrade from Plinney. The donation amount is 250 Rosaries.
The second donation quest appears some time after completing the first, and requires you to donate an additional 400 Rosaries. Once you've done this, reload the area and speak with Pavo, the singing bug near the Bellhart Bench. He'll give you the Bellhome Key, allowing you to unlock the top-left Bellhome in the upper sections of Bellhart.

Inside, you have access to a Bench and you can also assemble the Materium, allowing you to read about all the resources and substances you've discovered so far. You can also now speak with the shopkeeper Frey below, and unlock more nice things in and around your Bellhome, including a personal spa, a Desk, and several decorative items.
6. Complete all Wishwall quests.
Now we're getting more broad - if you want to leave no stone unturned before ascending to the final boss fight of Act 2, then you should spend time completing the various Wishwall quests in all three settlements: Bone Bottom, Bellhart, and Songclave.
I won't guide you through all of these quests because most of them are fairly simple, but here's the full list of all Wishes you can complete before the end of Act 2:
| Quest | Location | Prior Quest(s) | Reward |
|---|---|---|---|
| Bone Bottom Repairs | Bone Bottom | None | None |
| Garb Of The Pilgrims | Bone Bottom | None | Rosary Necklace |
| A Lifesaving Bridge | Bone Bottom | None | Bridge built |
| Volatile Flintbeetles | Bone Bottom | None | Memory Locket |
| The Terrible Tyrant | Bone Bottom | None | Heavy Rosary Necklace |
| An Icon Of Hope | Bone Bottom | None | Hornet Statuette |
| Silver Bells | Bellhart | None | Rosary Necklace |
| My Missing Courier | Bellhart | None | Frey's shop expands |
| My Missing Brother | Bellhart | My Missing Courier | None |
| Queen's Egg | Bellhart | My Missing Brother | 260 Rosaries |
| Liquid Lacquer | Bellhart | Queen's Egg | 650 Rosaries |
| Crawbug Clearing | Bellhart | None | Crafting Kit Upgrade |
| Pinmaster's Oil | Bellhart | None | Weapon upgrade |
| Restoration Of Bellhart | Bellhart | None | None |
| Bellhart's Glory | Bellhart | Restoration Of Bellhart | Bellhome Key |
| Savage Beastfly | Bellhart | None | Mask Shard |
| Building Up Songclave | Songclave | None | None |
| Fine Pins | Songclave | None | Heavy Rosary Necklace |
| The Wandering Merchant | Songclave | None | Jubilana's Shop |
| Balm For The Wounded | Songclave | None | Spool Fragment |
| Cloaks Of The Choir | Songclave | Building Up Songclave, Fine Pins | Heavy Rosary Necklace |
| Strengthening Songclave | Songclave | Building Up Songclave | None |
| The Lost Merchant | Songclave | Strengthening Songclave | Jubilana's shop expands |
| The Wailing Mother | Songclave | Strengthening Songclave | Heavy Rosary String |
| Final Audience | Songclave | Awaken Second Sentinel | Reserve Bind |
| The Lost Fleas | The Marrow | None | Travel to Greymoor |
| Berry Picking | Mosshome | None | Druid's Eye |
| Flexile Spines | Far Fields | None | Drifter's Cloak |
| Rite Of The Pollip | Shellwood | None | Pollip Pouch |
| Rite Of Rebirth | Shellwood | Rite Of The Pollip | None |
| Infestation Operation | Shellwood | Rite Of Rebirth | Witch Crest |
| Bugs Of Pharloom | Halfway Home | None | Tool Pouch Upgrade |
| Roach Guts | Sinner's Road | None | Tacks |
| Alchemist's Assistant | Wormways | None | Plasmium Phial |
| Great Taste Of Pharloom | Choral Chambers | None | Pale Oil |
| Broodfeast | Putrified Ducts | None | Longclaw |
| Trail's End | Any Wishwall | Meet Shakra everywhere | Throwing Ring |
7. Purchase every item from every shop.
Similarly, if you want to be as powerful as possible ahead of the final boss, now is a very good time to build up a large supply of Rosaries and buy out all the single-purchase items at every shop. The shops in question are:
- Pebb (Bone Bottom)
- Forge Daughter (Deep Docks)
- Mort (Far Fields)
- Mottled Skarr (Hunter's March)
- Frey (Bellhart)
- Grindle (Blasted Steps)
- Twelfth Architect (Underworks)
- Jubilana (Songclave)
Of particular interest will be any upgrade items, such as Spool Fragments and especially Mask Shards. Also, Frey's Multibinder, the Forge Daughter's Magma Bell, Mort's Weighted Belt, and Mottled Skarr's Fractured Mask are among the most powerful and essential tools in Silksong, so make sure you've bought these at the very least.
8. Bind Eva.
By around this point, you should have found all 18 Memory Lockets that are available before the end of Act 2. This should be enough to fully unlock every slot in all of your Crests. Here's a map of all the Memory Lockets' locations in case you're missing one or two:
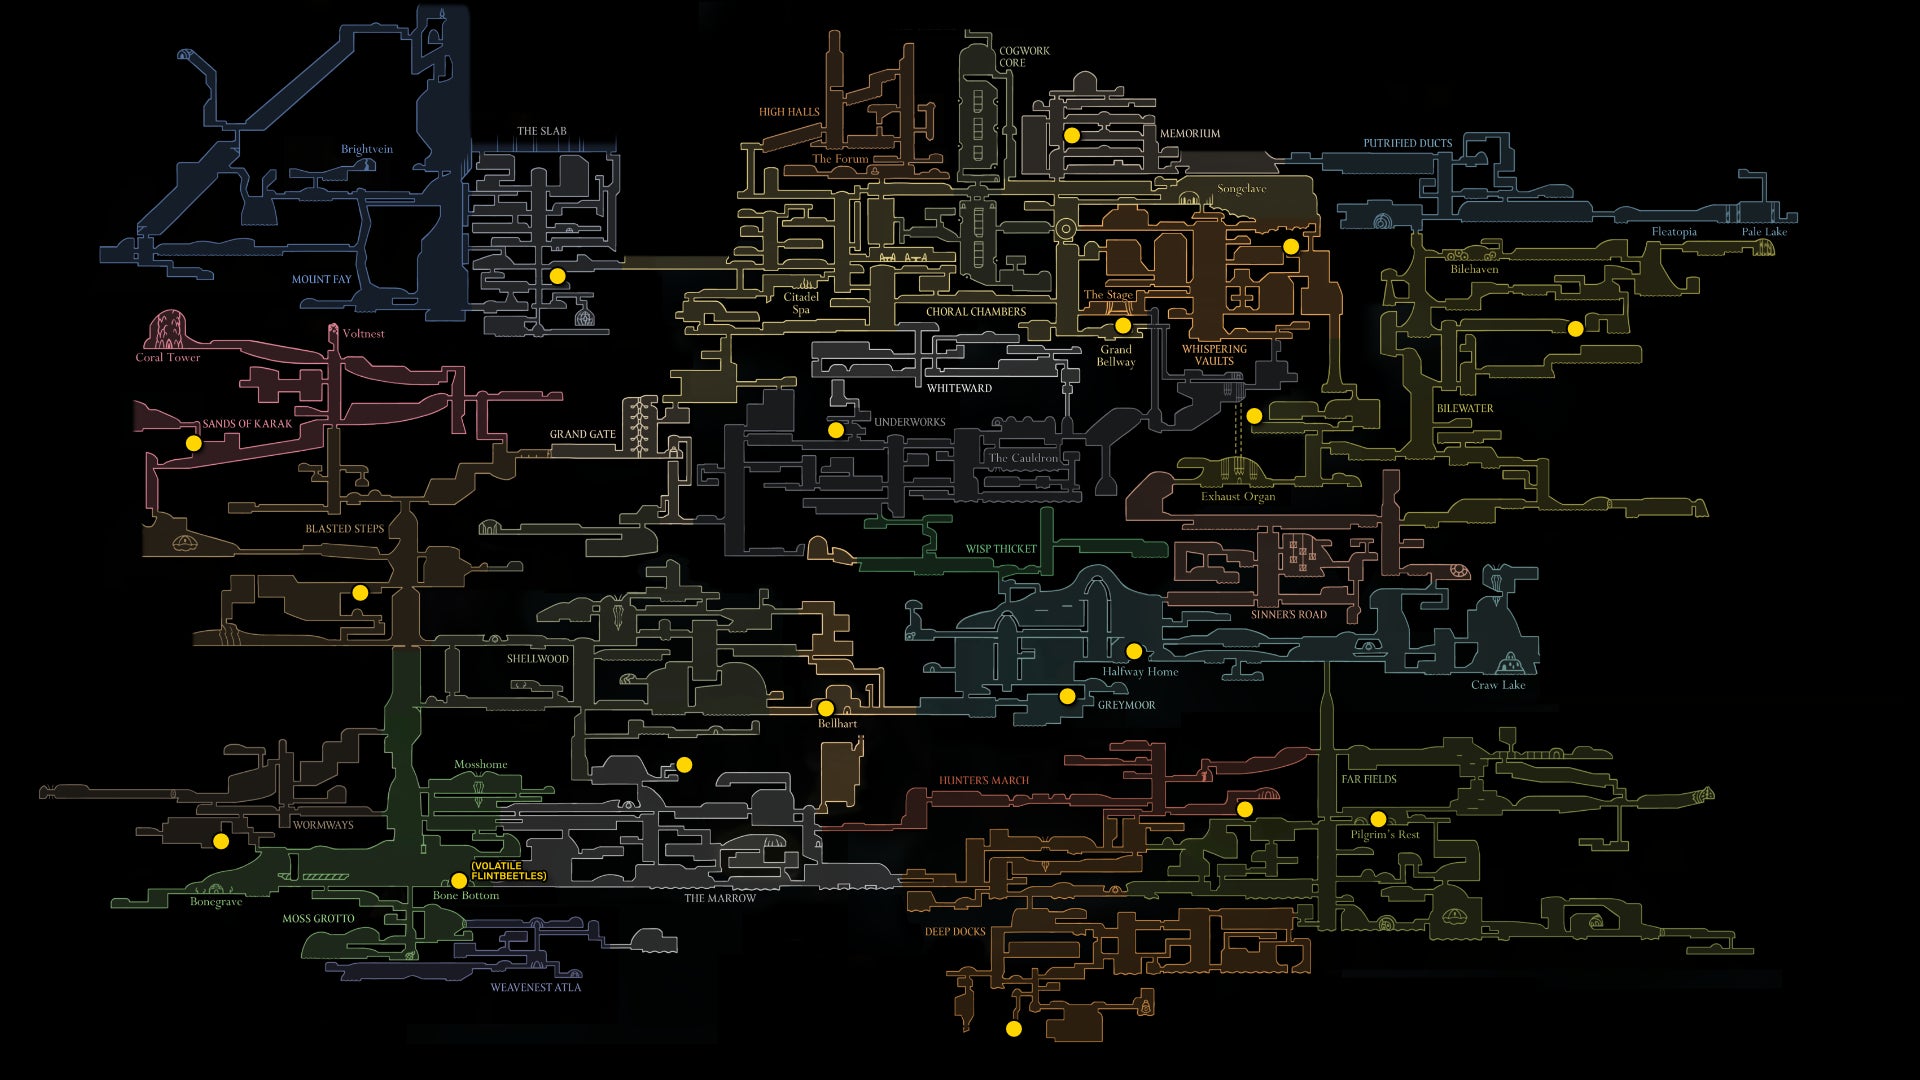
Take this moment to unlock every slot on every Crest, even the ones you don't use. Once you've done that, fast travel to Bone Bottom, duck down into Moss Grotto, and open the Needolin door to Weavenest Atla.

Use the teleporter to reach the bottom of the Weavenest, and then head to the right to visit the mysterious Eva. With all 18 Memory Lockets, she'll give you a number of rewards (if you haven't visited her in the interim), including a Vesticrest Upgrade which allows you to equip a yellow and a blue slot tool in addition to your Crest slots.
The true reward, though, is that after obtaining and using all 18 Memory Lockets, Eva will ask you to Bind her. Do so, and you'll free her from her strange imprisoned existence, and she'll provide you with the incredibly powerful Sylphsong ability - a passive ability which allows Silk to regenerate while you're resting at a Bench.

9. Complete Loddie's challenge.
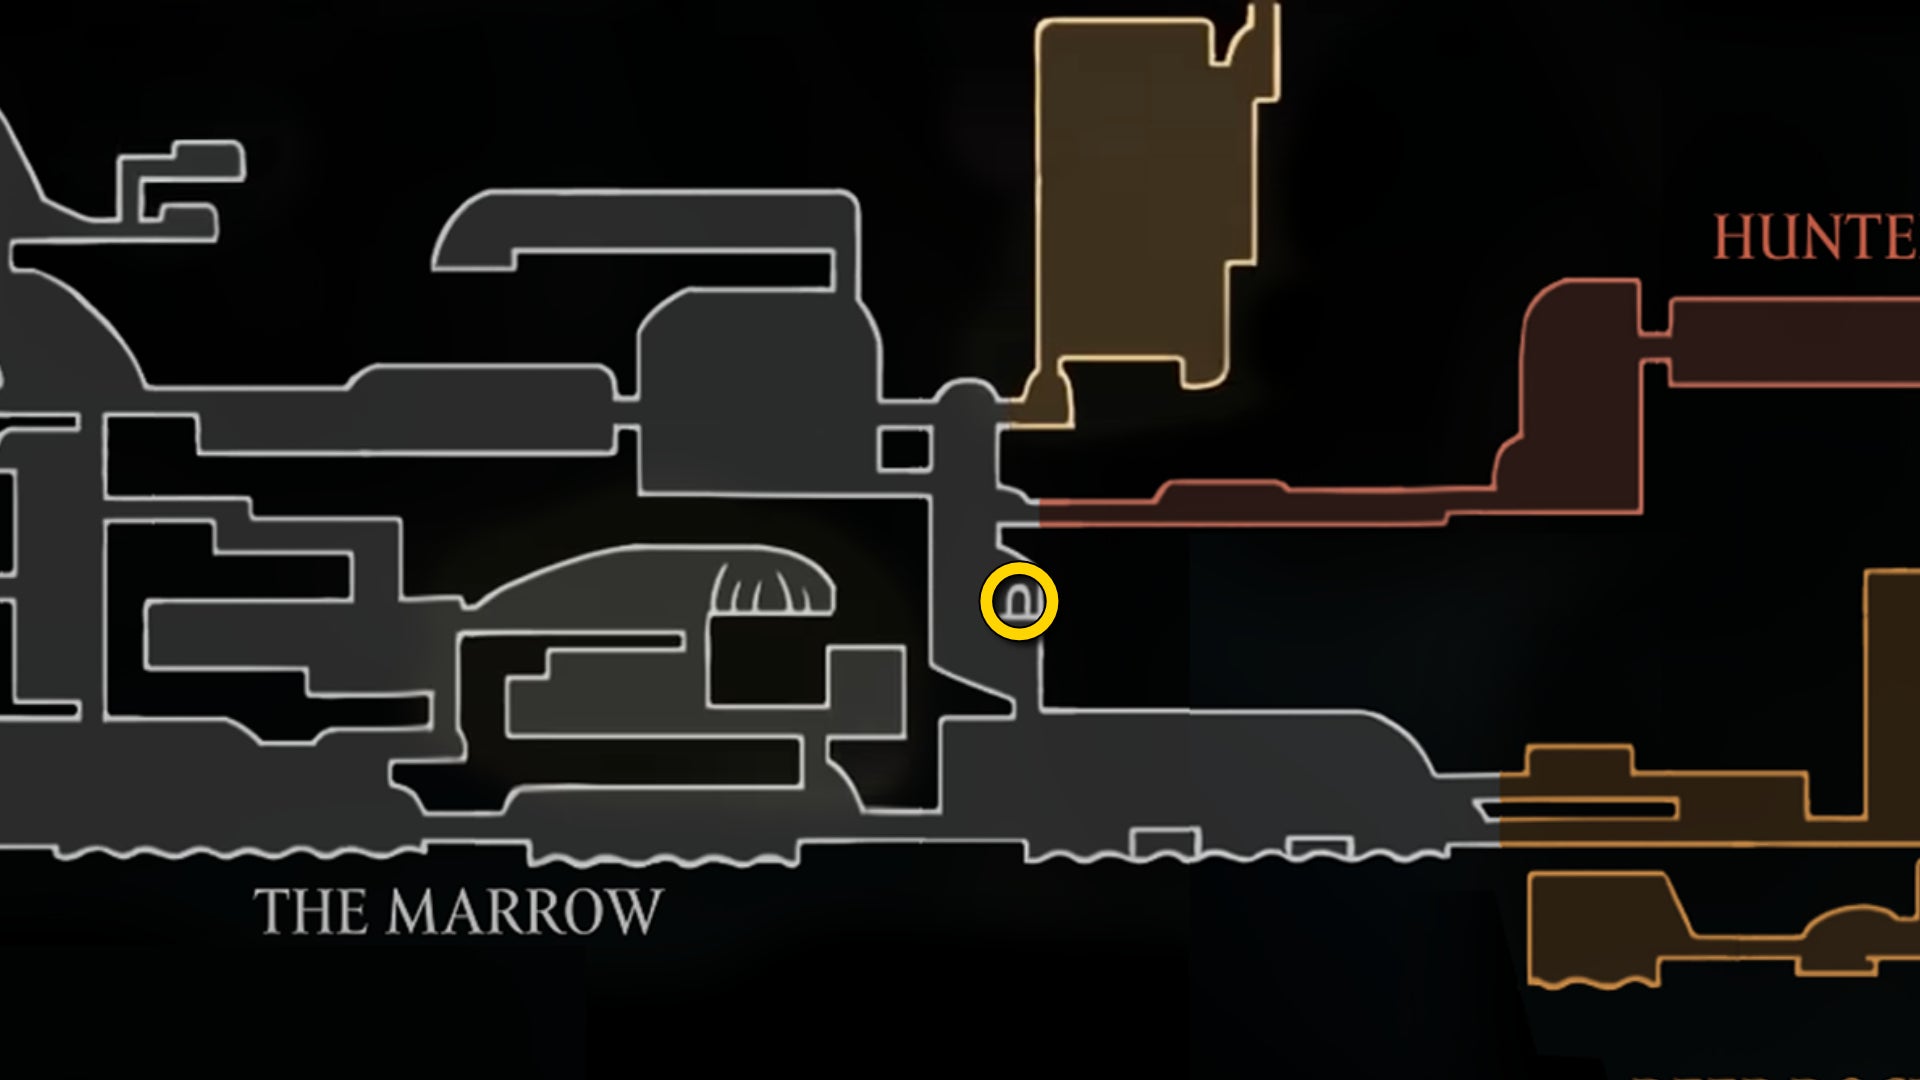
Remember that little jail where you first met (and freed) Grindle, within The Marrow? By this point it's long since been taken over by Loddie, an NPC who has set up a dart-throwing minigame there for you to try.

Head over to the jail - in case you've forgotten, it's just below the path that leads from The Marrow into Hunter's March. Speak with Loddie to begin the minigame, where you must hit the ladybird target using throwing darts. You're only allowed to jump - you cannot cross the red line at your feet, or you'll be disqualified.

Hit the target 15 times, and Loddie will reward you with a Tool Pouch Upgrade. Strike the target 25 times, and he'll hand over a Heavy Rosary Necklace. The downside is that you have to pay Loddie 25 Rosaries each time you want to try the challenge. That bastard.
10. Fill out your Hunter's Journal.
Nuu's Hunter's Journal is a compendium that you will of course continue to fill out well into Act 3. But at the very least you should try to complete Nuu's quest by adding 100 enemies to the Journal if you haven't already done so. Once you've got 100, speak with Nuu in the Halfway Home again and she'll give you a Tool Pouch Upgrade for your trouble.

If you like, you can also spend time ensuring that you've unlocked the entries for every Act 1 and Act 2 enemy, but this will be very time-consuming and not necessary to complete before the end of Act 2.
11. Hand in all your collectibles.
Another thing you can do at this point, for completion's sake, is to hand in all your collectible items to the relevant curators. By collectibles, I mean:
- Mossberries
- Relics (Bone Scrolls, Choral Commandments, Weaver Effigies, and Rune Harps)
- Psalm Cylinders
Mossberries should be given in to the Moss Druid in Mosshome - your final reward is that she'll upgrade the Druid's Eye tool to its more powerful Druid's Eyes form.
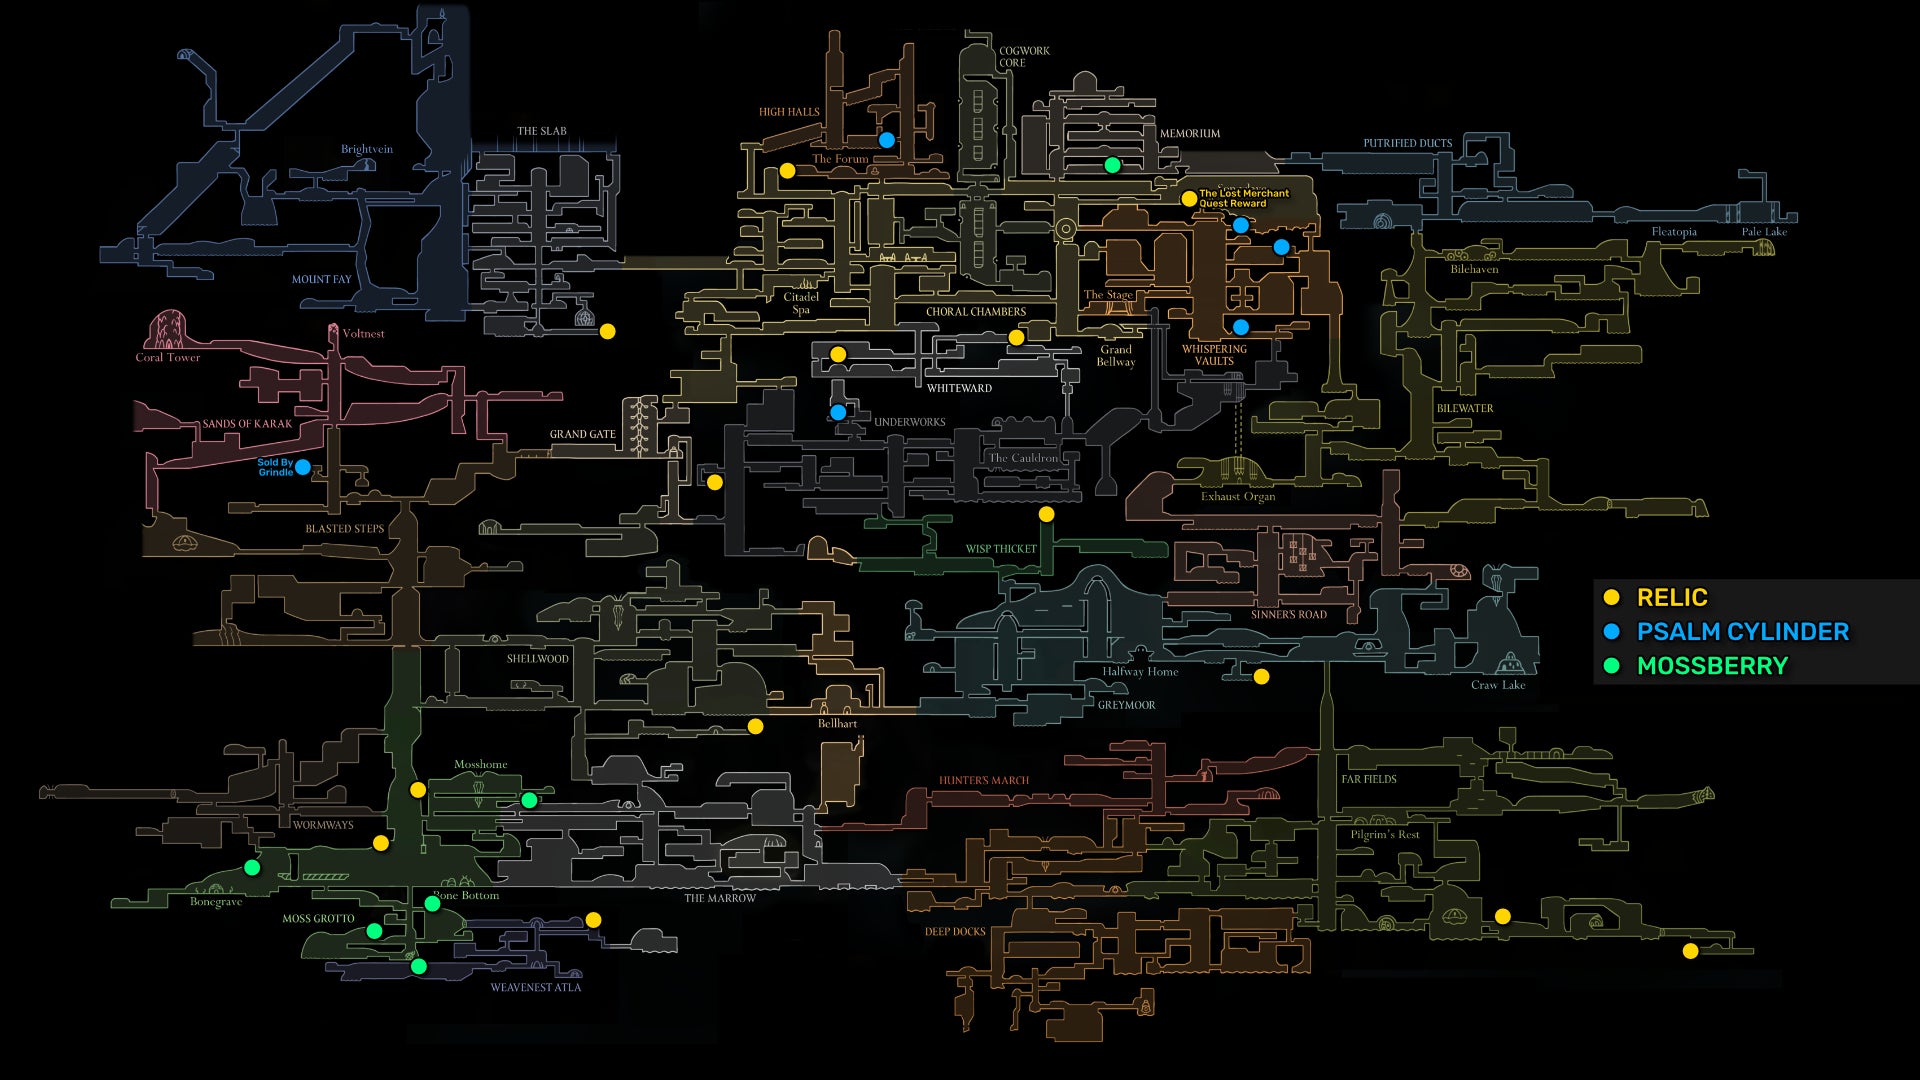
The others will simply provide you with Rosaries as a reward for each Relic or Psalm Cylinder handed in (to Scrounge in Bellhart and Vaultkeeper Cardinius in the Whispering Vaults, respectively). In case you missed any, consult the map below!
12. Duel with Shakra.
You've pretty much completed everything there is to complete before reaching the end of Act 2. Just one side task is left - a friendly duel with one of Pharloom's greatest warriors, and one of your greatest allies.
This is only available once you've completed Shakra's Last Wish quest. Head to the area of Greymoor that's right next to Bellhart, the flat section of land where the Flea Caravan once was located. Here you'll find one of Shakra's throwing rings on top of a stick in the ground. Attack it to sound a bell noise and summon Shakra from her tucked away spot in Bellhart.

She'll challenge you to a duel here. There are no rewards except for adding Shakra to the Hunter's Journal, but it's a very fun fight which will prepare you well for what's ahead.
Shakra moves very quickly, and her constant barrage of throwing rings can be hard to read at first. Thankfully, she only has the one phase, and she doesn't have a particularly high health pool, so once you get the rhythm down, it won't take you too long to beat her.
Alright. Now that we've got all of this busywork out of the way, I think it's time to play the Threefold Song and face the finale of Act 2. Join us in Part 33 of our Silksong walkthrough and I'll show you what awaits in the Cradle at the top of Pharloom.
Read this next
- Ahead of Hollow Knight: Silksong's Sea of Sorrow expansion, Team Cherry have gotten their Traditional Chinese and German translation ducks in a row
- We may have glimpsed Silksong's Sea of Sorrow expansion in a six-year-old trailer
- Hollow Knight: Silksong's first big expansion, Sea of Sorrow, flows into our lives for free next year
