
Hollow Knight Silksong walkthrough: Part 26 (Bilewater)
A tourist's guide to the most unpleasant region in Silksong


Looking for a safe path through the awfulness of Bilewater in Hollow Knight: Silksong? That's right, we've put it off for long enough in our Silksong walkthrough. It's time to fully explore the far-reaching swamplands of Bilewater, and explore every nook and cranny there for all its secrets. There are one or two very challenging areas in this region, but with the help of this guide, things should become far more doable.
In Part 26 of our Hollow Knight: Silksong walkthrough, I'll show you the best way to explore every part of Bilewater, leaving no worm-infested stone unturned on our quest to free Fleas, discover hidden (and trapped) Benches, and defeat the horror at the top of Bilewater in order to reach the Apostate's Key even further above.
Want the walkthrough for a different area of the game? Check out our Hollow Knight: Silksong walkthrough hub!
Bilewater walkthrough steps:
- Head into Bilewater via the Exhaust Organ.
- Steer clear of the Wardenfly for now.
- Rescue the Flea below.
- Buy the Bilewater map from Shakra.
- Obtain the Quick Sling.
- Reach the Mask Shard past the Slubberlugs.
- Spring the trapped Bench.
- Rescue the second Lost Flea.
- Unlock the secret Bench.
- Defeat Groal The Great.
- Collect the Seeker's Soul from Bilehaven.
- Find the Huntress and the Apostate's Key.

1. Head into Bilewater via the Exhaust Organ.
The best way to enter Bilewater right now is to head through the Exhaust Organ via the Grand Bellway - as long as you followed Part 21 of our walkthrough properly, and unlocked the path between Bilewater and the Exhaust Organ. Otherwise, you'll need to enter via Sinner's Road - but I'll assume you have the Exhaust Organ shortcut open by now.

From the Grand Bellway, head up the shaft to the right of the Ventrica, and follow the path all the way back to the Exhaust Organ. Exit the Exhaust Organ via the bottom-left doorway, and then dive into the worm-infested water to your right and swim into Bilewater. Once you're in the next room, you can cross it and immediately rest at the Bellway Bench before proceeding any further.
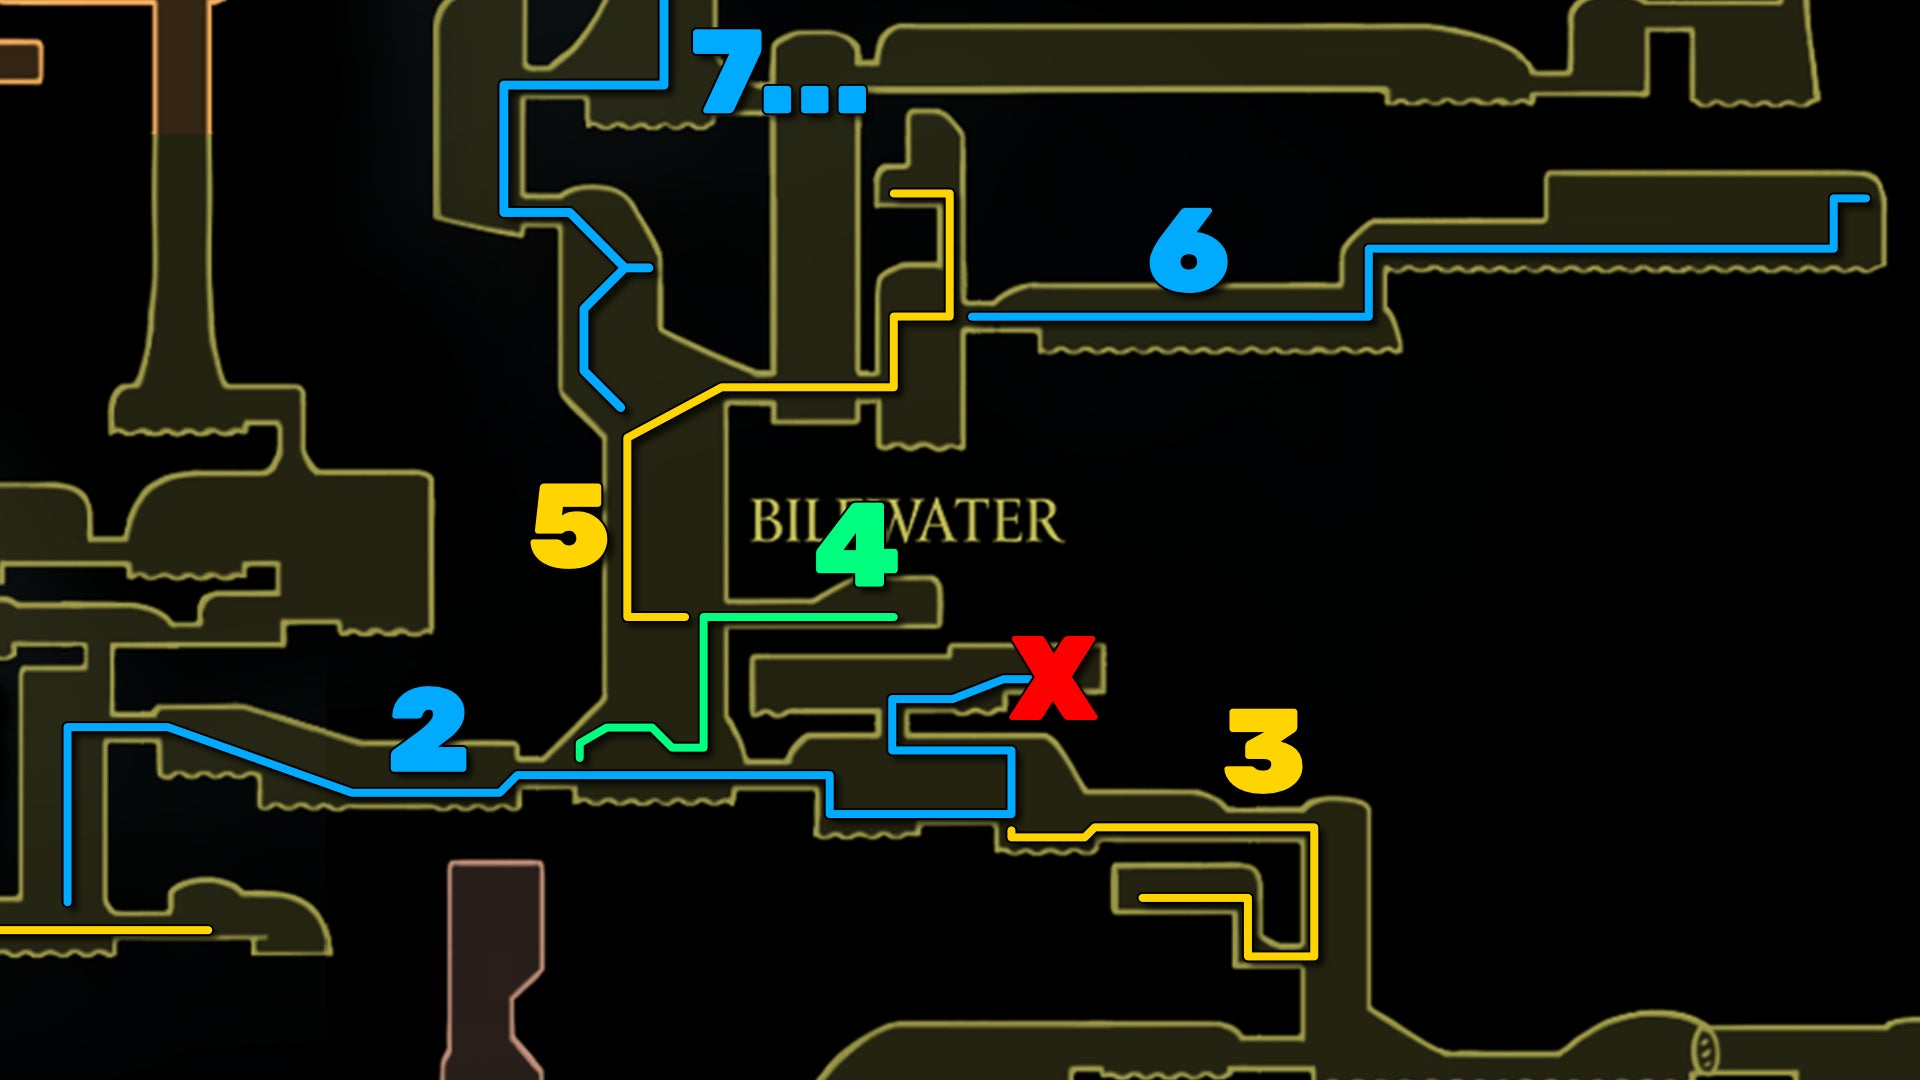
2. Steer clear of the Wardenfly for now.

Exit back out into the shaft and climb it until you reach the first exit on your right. In this room you'll come into contact with the same Swamp Squits as before, as well as a nasty, sneakier enemy called a Stilkin, which opts for hit-and-run attacks instead of facing you head-on. It's best not to waste time trying to kill them; just forge ahead into the right-hand room.
Cross this next room and exit - nothing will attack you. In the next room, it's worth pointing out that there's a path upwards about halfway along it, but all this leads to is a platform guarded by a Wardenfly.


These creatures have a unique interaction with you at this stage of the game - if they catch you with their spitting globule attack, and then trap you in their cage, you'll be instantly transported to a brand new region, and need to fight your way free.
It's a very cool interaction, but this walkthrough doesn't cover it - we prefer to explore that region when the time is right. So, if you don't want to be sidetracked from this walkthrough for an hour or so, be extremely careful when fighting the Wardenfly - or better yet, simply ignore this path for now, because there are no rewards up there. Instead, just head over to the right-hand exit of the room.
3. Rescue the Flea below.
In the next room, drop down to the lower ledge, minding the enemies on the walls and fluttering about in the air (prepare for a lot of that behaviour here in Bilewater). Once the left-hand wall is free to do so, slide down it until you reach a pathway blocked by a breakable wall. Break through it and enter the secret room beyond.

Climb up the wall in front of you, and you'll find a trapped Flea at the top, guarded by a Snitchfly - the same species as Grindle the NPC. These guys are hostile, and if they catch you with their leap attack, they'll pilfer some of your Rosaries and keep them until you kill them. As you approach, another will spawn behind you, so you're actually fighting two at once.
Once the Snitchflies are dealt with, attack the Flea to rescue it, and then exit back out of the room.
4. Buy the Bilewater map from Shakra.


Climb back up the shaft and head back to the short middle corridor where nothing attacked you. On the left-hand side, there's a path upwards. If you'd tried to explore Bilewater before getting the Faydown Cloak, this would be the point at which you can no longer explore any further - but now that we have the Cloak, you can double-jump up to reach the wall, and explore higher!
Climb up and clawline over the spikes to the platform patrolled by the little Miremite. To get higher from here, you first need to go lower. Drop down and Pogo off the green swamp balls (I wish I had a good name for these), then scale the wall up to the right-hand exit.

In this next room, you'll at long last find Shakra, content and humming as always. Speak with her and purchase her Bilewater map for 90 Rosaries.
5. Obtain the Quick Sling.

Exit out of Shakra's room and Pogo over to the left-hand side. From here you can start climbing higher up this central shaft, but be wary - the path upwards is patrolled by large creatures called Bloatroaches, which quickly spew lots of acid left or right when they notice you. Fortunately, they're completely defenceless when attacked from above, so you can feel free to Pogo off them to help you climb higher.


Don't climb all the way - when the path starts to veer off to the left, you should head to the platform on your right, and exit into the narrower conjoining shaft beyond. You'll see a couple of strange floating white flowers in the air - Mothleaf Lagnias. Ignore them! Just head straight across to the exit on your right.
In this next room, climb upwards through the tunnel immediately above you, and then climb the wall above the right-hand exit. At the top-right, you can attack the ceiling to reveal a secret passageway further up.

Break another ceiling section beyond it, then hop up onto the left-hand ledge. Here you can loot the Quick Sling - a situationally powerful tool which doubles the number of attack tools you throw at a time.


You can go even higher and break another ceiling tile, but all it does is drop a load of spiked balls down below (make sure you duck back into the lower-left ledge to avoid them falling!). There's no real point to doing this, there's nothing further up. Just a nasty trap set by those rascals at Team Cherry.
6. Reach the Mask Shard past the Slubberlugs.

Drop back down and enter the room on your right. This is a horrible corridor, just to warn you. It's guarded by a rare Bilewater enemy known as a Slubberlug. They're the infantile form of Sinner's Road's Muckroaches, so of course they're a pain in the arse. These Slubberlugs will jump out of the water in an arc and latch onto you if they can. They're hard to kill, and hard to dodge. My advice is to travel fast.

Head to the very end of the corridor, climb upwards, and then across and even worse stretch than before, and then finally climb up again. At the end, you'll find a Mask Shard for the taking. After that, head through the passage to your left for a shortcut back through some of the worst part. Return to the previous room, and take solace in the fact that you'll never again have to return to this hideous corridor.

7. Spring the trapped Bench.
Return to the larger shaft patrolled by the Bloatroaches, and jump over to the left-hand side to continue climbing up it. Keep an eye out for a ledge on your right partway up, where you can loot a Frayed Rosary String from a Pilgrim's body. Just mind the falling boulder, and the spew from the nearby Bloatroach.

Climb up to the next room, and use your Clawline to avoid the spikes as you climb up the walls of the room beyond. At the very top is a Rosary cache to collect, after which you should exit through the right-hand doorway.
To climb further up, the best way is to clawline over to the Bloatroach level with you, and Pogo off its head to reach the Pogo-able ball above. Keep climbing all the way up - you'll find an exit on your right, but ignore it for now. Climb even higher, and then enter the room on your left.

Listen up - the Bench here is trapped, and will not allow you to rest, ever. You can choose to spring the trap deliberately, just to explore the little pathway below. There's no way to avoid landing in the worm-water below, but there's at least an easy way out by swimming to the right.


If I were you, I'd now spend a bit of time carefully Pogo-ing off the tops of Bloatroaches to gain enough Silk to disperse the parasite and allow yourself to heal once more.
8. Rescue the second Lost Flea.

Now take the right-hand exit out of the shaft. You'll find more of the regular Bilewater enemies in this next room. Use your clawline to safely cross the spikes further in, and you'll reach a haunting visage of lots of pilgrims strung up from the ceiling above you. You can play your Needolin here for a bit of lore.

The next room is filled with traps and Stilkins trying to bait you into accidentally springing said traps. These traps will fire spikes in various directions through the tunnels ahead, and are actually fairly easy to avoid as long as you spring each trap with intent. Take your time, and don't bother trying to kill the Stilkins.

At the top of the first vertical tunnel, keep climbing up the left-hand wall, through the ceiling. There's a secret passageway beyond. Break the rope in front of you to spring the trap, and immediately dive back down below to avoid the spikes coming from the right-hand side. Then head along the path (the next trap you can just jump on the spot and dash in mid-air to avoid the pendulums) and rescue the trapped Flea at the end.

9. Unlock the secret Bench.


Backtrack out of the secret passageway, and continue to the right. Don't climb further up yet - just head over to the right-most platform, and then drop downwards into the worm-water below. Jump and attack the wall to your right, then follow the path beyond to the room below.
Again you'll drop into worm-water - it doesn't matter, the Bench is nearby. Swim over to the left and attack the breakable wall beyond to enter a secret room containing a well-positioned Bench.

On the right is a tablet with some lore; on the left is another breakable wall which leads out into a long corridor you skipped. Had you come at it from the other direction, you would have needed to pass through the entire corridor to reach the Memory Locket at the end. This way, you can just take the Memory Locket immediately, then dip back into the Bench room and ready yourself for the trials ahead.
10. Defeat Groal The Great.
Here comes the greatest challenge of Bilewater - a nasty arena fight followed by a nasty boss, with a nasty runback if you fail. I'll guide you through it best I can.
Head back upwards from the Bench, and once you're out of the path that took you to the Bench in the first place, climb upwards and head through the exit to your right.
In the next room, you can either head to the far right in order to climb upwards, or - if a Swamp Squit happened to spawn above the crumbling platforms on water-level - you can just Pogo upwards to the left-hand ledge, and climb from there. Either way, Pogo up to the left-hand exit above the spikes.
Beyond that, you have a long corridor heading west, guarded by Stilkins and some annoyingly-placed Swamp Squits. You can climb upwards at first for a higher-level path (mind the traps though). This path leads to another upper platform with some cobwebs you can strike to replenish your Silk - good for getting rid of the worm parasite just before the arena.


Sprint and jump across the rest of the corridor, preparing to dodge any attacks from Stilkins. Finally you'll reach the next room. Head upwards first for a bit of lore on a tablet, and then drop back down and head to the left where you can jump up into the arena, and face your final test of Bilewater.

The first stage of this arena gauntlet is against two Stilkins. The second stage is against two of a new and similar enemy called Stilkin Trappers - taller Stilkins that fire spikes directly downwards. For both these enemies, the best tactic is to stick to one edge of the arena, bait them to emerge nearby, and then Pogo off their heads to kill them.
After the first two stages, a pendulum swings past from right to left; you can avoid it by hiding on the far left or right.

After the pendulum, you need to face two more waves, against Swamp Squits and then a Stilkin/Trapper duo. Then the pendulum will swing again, twice this time (avoid it in the same way as before). And one more wave of enemies will emerge for you to defeat.
Once all the waves are defeated, Groal The Great will emerge and start to fight you. And yes, if you die to Groal, you'll have to repeat the entire arena fight before him again in order to face him. Bilewater really sucks.

Groal is quite simple really - it's just more of a challenge facing him at the end of such an ordeal. He'll periodically dive into the water and back up, which can catch you if you're Pogo-ing above him - but otherwise, Pogo-ing is still your best bet as it avoids his other attacks.
Groal will spit explosive acid balls at you, and he also will try to suck you into his mouth and start to chew you - but this is actually a good thing for you. You'll take a fair bit of damage, but you can repeatedly attack while inside him to damage him and gather enough Silk to heal yourself once he spits you out. It's not worth doing if you're worm-infested, but otherwise it's a good strategy, particularly if you've bought and equipped the Multibinder tool from the Bellhart shopkeeper, which allows you to heal four masks instead of three.

Use your Clawline to quickly travel from the sides of the arena to its centre, and vice versa. Quick movement is essential in this fight. Halfway through, Groal will start to summon minions, and the pendulum can also swing from time to time, so watch out for this. Groal also has a Silk-powered attack, where his eyes glow white and he spits out three Silk projectiles to the side. Thankfully if you have enough distance from him, they're fairly easy to read and dodge.
It's a very nasty fight, but persevere and you'll be well rewarded.

11. Collect the Seeker's Soul from Bilehaven.
With Groal finally defeated, a Bench will appear in the middle of the arena for you to rest at. After resting, the left-hand door will open, allowing you to enter the building beyond. This is Bilehaven - a small house containing nothing except a very important item for later on: the Seeker's Soul.

This item does nothing on its own, but is required in order to reach Act 3 of Silksong. A worthy reward, and well-earned!
12. Find the Huntress and the Apostate's Key.

Exit Bilehaven and attack the rope on your left to open a shortcut downwards to earlier parts of Bilewater. Don't bother going down there - instead, head upwards and destroy the second rope in the room above to unlock a closed-off area of an even later region: the Putrified Ducts.

Climb to the upper level of this room, and beware of the tendrils hanging from the ceiling in certain places. These are tongues - long tongues of a new ceiling-dweller called a Garnak. Come into contact with a tongue and it will snag you and pull you upwards. Attack repeatedly to free yourself before you reach the Barnak. You can attack the waiting tongue to cause it to retract for a moment, allowing you to safely pass it by.


On the darkened upper ledge in the middle of the room, you'll also come into contact with a giant charging creature called a Ductsucker. Dodge up over it and run over to the left-hand side. Jump across the gap, and loot the item at the end of the path for the Apostate's Key. This little key will allow you to properly explore the region we're heading to next!
Finally, drop down the right-hand side of the Apostate Key platform. You can head left for some Shell Shards, but otherwise head right and enter the building beyond to meet the Huntress and accept her Broodfeast quest. After that, you can exit the building and destroy the breakable wall to the right for a shortcut back to the start of the room.


Okay, that's it for Bilewater! Now you just need to make your way safely back down to the Bilewater Bellway, where you can rest ready for the next part of your journey. Don't worry, it won't be nearly as awful as Bilewater's been.
Join us in Part 27 of this gargantuan, completionist-focused Hollow Knight Silksong walkthrough, where we'll make good use of that Apostate Key you just picked up.
Read this next
- Ahead of Hollow Knight: Silksong's Sea of Sorrow expansion, Team Cherry have gotten their Traditional Chinese and German translation ducks in a row
- We may have glimpsed Silksong's Sea of Sorrow expansion in a six-year-old trailer
- Hollow Knight: Silksong's first big expansion, Sea of Sorrow, flows into our lives for free next year
