
Hollow Knight Silksong walkthrough: Part 30 (Memorium)
Visit previous regions in microcosm with the Memorium


Looking for a Memorium walkthrough in Hollow Knight: Silksong? For my money, the Memorium is one of the most intriguing and unique regions in Silksong, ironically because it is made from transplanted flora and fauna from various other ecosystems within Pharloom. It doesn't take too long to explore, but there is an ideal order and route to everything in the Memorium to ensure that you discover all its secrets in an intuitive manner.
In Part 30 of our Hollow Knight: Silksong walkthrough, I'll show you how to reach and explore every room of the Memorium, and uncover all its secrets, including the final Lost Flea, the final Cogheart Piece, and more.
Want the walkthrough for a different area of the game? Check out our Hollow Knight: Silksong walkthrough hub!
Memorium walkthrough steps:
- Accept The Lost Merchant wish in Songclave.
- Climb up into Memorium.
- Obtain the Memorium map.
- Obtain the final Cogheart Piece.
- Collect the Memory Locket beyond the spikes.
- Activate the Memorium Ventrica Station.
- Obtain the Spool Fragment in the large room.
- Collect the Materium and Volt Vessels.
- Rescue the Huge Flea.
- Find Jubilana on your way to the Putrified Ducts.
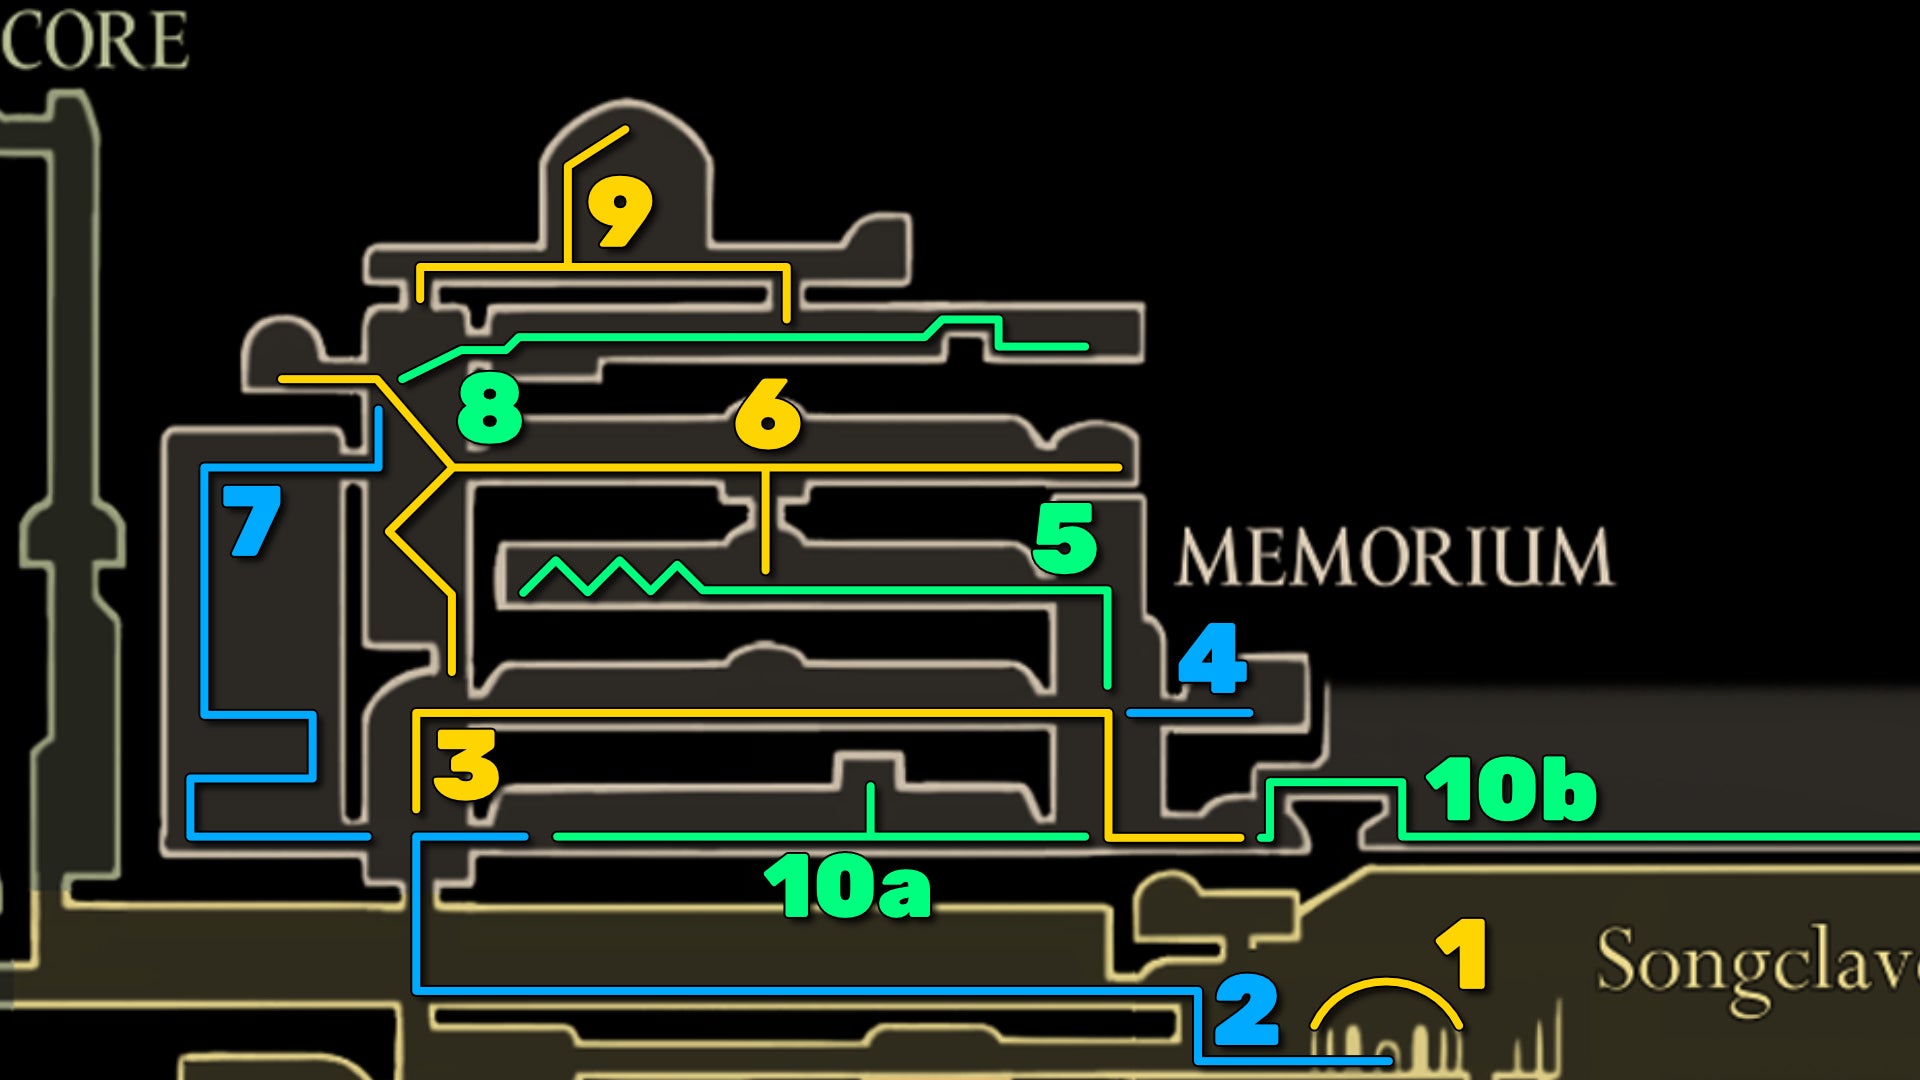
1. Accept The Lost Merchant wish in Songclave.
Before you enter Memorium, we might as well kill two birds (or bugs) with one stone. Go to Songclave, and check the Wishwall for the Strengthening Songclave Wish. Complete it instantly by donating 500 Rosaries to the town.
If you travel elsewhere and then return again, you should find a couple of new Wishes on the Wishwall after completing "Strengthening Songclave". One such wish is "The Lost Merchant" - apparently Jubilana has gone missing again. You'll find her in Memorium, hence the usefulness of accepting this quest now!

2. Climb up into Memorium.


The way up into Memorium is trivially easy now that you have the Faydown Cloak. From Songclave, head to the upper-left exit into the long corridors guarded by Grand Reeds. Jump over the first two Grand Reeds, and then when you see a hole in the ground and ledges above you, jump up to one of the higher ledges and climb to the top.
The way up off-screen is blocked by thick vines, so hack at them to destroy them, and then hop upwards into Memorium.

3. Obtain the Memorium map.
Before doing anything else, take the right-hand exit at ground level and rest on the Bench there. Then head back into the previous room and climb upwards to the next exit on your right.

This room - the entire region, in fact - is a bit of a blast from the past. This corridor is like The Marrow in miniature, with Skull enemies patrolling the grounds that will of course be no match for you by this point.

Keep heading to the right, and you'll find a slightly more troublesome foe - a Rhinogrund. Remember the one you encountered bashing on the door in Far Fields? It's another of those ones. Aim at the white, non-armoured sections, and Pogo over him lots, and you'll nonetheless make short work of him just like the other enemies here.

In the neighbouring shaft to the right, drop to ground level and head right, where you'll find a model of the Citadel that can give you the Memorium map in exchange for 70 Rosaries.
4. Obtain the final Cogheart Piece.

Exit back out of the map room, and jump upwards to the room opposite where you entered, just above you on the right. In this room, you'll find another bell puzzle that gives you a Cogheart Piece at the end of it. Just like before, you need to stand on the pressure plate in the middle, watch and listen to the bells being rung, and hit them again in that order. The slight difficulty about this particular one is that you'll need to climb up the walls and leap over to the top bells in order to reach them.
Given the layout of the bells in this room, it's harder to intuitively number them, but let's say that they're numbered like a clock, with the top-right bell being 1, and then counting up clockwise from there, with the middle bell being 7.
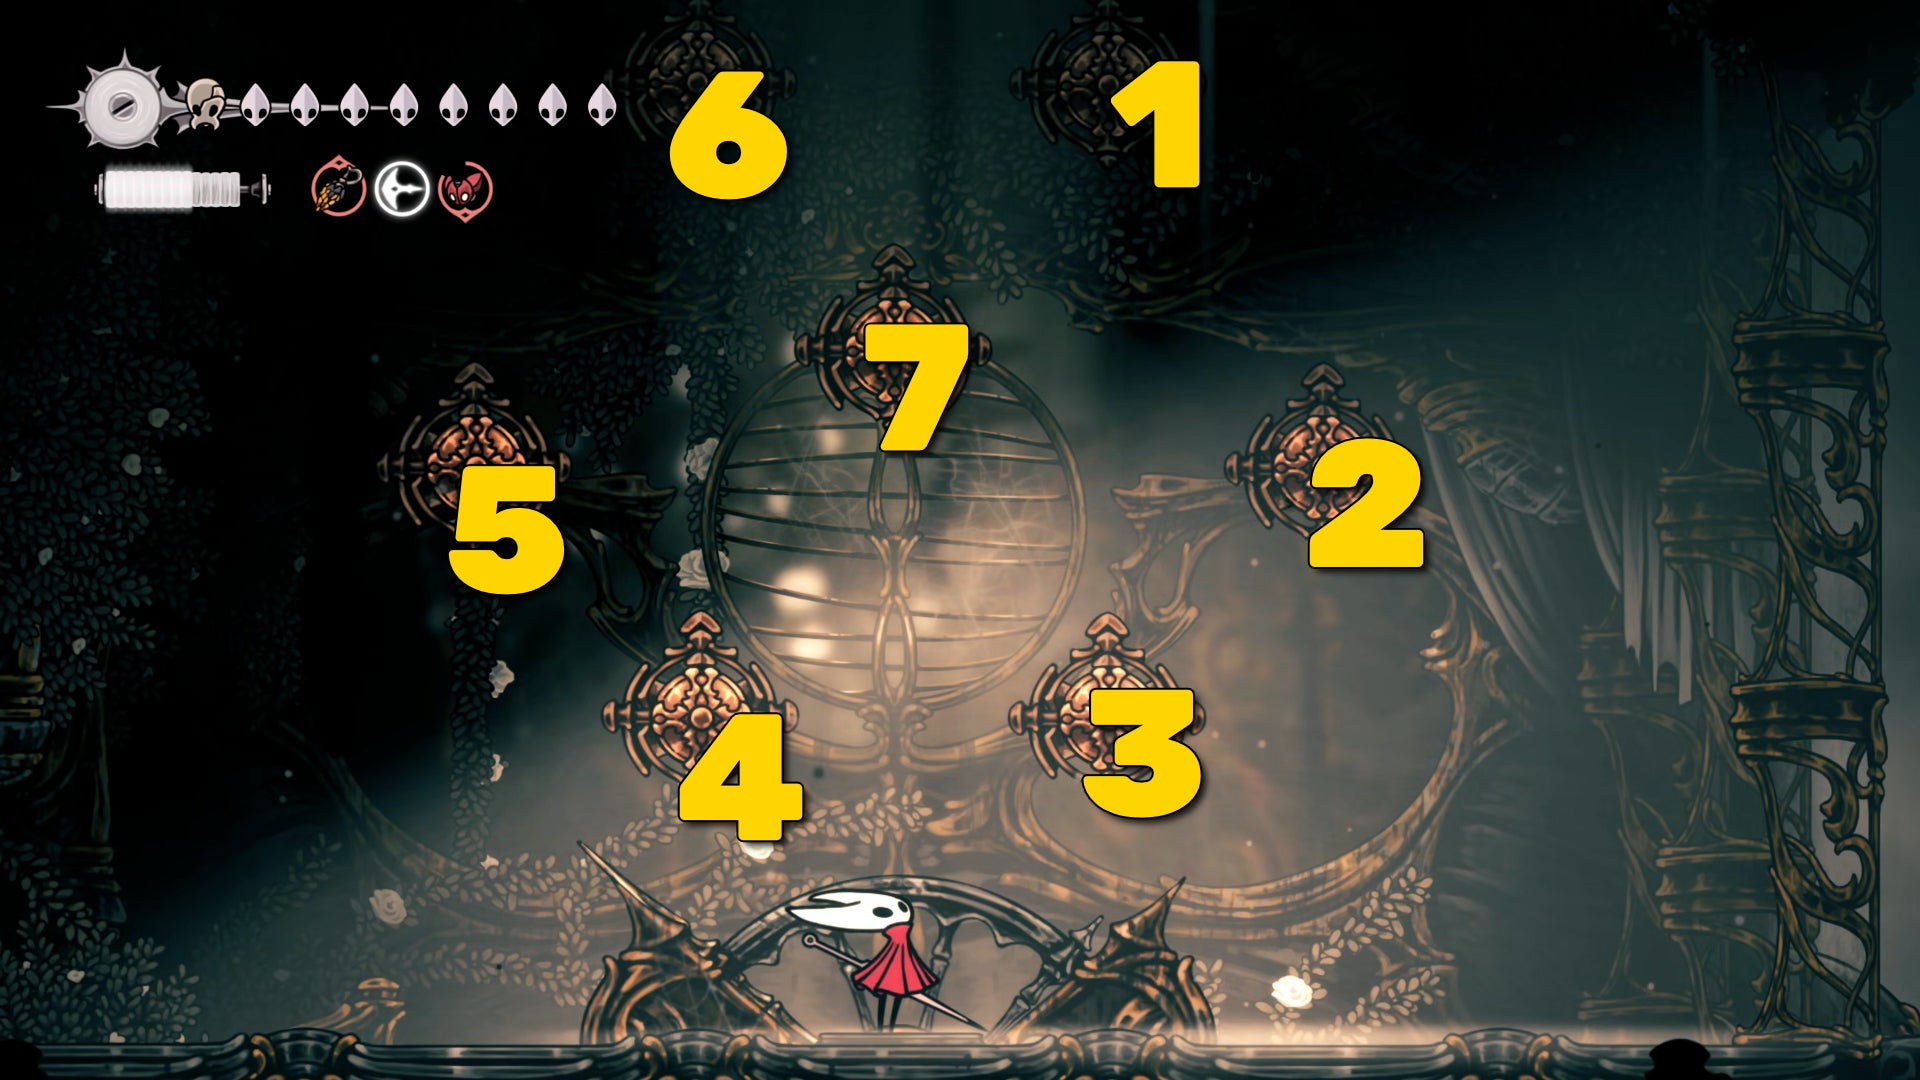
The correct order is:
- First Stage: 3-1-7-4
- Second Stage: 7-1-6-7-5
- Third Stage: 6-2-4-1-3-5
Once the puzzle is solved, the final Cogheart Piece will appear. Once you pick it up, check your inventory - you'll see the three Cogheart Pieces have assembled into a single Cogheart.
5. Collect the Memory Locket beyond the spikes.


Back out of the bell room and climb upwards to the top-left exit. This next corridor is a microcosmic Shellwood, with several of the enemies you've previously encountered there - along with a huge number of spikes.
Make your way to the far left end, and you'll start to encounter Gahlias - those plants that extend outwards to attack you. Carefully bait and kill the first two, and then clawline over the spike "hump". You'll then need to immediately jump over the next Gahlia and kill it with Pogo attacks.

Jump over the next "hump" and you'll find yourself attacked by a Pollenica, firing ranged projectiles at you. Don't panic, just clawline directly into it and Pogo off it to kill it. Then you can make your way to the very end of the path, where you can loot a Memory Locket from the ground.
6. Activate the Memorium Ventrica Station.
Head back across the spikes, and then climb up the ledges above you and attack the red plant stuff in the ceiling to reveal a new path upwards.


There's a breakable wall on either side of you; take the right-hand path first. Well, there are Shell Shards above you first of all, but after that take the right-hand path. Be warned - once you jump over that first set of spikes on the right-hand path, you'll be waylaid by a new enemy called a Crustcrag.
All they do is charge at you, but they hit for double damage and it's in an awkward position, so it's worth backing off and taking your time to chip away at it. That, or burst it down with your Silk Skills and tools before it can hurt you.
Beyond the Crustcrag is a drop to a lower ledge patrolled by another Crustcrag. This one's much easier, because you can just Pogo off its head whenever it passes by the gap above it.

Drop to the lower level once it's dead, and head out the right-hand side through the breakable walls. All that's here is some lore to read, so once you're done, double back to the start of this corridor and this time take the left path.

This corridor contains another Crustcrag, thankfully in a more open area. Kill it, and make your way to the next room, which is in fact a higher-up section of the shaft you first climbed into in the Memorium. Drop downwards, and float past the spikes to find a bed of vines on the floor. Attack the vines to open a shortcut up through the shaft.
Once that's done, climb back up and you'll see two exits on your left, one above the other. Take the upper one first - it leads to the Memorium Ventrica Station. Pay 80 Rosaries to unlock it, and then exit out of the room.
7. Obtain the Spool Fragment in the large room.
Drop down to the left-hand exit just below you, and pass through the glass room beyond. Once you get to a drop, head all the way down it - there's no point exploring the rooms along the way unless you're interested.


At the bottom, veer to the right to avoid the spikes, and land on the ledge leading to the right. Ahead of you is a short but tricky parkour section where you'll need to do some deft clawline-ing to avoid the spikes. The tricky bit is right at the bottom - you need to hang onto the wall on your right, clawline over to the left, and immediately double-jump above you to reach the upper wall.


At the end of this path you'll find a Spool Fragment - one of the last in the game. Once you've collected it, hack at the vines below you and you'll reach a lower section guarded by a couple of Massive Mossgrubs. Despite their size, they're easy to Pogo off and kill. Make your way to the right-hand side and hit the glass at the end for a shortcut back out into the main shaft.
8. Collect the Materium and Volt Vessels.

Climb up to the very top of the shaft, and you'll see two exits - a lever on the ceiling, and a doorway on your right, blocked by breakable glass. Break the glass to take the doorway on your right, and head down the electrical corridor that follows. You'll recognise these electricity traps from the Voltnest in the Sands Of Karak - use your clawline to pass by them quickly.
At the end of the corridor, past all the specimens on the wall, you can loot the Materium. This item can be placed inside your home in Bellhart (once you have it), and can be used to track all the interesting materials you've come across during your journey.

Now hit the upper part of the right-hand wall to break it open, and keep going. This short path will take you right into an arena fight against a couple of new enemies, called Memoria. They look and behave very much like Choral Chambers enemies, but they also throw explosive electric grenades at you.

Once you kill them both, the pedestal at the end of the room will open, allowing you to collect the Volt Vessels tool. This weapon-tool is unique, because while resting on a Bench you can transform it between two modes. One mode creates a bolas of those same electrical grenades, while the other creates an electricity column, like the traps you just passed earlier.
9. Rescue the Huge Flea.


Backtrack to the centre of the corridor, a little way to the left of where you picked up the Materium. Hop up onto the small ledge above you, and hit the lever to open a path upwards.
Head all the way to the left-hand side, as far as you can go. At the end, you'll find some breakable wooden struts - this opens a pathway down to the top of the main shaft, just for ease of access.
Once that's broken, double back and climb upwards to reach the very top of the Memorium, where a Huge Flea is caged cruelly inside a cage too small for it. Attack the cage to break it.

Surprisingly, the Huge Flea will start to fight you at this point - its attack pattern is incredibly simple, just charging back and forth, but it can deal a lot of damage and its height variation can make it hard to avoid. It's best to duck below and attack above whenever it gets near if you want to be safe about it.
Thankfully, you don't need to kill the poor thing. After enough damage, it will come to its senses, and fly off. And with that, you've just saved every last Lost Flea that needs saving in Silksong! One of the most meaningful achievements in the game, in my humble Flea-loving opinion.
10. Find Jubilana on your way to the Putrified Ducts.
That's almost everything done in the Memorium - it's quite a small region really. All we need to do now is find Jubilana for the Lost Merchant quest. To do this, make your way all the way back to the bottom-right corner of the Memorium, to the tiny room where you obtained the Memorium map.

First, head to the left, and you'll find the one corridor in the Memorium region you haven't yet explored. This room is made up of more Marrow stuff, including a large Marrowmaw. Fight your way past it, and in the next room, you'll find a Mossberry hanging from the ceiling in the glass section. This should be the last Mossberry you've picked up, and you can at any point now take them to the Moss Druid in Mosshome (above The Marrow) and use them to upgrade your Druid's Eye into Druid's Eyes - a better version of the tool.
Keep heading all the way to the left and hack past the breakable walls to reach the Bench at the start of Memorium. Rest at it if you like, then head all the way back to the Memorium map room.
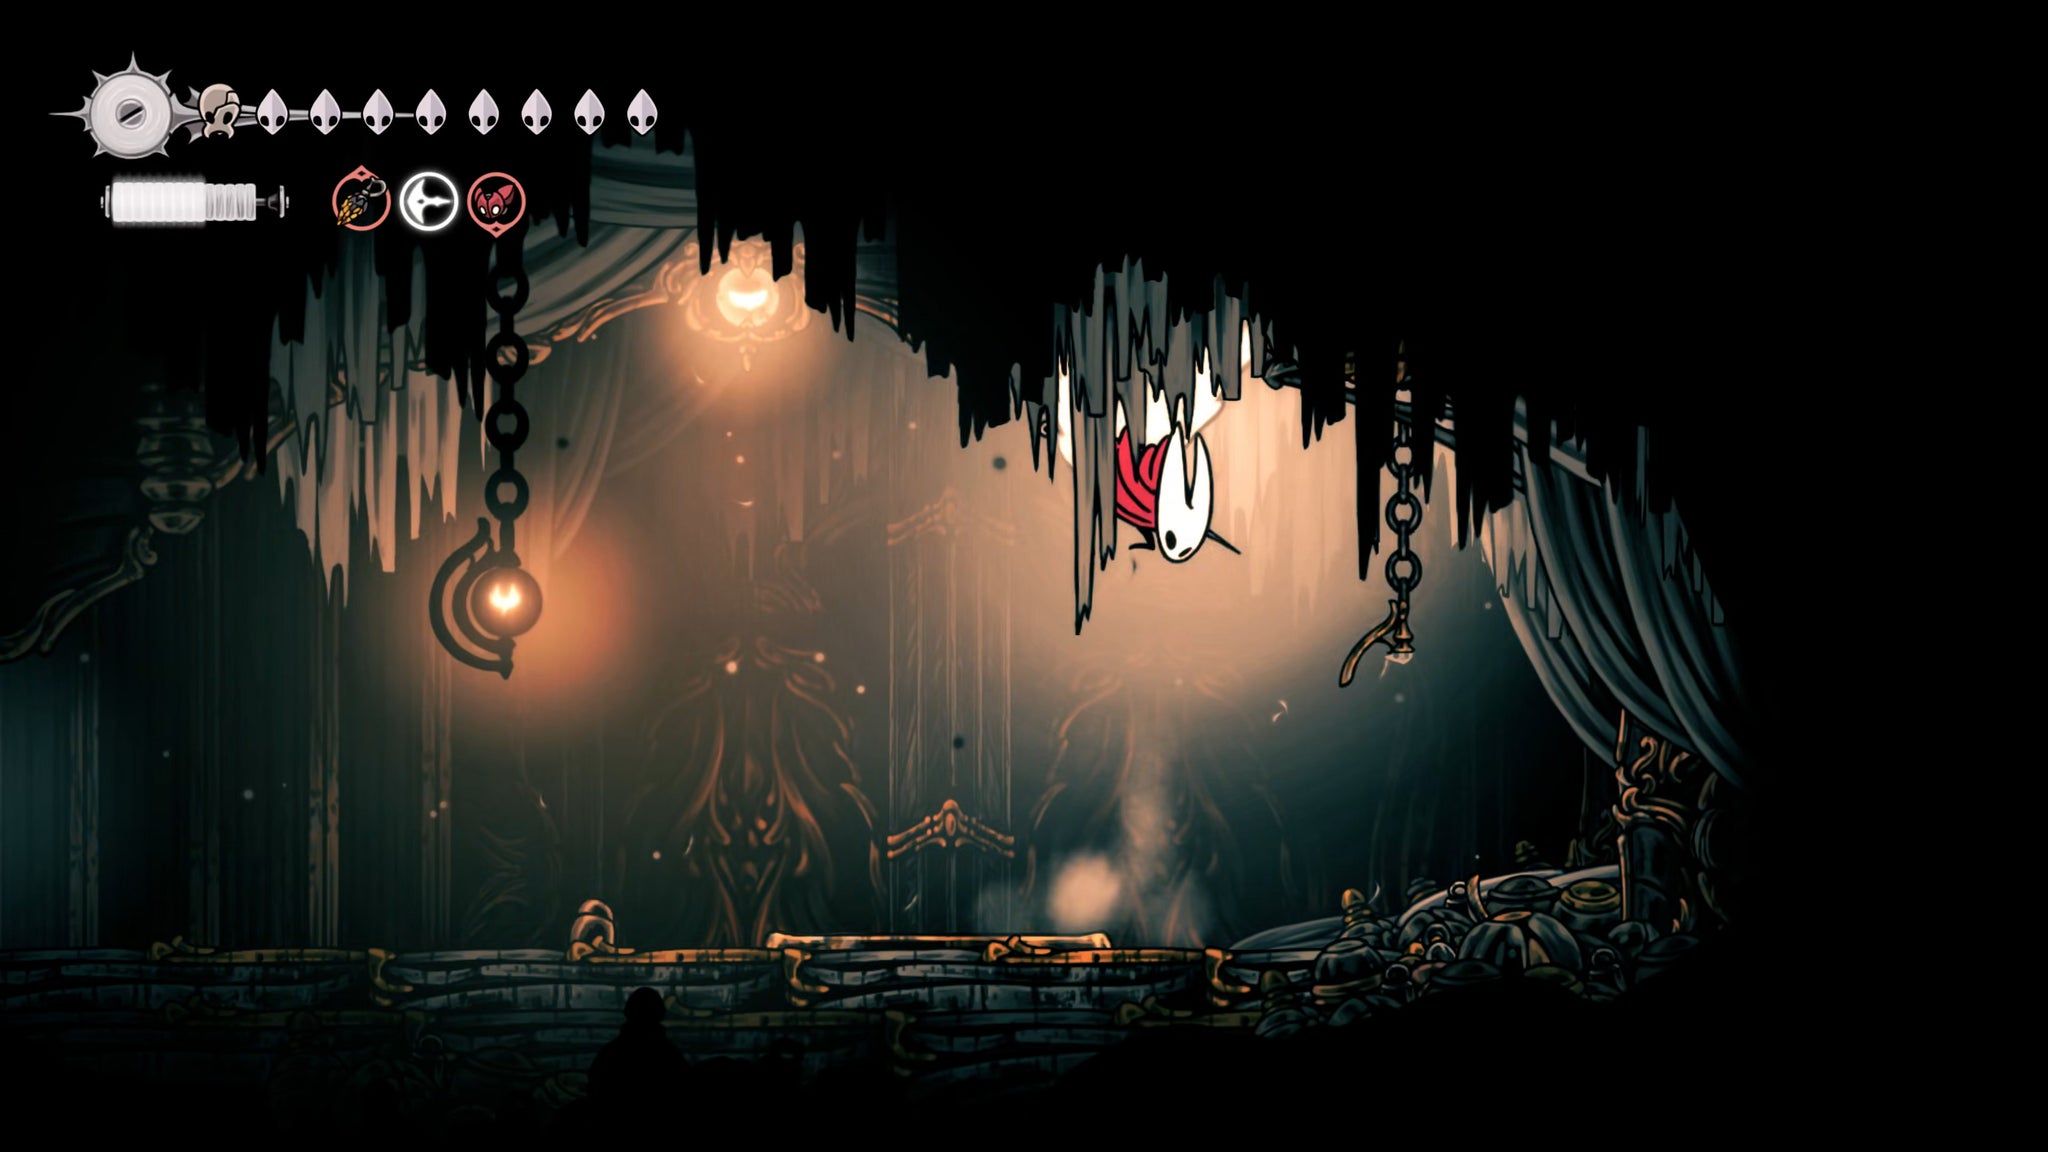

From here, double-jump up towards the tattered cloth hanging from the ceiling on the right-hand side, and you'll be able to climb up to a secret passageway that leads outside the Memorium.
Once you're on the balcony outside, jump over the rails to the path below, and continue down it until you find Jubilana. She's under attack by several Drapeflies and even larger variants called Drapelords. Your Cogfly will come in handy here. Defeat the two waves of enemies, and then speak with Jubilana to complete the Lost Merchant quest.


With Jubilana saved, continue heading to the right-hand side of the path, and once you reach the wall, jump upwards at an angle to reach the upper levels of the wall. Near the top, you'll find a section that is breakable. Tear through it, and follow the path beyond the spikes to reach the last region we'll explore before finishing the main quest of Act 2: the Putrified Ducts.


The Putrified Ducts are, I'm sad to say, like an even nastier version of Bilewater. Thankfully, it's nowhere near the same size, so it shouldn't take us too long to get to the far end of it. Join us in Part 31 of our Silksong walkthrough to take the best possible path through the dank and dangerous waters of the Putrified Ducts.
Read this next
- Ahead of Hollow Knight: Silksong's Sea of Sorrow expansion, Team Cherry have gotten their Traditional Chinese and German translation ducks in a row
- We may have glimpsed Silksong's Sea of Sorrow expansion in a six-year-old trailer
- Hollow Knight: Silksong's first big expansion, Sea of Sorrow, flows into our lives for free next year
