
Hollow Knight Silksong walkthrough: Part 14 (Blasted Steps)
It's time at last to end Act 1...


Trying to make your way up the Blasted Steps in Hollow Knight: Silksong? The Blasted Steps are a very intimidating place to find yourself in - even more so when you find out what's awaiting you at the top step. But a methodical approach and the right progression path through the Blasted Steps can make it far more manageable, and all but guarantee plain sailing to the end of Act 1.
Hot on the heels of last chapter's Weavenests, Part 14 of our Silksong walkthrough guides you through the entirety of the Blasted Steps, highlighting every hidden area, collectible, NPC, and boss fight along the way.
Want the walkthrough for a different area of the game? Check out our Hollow Knight: Silksong walkthrough hub!
Blasted Steps walkthrough steps:
- Find the edge of the map.
- Collect the Memory Locket from the first room.
- Buy the Blasted Steps map from Shakra.
- Collect the Silkeater in the secret room.
- Unlock the upper Bench and Bellway.
- Defeat the Great Conchflies.
- Learn Needle Strike from the Pinstress.
- Meet Lumble The Lucky.
- Kill the Squirrms.
- Rescue the Flea.
- Collect the Craftmetal below the sand dunes.
- Defeat the Last Judge.

1. Find the edge of the map.
Fast Travel to the Shellwood Shellway and rest at the bench there. Then head left over the gaps in the next couple of rooms to enter the Blasted Steps region.
It's not necessary, but to satiate your curiosity I'll tell you right now to head all the way to the left, as far as you can go.

Eventually, you'll hit a point where Hornet will stop, and recall that this is the way she was brought in by her captors in the opening cinematic (and is, therefore, the way out of Pharloom itself). She won't let herself leave yet, while her objective remains unfulfilled.
Congrats though - you've discovered that the incredibly vast world of Hollow Knight: Silksong does indeed have a border. It's a grounding feeling, no?
2. Collect the Memory Locket from the first room.


Head back until you reach the metal plate underfoot, then follow the path above you to reach the proper entrance to the Blasted Steps. You'll find a Bench at this starting point which you can pay 80 Rosaries to open, although to be honest, if money is tight, don't bother. The Bench near the Shellwood Bellway isn't so terribly far away.
Two things to understand about the Blasted Steps terrain, going forward. First: the sand is infested with worms, and effectively acts as double-damage spikes. Second: there's a periodic strong wind blowing east, which affects Hornet's movement while floating with the Drifter's Cloak.

That understood, head across the ledges to the left and then upwards. You'll meet the first Blasted Steps enemy, called a Judge. These guys are generally more trouble than they're worth to stay and fight, but if you must, Pogo-ing off their heads does do the trick.
Jump to the lower-left ledge from the Judge. If you head down the hole here, you'll find little more than a couple of meagre Shell Shard caches guarded by Pharlids (spiders). Head upwards for the main path, where you'll fight a few possessed Pilgrim enemies.

Pogo off the hanging bronze balls to continue to the right, and check under the ledge for a lever. You can drop and dash to reach it, and pulling the lever simply drops a platform that allows you a shortcut up this room for next time you need it.
Continue on, and when you start to see the ceiling right above you, look down and you'll see a lower area where an item is blinking atop a Pilgrim's corpse.


Drop down the far-right side of this ledge and then jump over the gaps to collect the Memory Locket waiting for you. Then climb back up and head into the next room to your right.
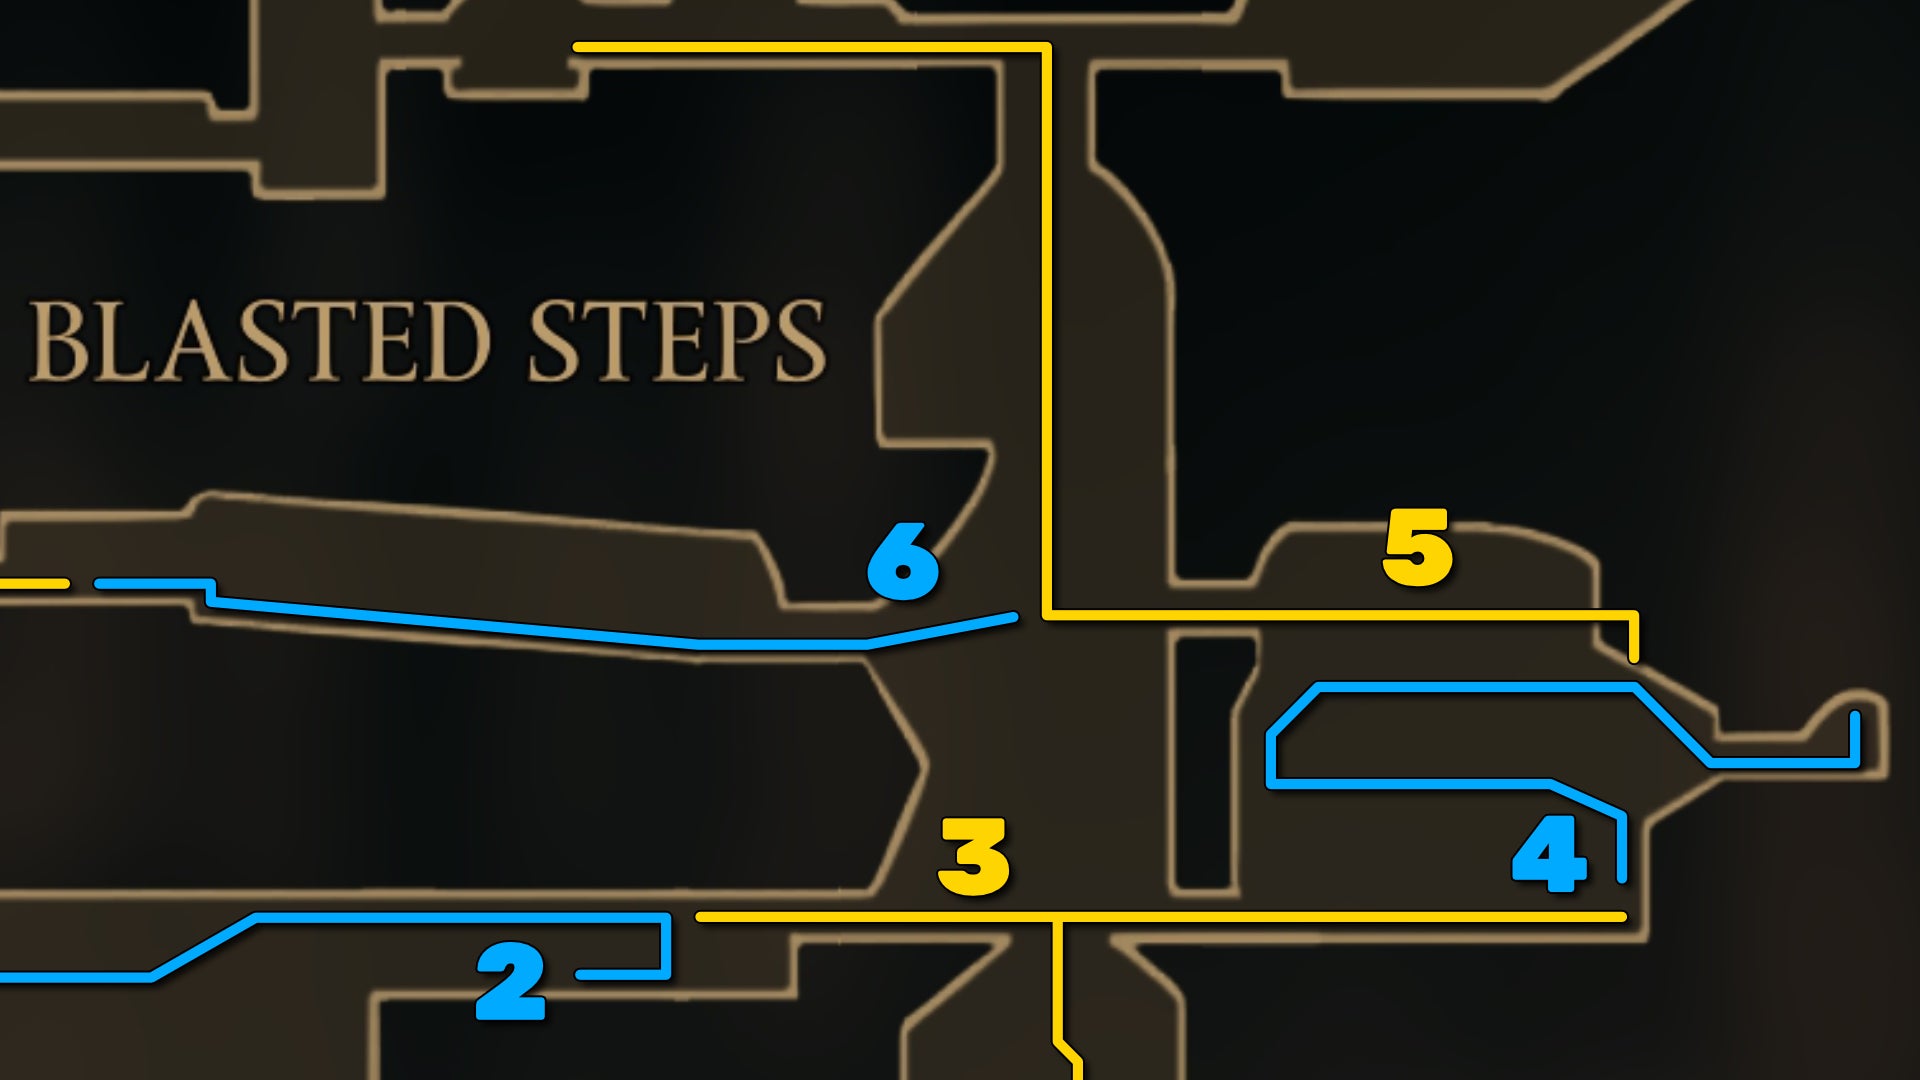
3. Buy the Blasted Steps map from Shakra.


In the next room, take a few steps forward to proc the unveiling of a new (and very irritating) enemy: the Driznit. These flyers fire projectiles which bounce diagonally in often-hard-to-read ways, so treat each one you find slowly and carefully.
Once it's dead, drop through the gap in the floor, and you'll find a body in a cage that you can loot for a Frayed Rosary String. Then climb back up and head to the next room.

Jump the next gaps across the sand, and you'll find the lovely Shakra waiting for you. Exhaust her dialogue, and buy her Blasted Steps map for 70 Rosaries.
4. Collect the Silkeater in the secret room.
From Shakra's position, climb the walls above her and carefully dispatch another Driznit, then follow the path up to another Judge-patrolled platform, followed by one guarded by more Pilgrims.


Go to the right-hand side of this latest platform, and jump down to the ledge on the right with the Rosary cache. Mind the boulder that tries to land on you as you do this!
Collect the Rosaries, and destroy the wall to your right for a little secret passage containing another Silkeater inside a spider egg.
5. Unlock the upper Bench and Bellway.

Wall-climb back up to the previous ledge, and then climb higher up and jump over the spikes. Follow the path to the exit on your left, and in the next room spend some time climbing the hanging cages. If you head to the left fairly immediately, you'll see a lever you can flick to bring the cages to more agreeable climbing heights.


Climb all the way to the very top where the wind quietens, and head to the left. You'll quickly find a Bench to unlock, and sitting next to it is Sherma! Exhaust his dialogue for more adorably misguided optimism, then unlock the Bench for 60 Rosaries and rest at it. A little further to the left, you can also unlock the Blasted Steps Bellway for 80 Rosaries.
6. Defeat the Great Conchflies.
Once you've rested, head back down the shaft you just traversed with all the hanging cages, and hang a left as you go. About halfway up the shaft is a walkway to your left, guarded by more Driznits. Try not to expend too much health dealing with them (I'd just run past them if I were you), because next up is a boss battle.

Head to the end of this path, and you'll be locked in an arena to face not one but a pair of Great Conchflies. Essentially giant Driznits, these guys. It may take you a minute to get used to their quick appearances and disappearances.
Note that they both look slightly different - one of them has only one eye visible. This is designed so you can keep track of which one's which, so that you can focus on one before the other. Once you kill one, the other will run away and the fight will be won.
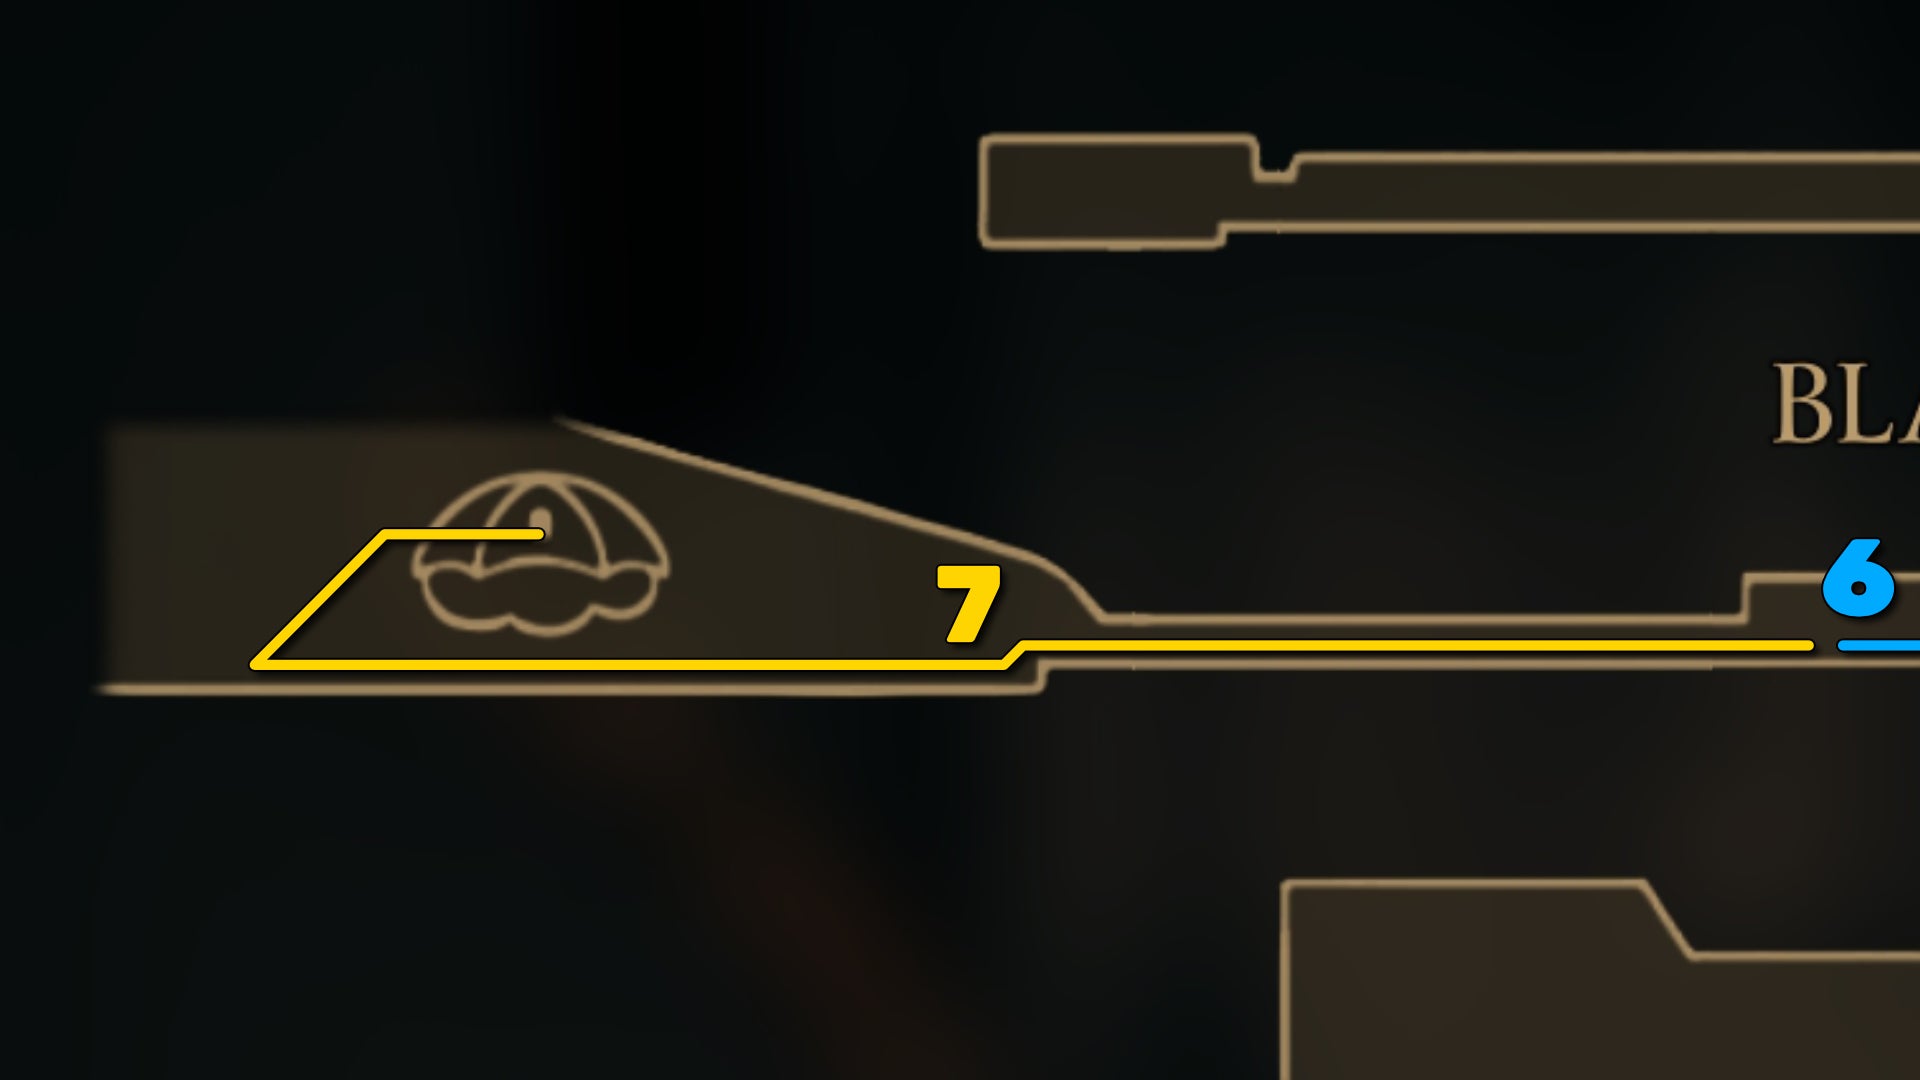
7. Learn Needle Strike from the Pinstress.

After killing the Great Conchflies, exit to the left, and you'll come to a new room where you must take a running jump to reach the next ledge just off-screen. Continue in this manner to the end of the path, and you'll find a blue balloon home quite reminiscent of the Seamstress's home in Far Fields. Enter it to meet the Pinstress.
Discovering the Pinstress is a great boon to Hornet. Exhaust her dialogue, and agree to train with the Pinstress to unlock a new skill: Needle Strike. This skill allows you to hold down your Attack button to charge up a more powerful strike. It's useful only in certain situations, as many of Silksong's enemies don't give you enough of a window for that kind of attack, but it's another valuable quiver to your bow.
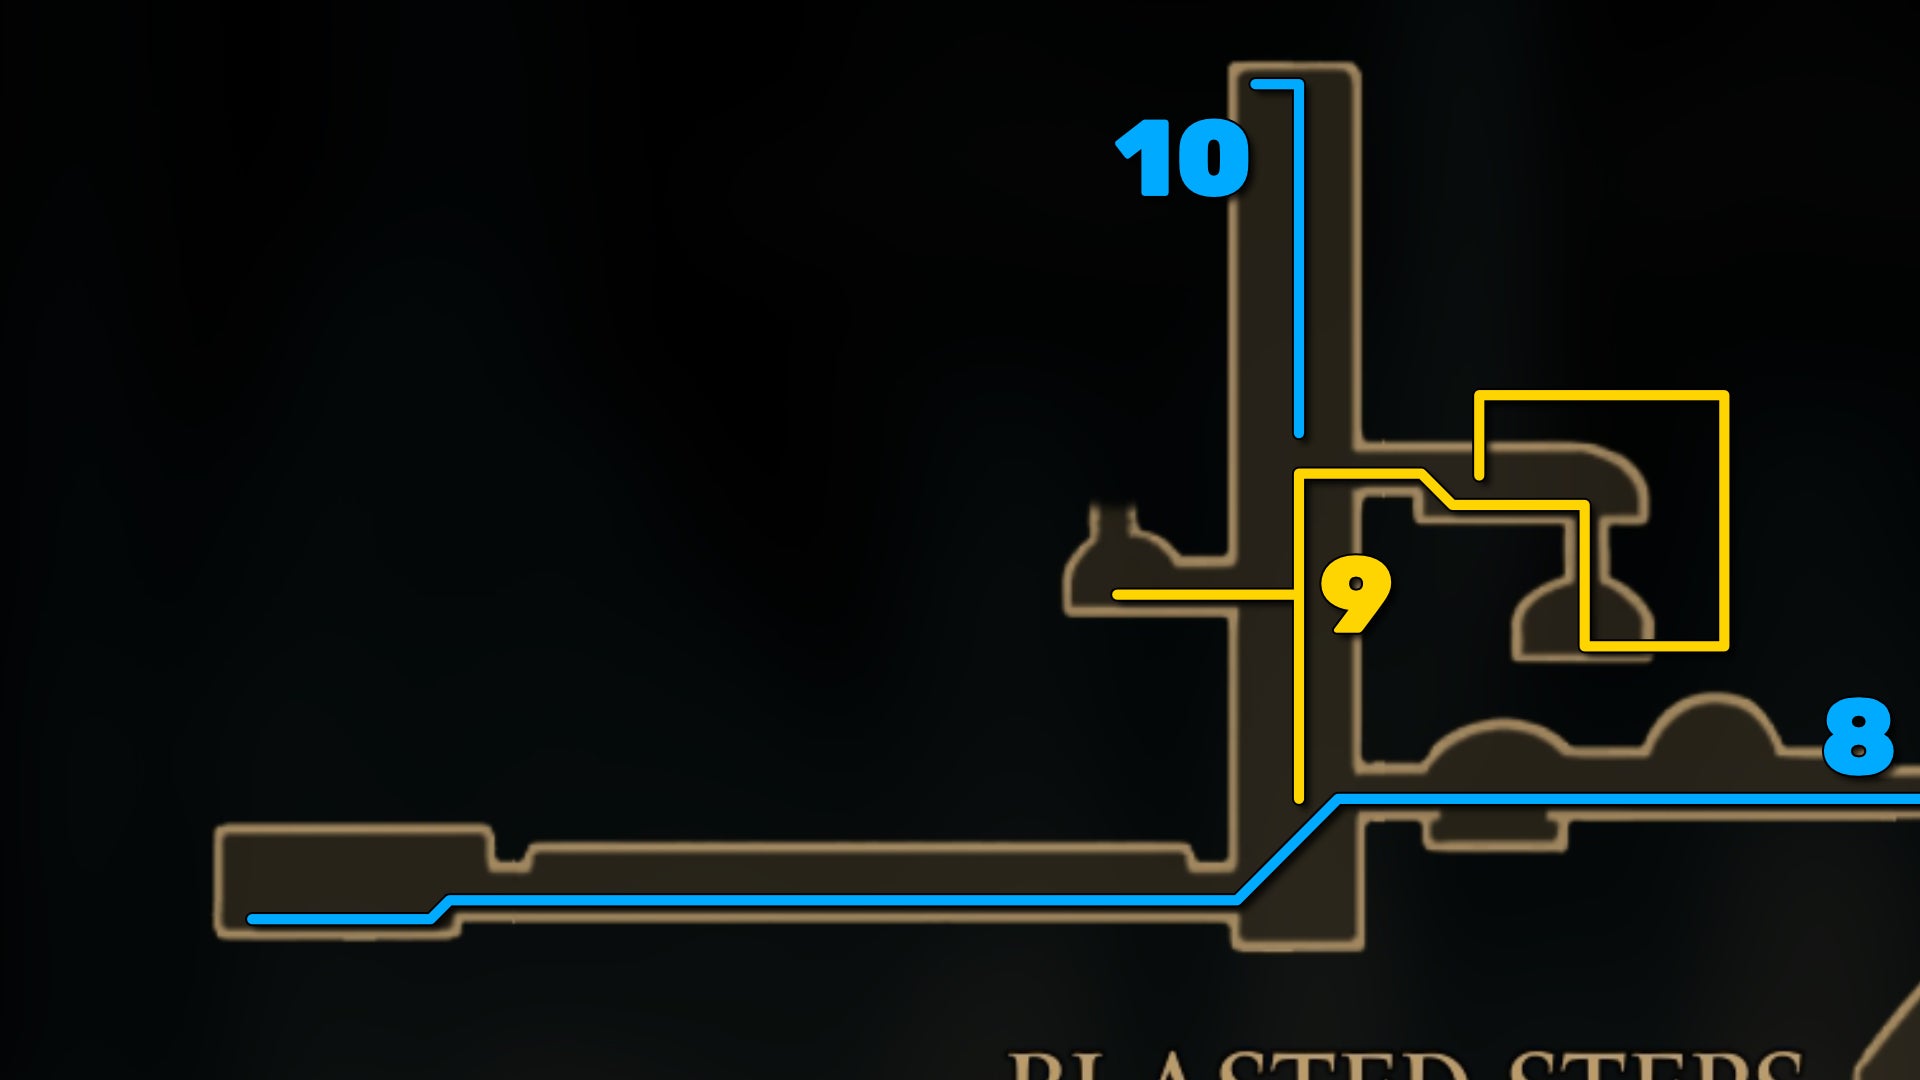
8. Meet Lumble The Lucky.
Head back through the Great Conchflies arena, and climb up to rest at the Bench by the Bellway again. Then jump over the Bellway and exit to the left.
In this secondary shaft of hanging cages, drop down to begin with and head through the ground-level exit. Follow this path for a wonderful interaction with a new NPC named Lumble The Lucky. If you exhaust Lumble's dialogue, he'll suggest playing some Dice. All it amounts to is a random chance to gain or lose 5 Rosaries, but it's still a lovely moment. Playing Dice at the end of the world.

9. Kill the Squirrms.
Next up, return to the shaft and head to the next exit above, with the cloth sign by it. As you enter this room, for a moment you'll see Grindle - the prisoner you rescued from that cell in Deep Docks - before he sees you and scarpers upwards, where you currently can't follow.


Fair enough! Head back, and climb a bit further up until you reach a ledge on the right-hand wall. Attack the wall until it breaks, and pass through it.
In the next room you can read a bit of lore from the plaque in front of you. Also notice the strange creature noises emanating from below. Drop down the hole into the sand, and you'll see the source of these noises - some new types of worms - before they promptly hide.
This is actually the only place in Silksong where these particular enemies can be found, so if you wish to add them to your Hunter's Journal, play your Needolin for a few seconds until they appear in order to sing a choir to your music. Then brutally cut them down, for they are naught but worms! The best way to kill them quickly is using Thread Storm.

That done, head through the passage to your right and follow the path up and around. You'll find a big Shell Shard statue there for you to break, along with a drop that takes you back to the lore plaque.
10. Rescue the Flea.

Before you think about heading back, climb all the way to the top of this shaft you're in, dodge-jumping over all the spikes as you go. At the very top you'll find another sweet little Flea to rescue. Honestly, these guys are nearly as cute as the Grubs from the first game. They grow on me every time I encounter them.
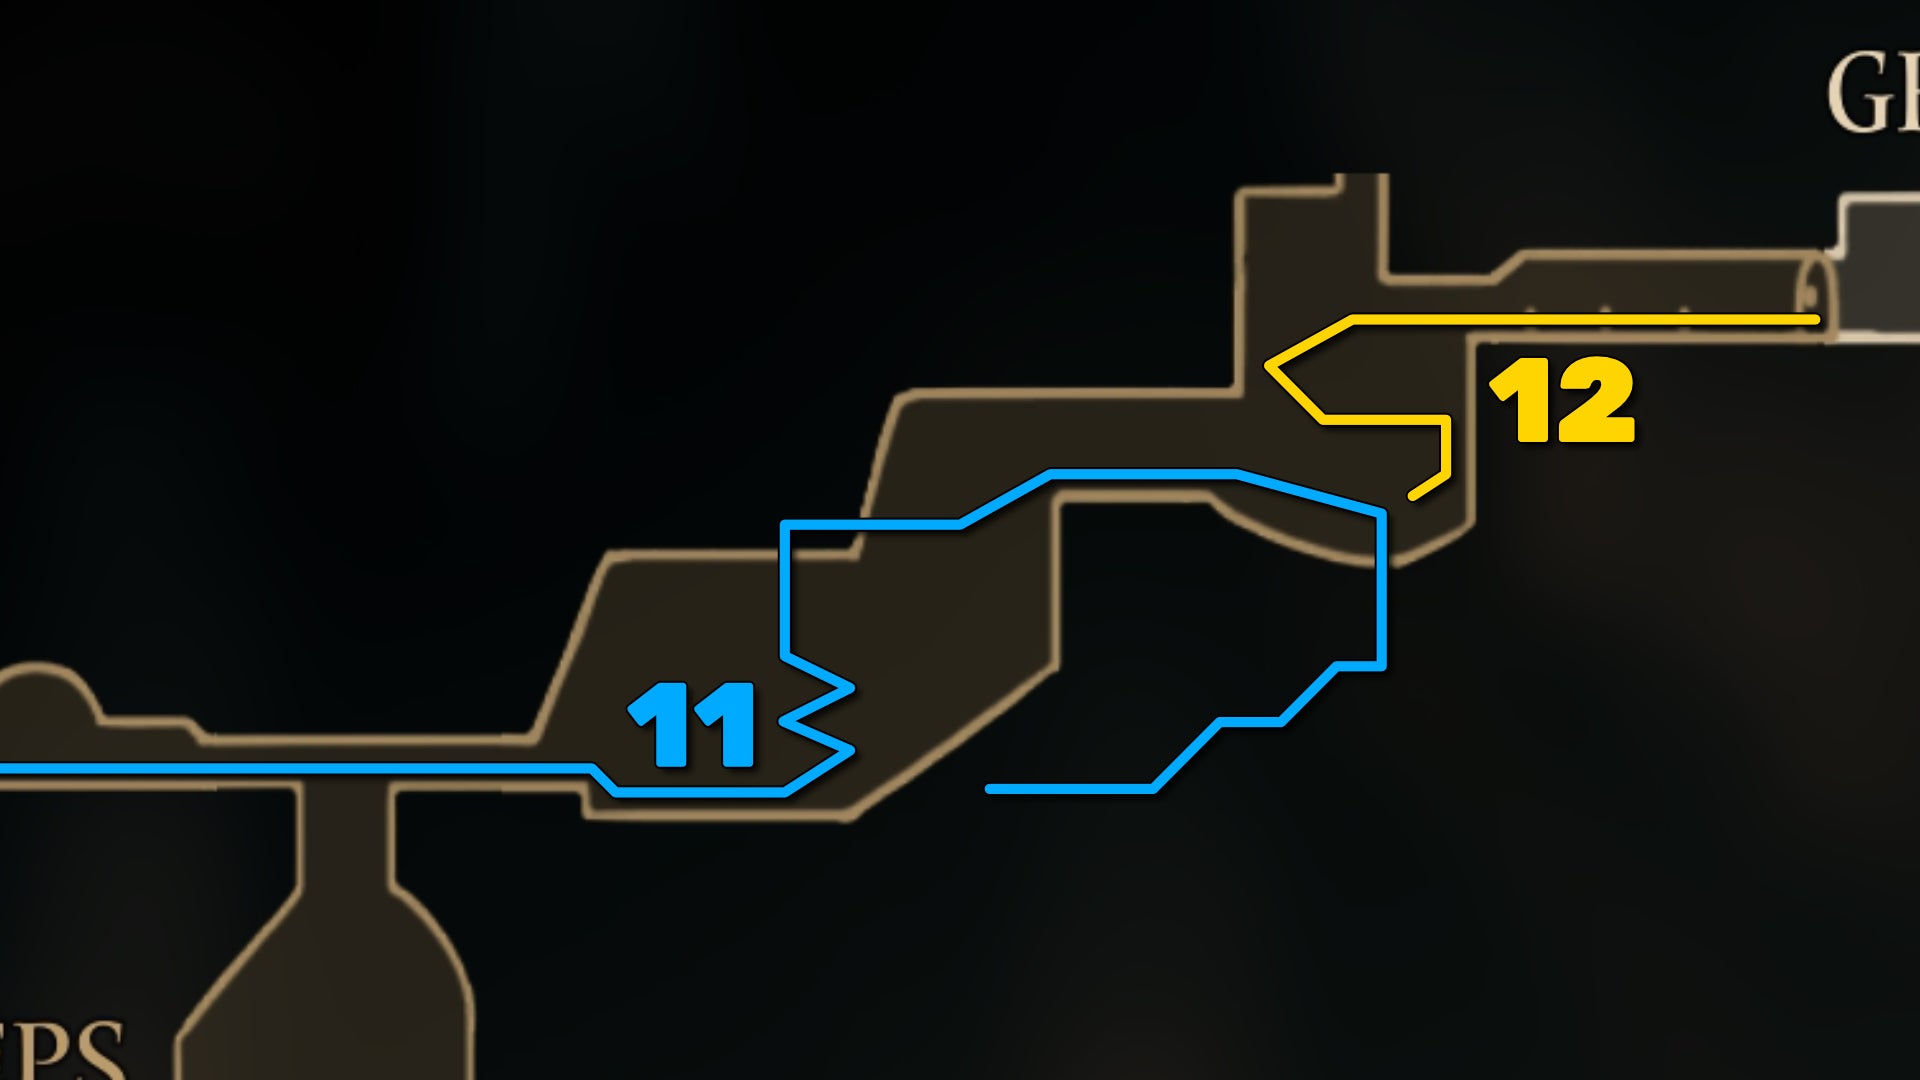
11. Collect the Craftmetal below the sand dunes.
You're nearly done with the Blasted Steps now. Return to the Bench by the Bellway, and rest once more if needed. Then progress to the east and exit off-screen. The large room beyond is a bit of a nasty parkour course, with plenty of enemies to contend with as well. At least the path forward is always fairly clear.

When you reach the two bronze balls at the far-right side of the room, float down between them instead of Pogo-ing off them and you'll find a secret tunnel down below the sand dunes. Take the first left-hand path to avoid landing in more worms.

Carefully follow this short path to the end, and you'll be able to collect another Craftmetal for upgrading your tool repertoire later on.
12. Defeat the Last Judge.
Make your way back out of the secret passage and Pogo off the bronze balls to continue along the main path. Again, the way forward is challenging, but fairly self-explanatory. As you near the end, you'll see a path straight upwards towards the ceiling, but it currently doesn't lead anywhere for you. You'll unlock it from above later on.


At the end of the room, exit to the right. You've at long last arrived at the Grand Gate. Speak with the Tall Pilgrim by the Gate to learn more about this task. This interaction unlocks a new main quest: Grand Gate. You need to have rung the large bells at five previous locations in order to unlock the Gate. These locations are:
- The Marrow
- Deep Docks
- Shellwood
- Bellhart
- Greymoor
Happily, if you've been following along with this walkthrough, you've already rung all five bells! The Tall Pilgrim will then tell you to simply play your Needolin in front of the Grand Gate to open it.
Unfortunately, the moment you start playing your Needolin, a big boss leaps out to meet you: the Last Judge.

There are two ways to get into the Citadel and reach Act 2. Defeating the Last Judge is one of them. Therefore, expect a pretty tough fight here!
The Last Judge wields a large ball and chain, and has three basic attacks at first: a downward slam, a circular area-of-effect attack, and a ranged throw of the ball, which can also hit you on the return as the Judge pulls it back. In Phase 2, all of these attacks will be upgraded to fiery and explosive variants, and she also gains a fast-acting charge which leaves behind gouts of flame on the ground. It's a bit of a hellish boss fight, I'll be honest.

What makes this particular boss much worse is that when you die, the runback from the Bench involves making your way through the entire previous room again. No, there's no way around it. Just avoid the enemies as much as possible, and you can minimise the annoyance of it to just 30 seconds or so of (admittedly dangerous and challenging) runback time.

If you're really struggling against the Last Judge: you may wish to consider your equipment and general preparedness for such a fight. By this point, I would want to have gathered at least 4 Mask Shards, and both the Fractured Mask from Mottled Skarr and the Plasmium Phial from Alchemist Zylotol. I'd also consider using the Pollip Pouch with any of your throwing tools, and then saving them for the second phase because that's when you're often forced to put distance between the Last Judge and yourself.
Eventually, you'll beat her. I promise. And once you've done that, you can enter through the gate for a momentous cutscene.

You've finally made it to the Citadel - and Act 2 has begun!
Where to, next? The only way is forward! Well, there are several other ways, to be honest. And we actually won't be going forward quite yet. I lied. Next up in Part 15 of our ever-expanding Silksong walkthrough, we're off to Sinner's Road.
Read this next
- Ahead of Hollow Knight: Silksong's Sea of Sorrow expansion, Team Cherry have gotten their Traditional Chinese and German translation ducks in a row
- We may have glimpsed Silksong's Sea of Sorrow expansion in a six-year-old trailer
- Hollow Knight: Silksong's first big expansion, Sea of Sorrow, flows into our lives for free next year
