
Hollow Knight Silksong walkthrough: Part 9 (Shellwood)
Here's how to follow the ideal path through the mysterious Shellwood


Looking for a walkthrough for the region of Shellwood in Hollow Knight: Silksong? The entire reason for making your way through the Wormways in the previous part of our walkthrough was so we could reach the Shellwood - home to hidden creatures galore, as well as a frightful new boss, and a brand new and game-changing movement skill.
In Part 9 of our Silksong walkthrough, we'll guide you down the optimal route through Shellwood, pointing out key locations such as Mask Shards, and all the Pollip Hearts you need to complete the mysterious Greyroot's quest!
Want the walkthrough for a different area of the game? Check out our Hollow Knight: Silksong walkthrough hub!
Shellwood walkthrough steps:
- Defeat the Covetous Pilgrim.
- Find Shakra for the Shellwood map.
- Rest at the Bellhart Bench.
- Survive the Gauntlet to the north.
- Find Greyroot and accept their quest.
- Pollip Heart #1.
- Rescue the Flea amongst the white flowers.
- Collect the Mask Shard.
- Unlock the Bellway.
- Pollip Heart #2.
- Ride the elevator down and rest.
- Defeat Sister Splinter.
- Pollip Heart #3.
- Obtain the Cling Grip skill.
- Pollip Heart #4.
- Pollip Heart #5.
- Obtain the Longpin behind the Wasp Nest.
- Unlock the Bench west of the Bellway.
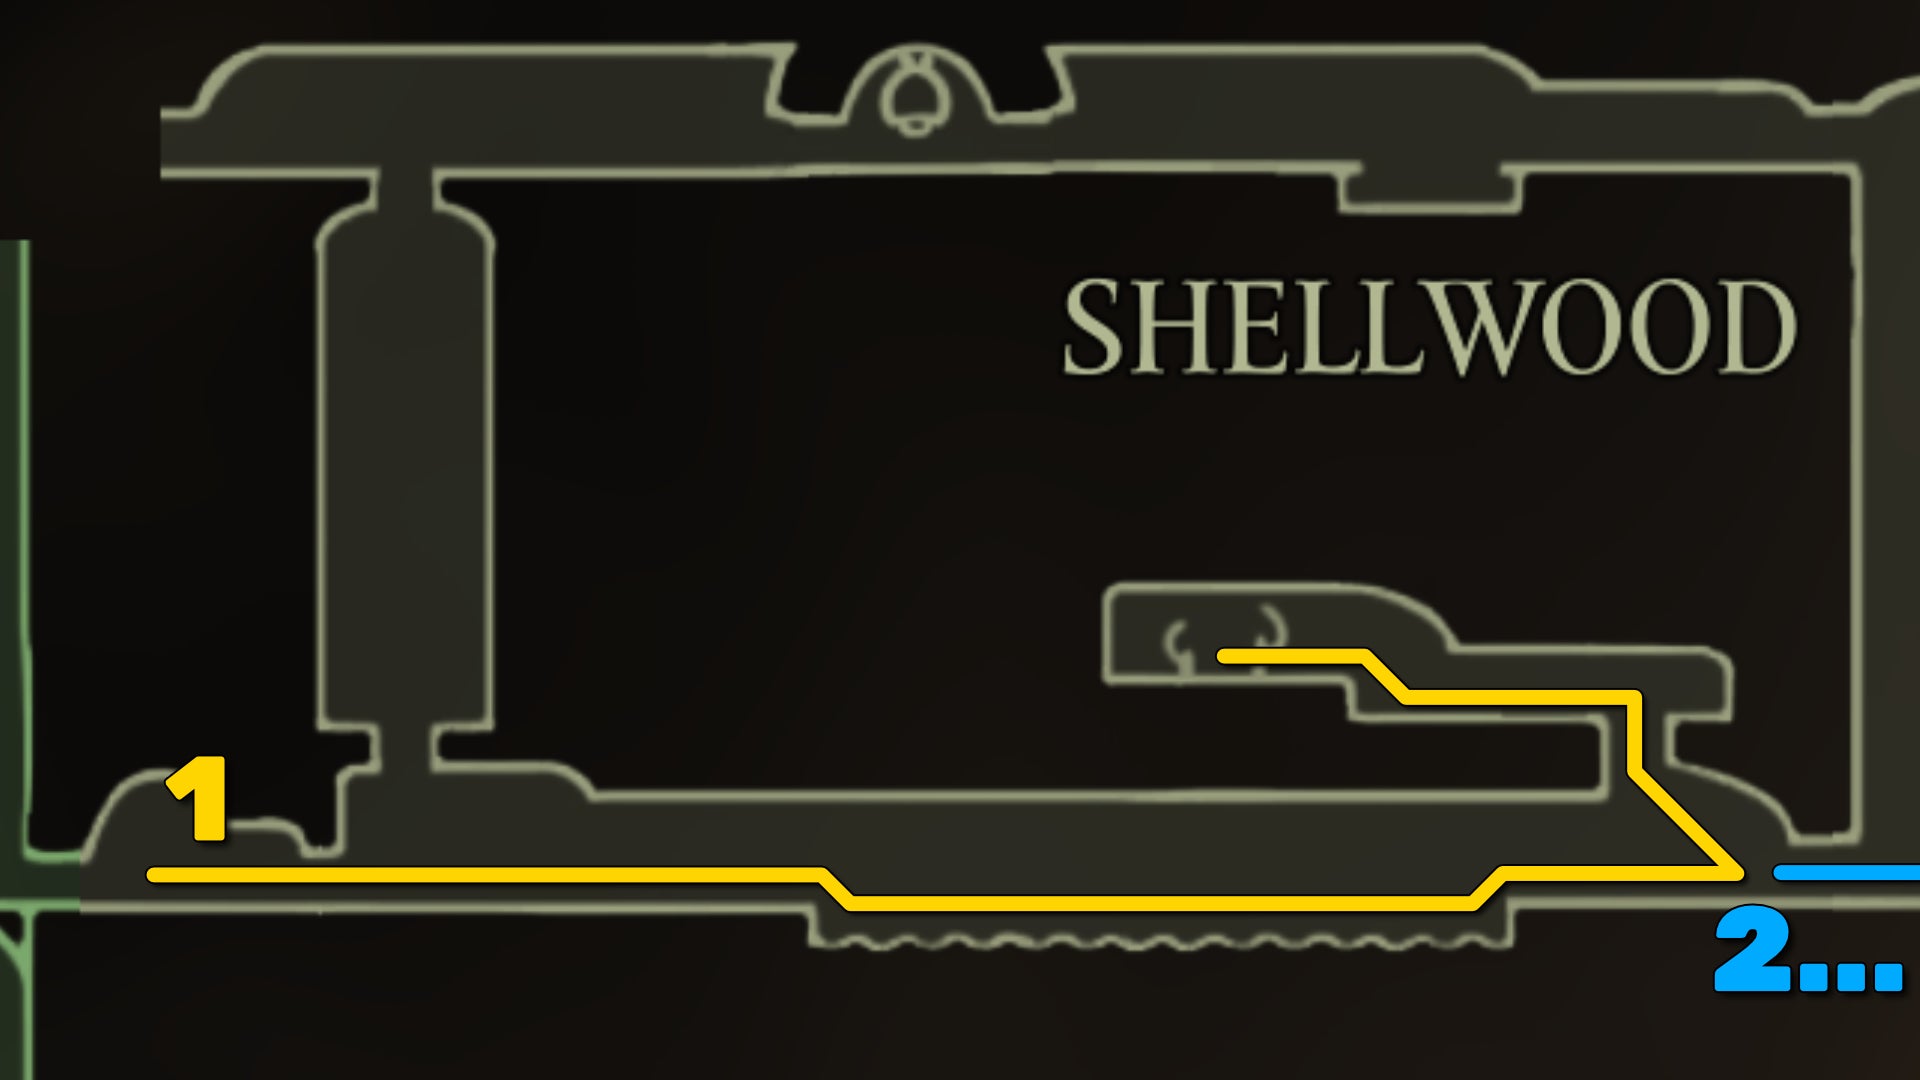
1. Defeat the Covetous Pilgrim.

From the Bench you last rested at, head right, into Shellwood itself. Make your way to the end of the room, taking care not to underestimate the flying Pondcatcher enemies. There's an element of slight randomness to the angle in which they throw their spears when they target you, so they can easily hit you despite your attempts to evade.
Once you reach the end of the room, use the hanging platforms to reach the room above you. Here you can read an inscribed tablet for some lore, before jumping up the ledge to face a large Covetous Pilgrim.

This big beefy Pilgrim uses a string of Rosaries as a whip. It has a surprising range, and deals double damage per hit, so take your time and make liberal use of ranged tool attacks to take it down safely. It'll burst into Rosaries when it does, so hoover all of them up before returning to the ground level of the first room again.

2. Find Shakra for the Shellwood map.
The next step is to procure the Shellwood map from Shakra, who is mercifully easy to find this time around. Head into the next room to your right, and run along the ground level all the way into the room beyond. You can Pogo off the white plants in this region, so employ this tactic to reach the centre of the room where Shakra is waiting.


Buy the Shellwood map from her for 70x Rosaries.
3. Rest at the Bellhart Bench.

Continue right into the next room, and again make your way along the ground level of the room, ignoring anything going on above you for now. Stand on the pressure plate at the end of the room to unlock the door leading further east.
Then, once again, head right along ground level, through the door, and past the bell-littered corridor beyond. As you enter the next room, you'll be treated to a rather disturbing cinematic, welcoming you to the haunted town of Bellhart.

We're not staying here. Once the cutscene ends, rest at the Bench right next to you, and then go back the way you came, through the corridor and into Shellwood again.
4. Survive the Gauntlet to the north.
Now it's finally time to start exploring upwards. Go back to the left-hand side of the room, and climb up the platforms above you. They'll lead you up, to the left, and then back around to the right. Keep an eye out for grey shells in the floors and ceilings; these are Shellwood Gnats - low danger, but they can still give you a point of damage if you're not careful.

Once you reach the point where you can't go higher, drop down a couple of ledges (and hit that silver bell hanging off the nearby platform for some Shell Shards). A little further down you can loot a Frayed Rosary String from a Pilgrim's body. Then keep heading across the platforms to the right and you'll find your way up to the exit in the top-left corner.


Drop down the hole in the next room and you'll land inside another gauntlet arena, where you must survive several waves of Shellwood enemies. Among them are a tricky new class of enemy - Splinters. These stick insects are fast-moving and dangerous, so you should try to keep your distance and employ hit-and-run tactics to keep yourself safe from them.

5. Find Greyroot and accept their quest.
Once the gauntlet is cleared of enemies, head up the passage to your left, and pay 60 Rosaries to unlock the Bench above you so you can rest.


Then exit out the left doorway, and activate the elevator cage, riding it down to the bottom of one of the rooms you skirted through earlier. Climb on top of the elevator once you're at the bottom, and use the ledge above to jump over to the left-hand side.
Continue climbing the platforms up the left side of the room, and you'll find an exit on the left which leads to a little cave, with a building of white light at the end.

Enter the building, and you'll find Greyroot - a new NPC of unknown origin, who gives you a quest to track down 6 Pollip Hearts from within Shellwood. These Pollip Hearts are extracted from the giant purple flowers strewn about the region. As we continue with the walkthrough, I'll highlight their locations so you can collect them all.
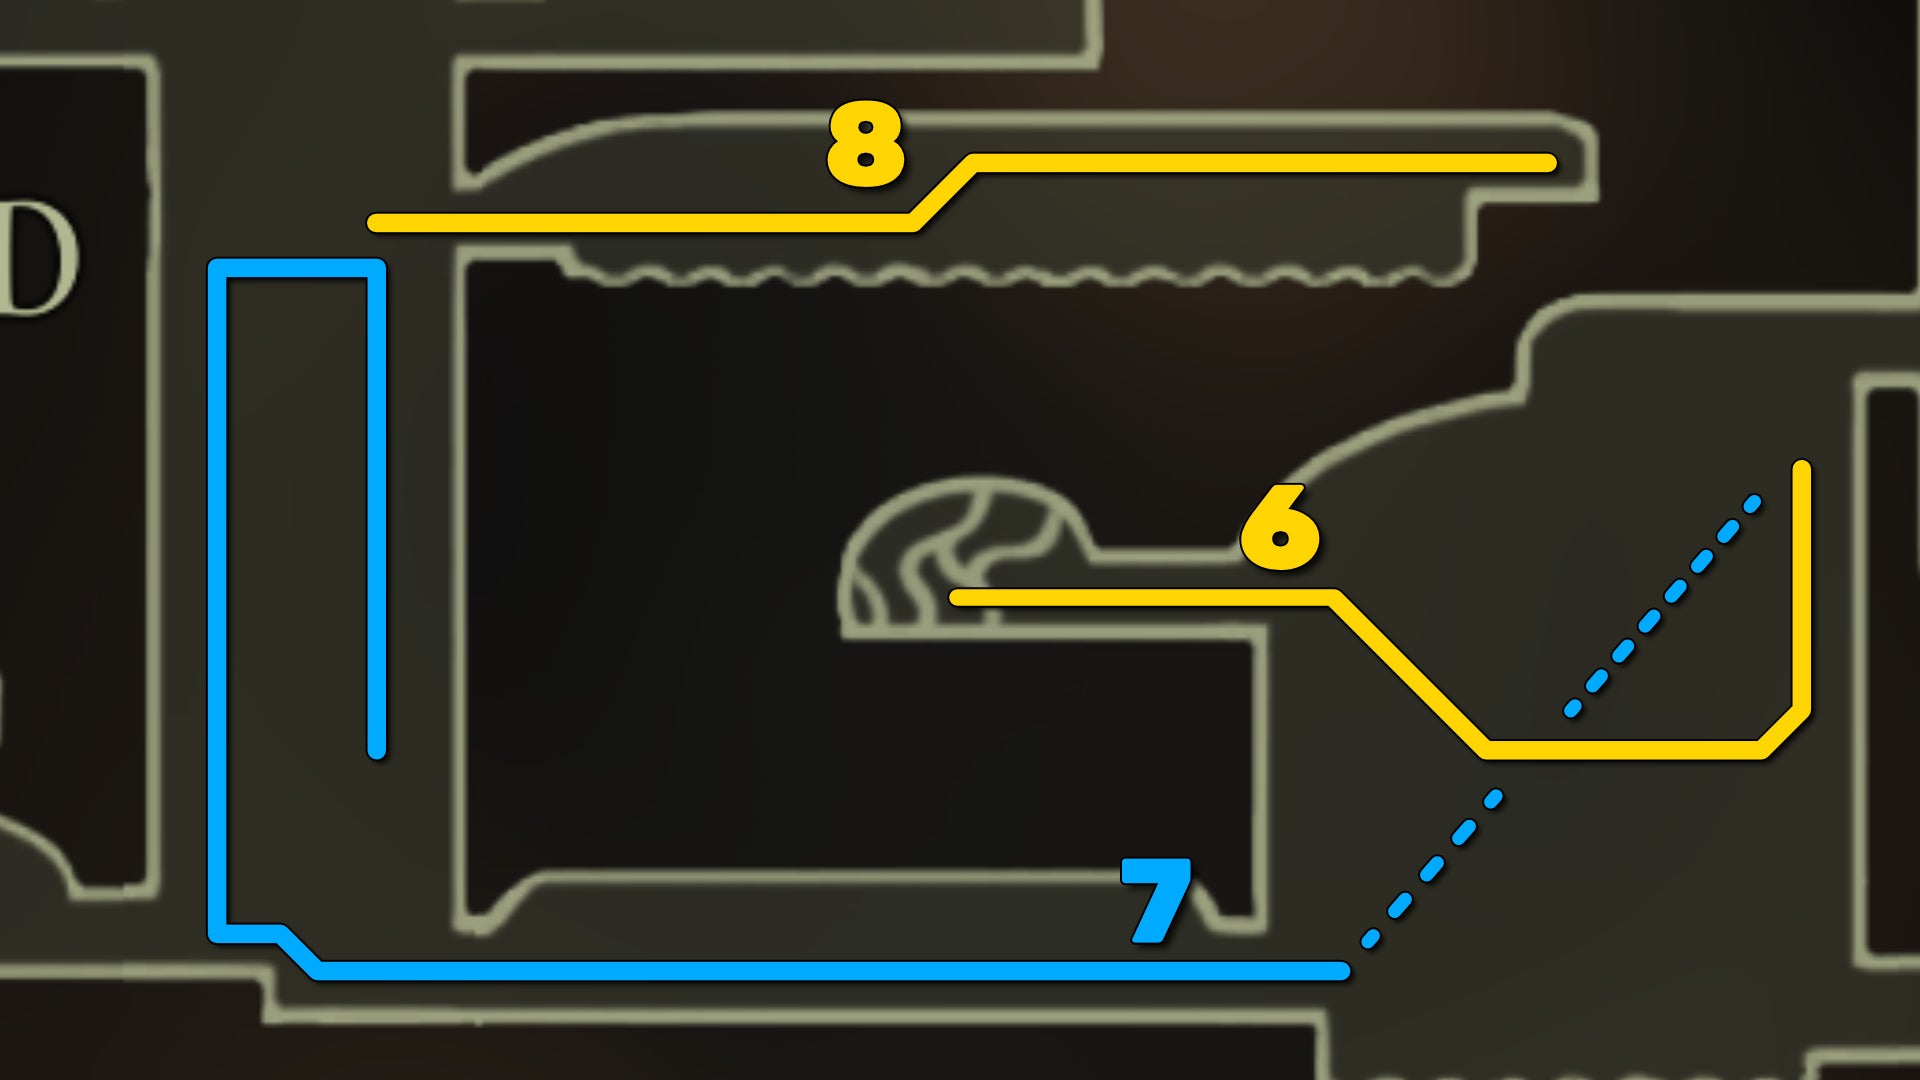
6. Pollip Heart #1.
The first Pollip Heart is very close by. Head back out into the main room and make your way to the centre of the room, where you'll see a Gnat floating around above a central platform.
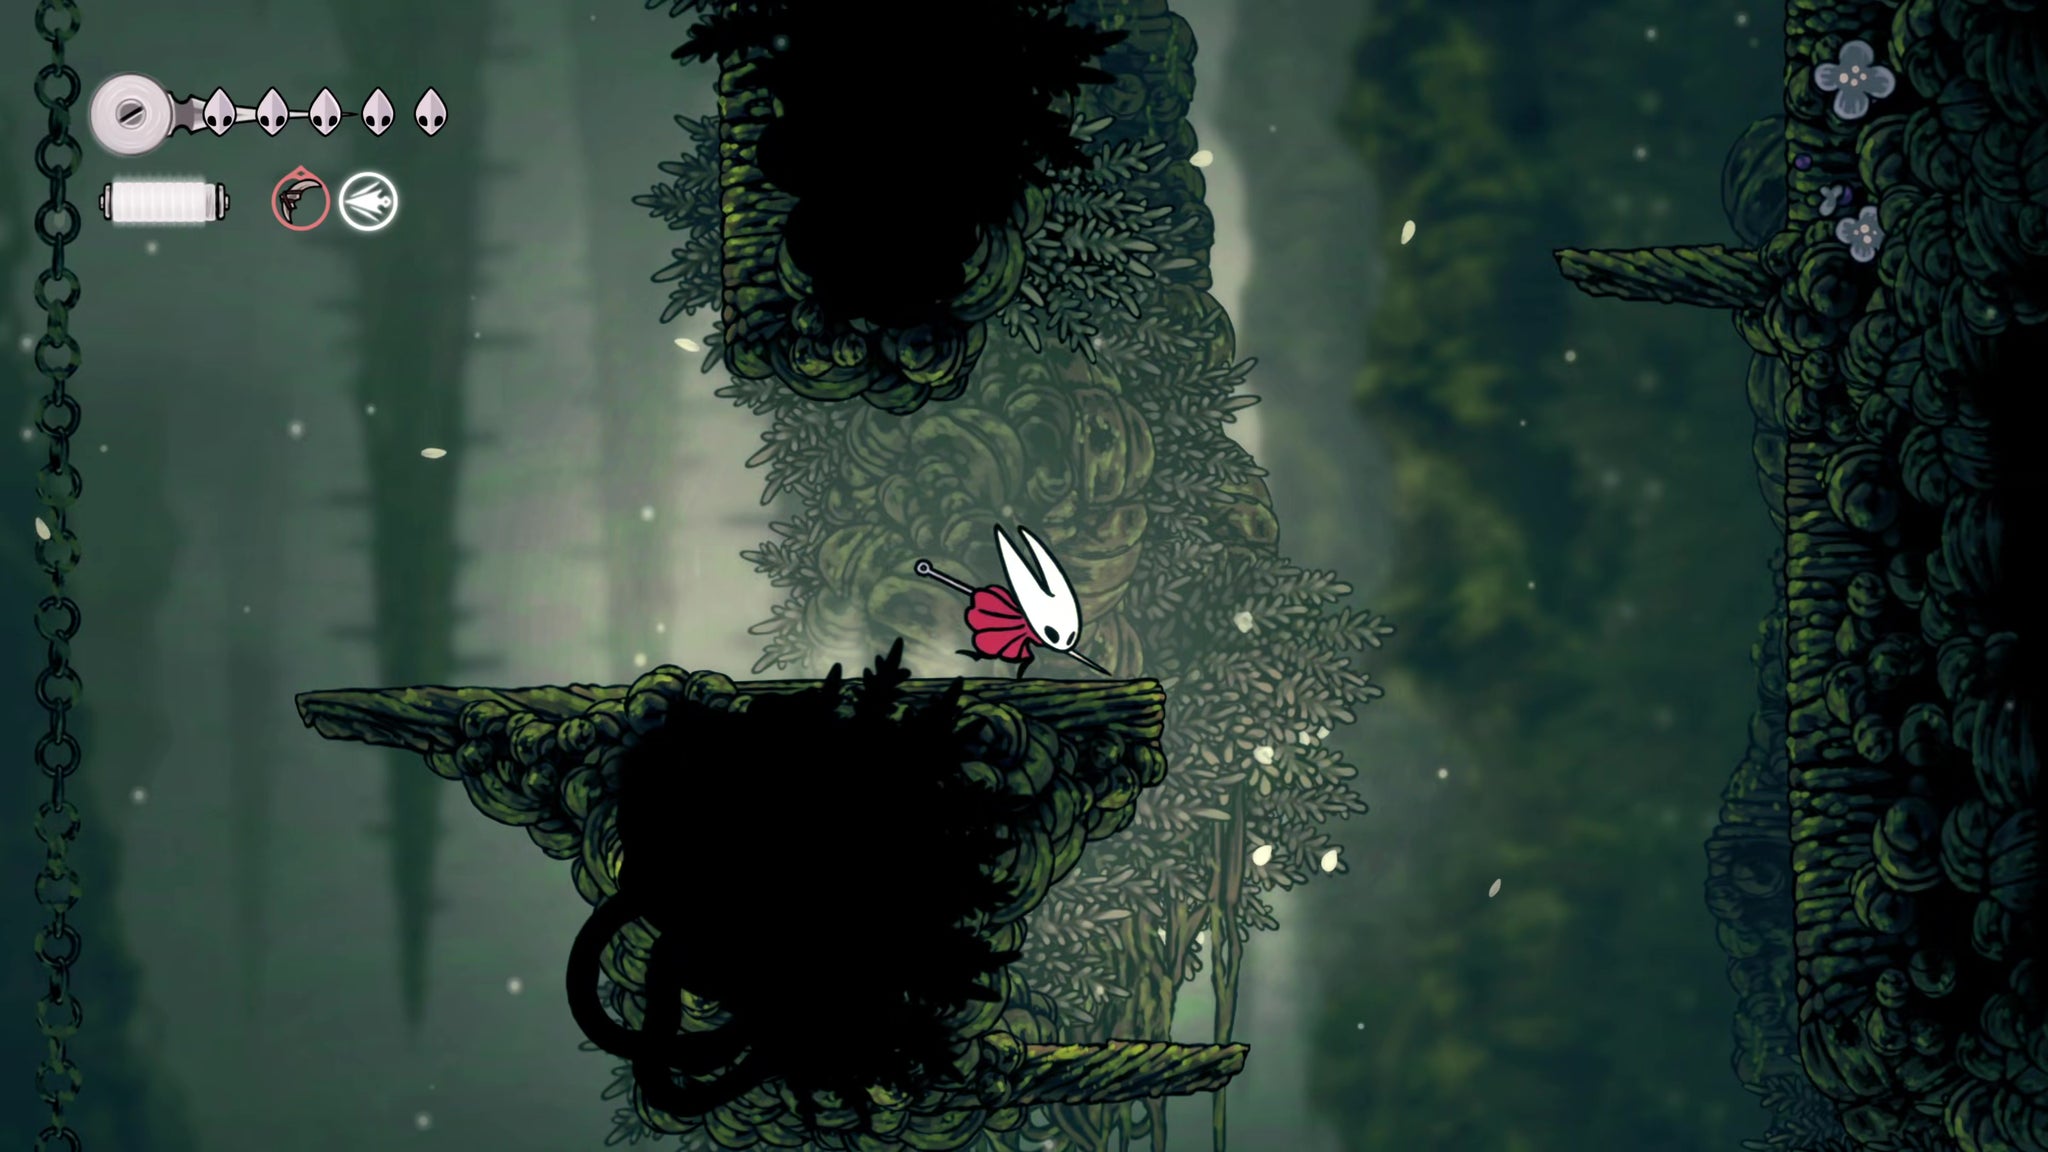

Go to the right side of this platform and use the ledges above you to climb upwards. Kill the nasty little purple Wood Wasps up there, and attack the purple flower to gain your first Pollip Heart.
7. Rescue the Flea amongst the white flowers.
Drop down to the bottom of the room and head left, past the next two rooms until you arrive at the large vertical shaft. Use the white flowers on the left side to Pogo your way up, and watch out for the flowers which turn into Phacia enemies as you draw near.

Once you're on the middle ledge, carefully drop down the right-hand side. On this side, you'll have to contend with Pollenicas - wall flowers which spit globules of yellow badness at you. At the bottom is a bed of spikes, and just above that, a Flea is trapped in a vine wall, opposite another Pollenica. Kill the Pollenica and free the Flea before climbing back up.

8. Collect the Mask Shard.
Once you're back on the central ledge, jump across to the exit on the right. Pogo across the next room and hack away the vines on the right to reveal the path further on. Keep parkouring to the very end of the path, where you'll find a Mask Shard.


On your way back several Phacias will spawn, so take your time and make liberal use of your Silkspear skill and ranged tools to take them out safely.
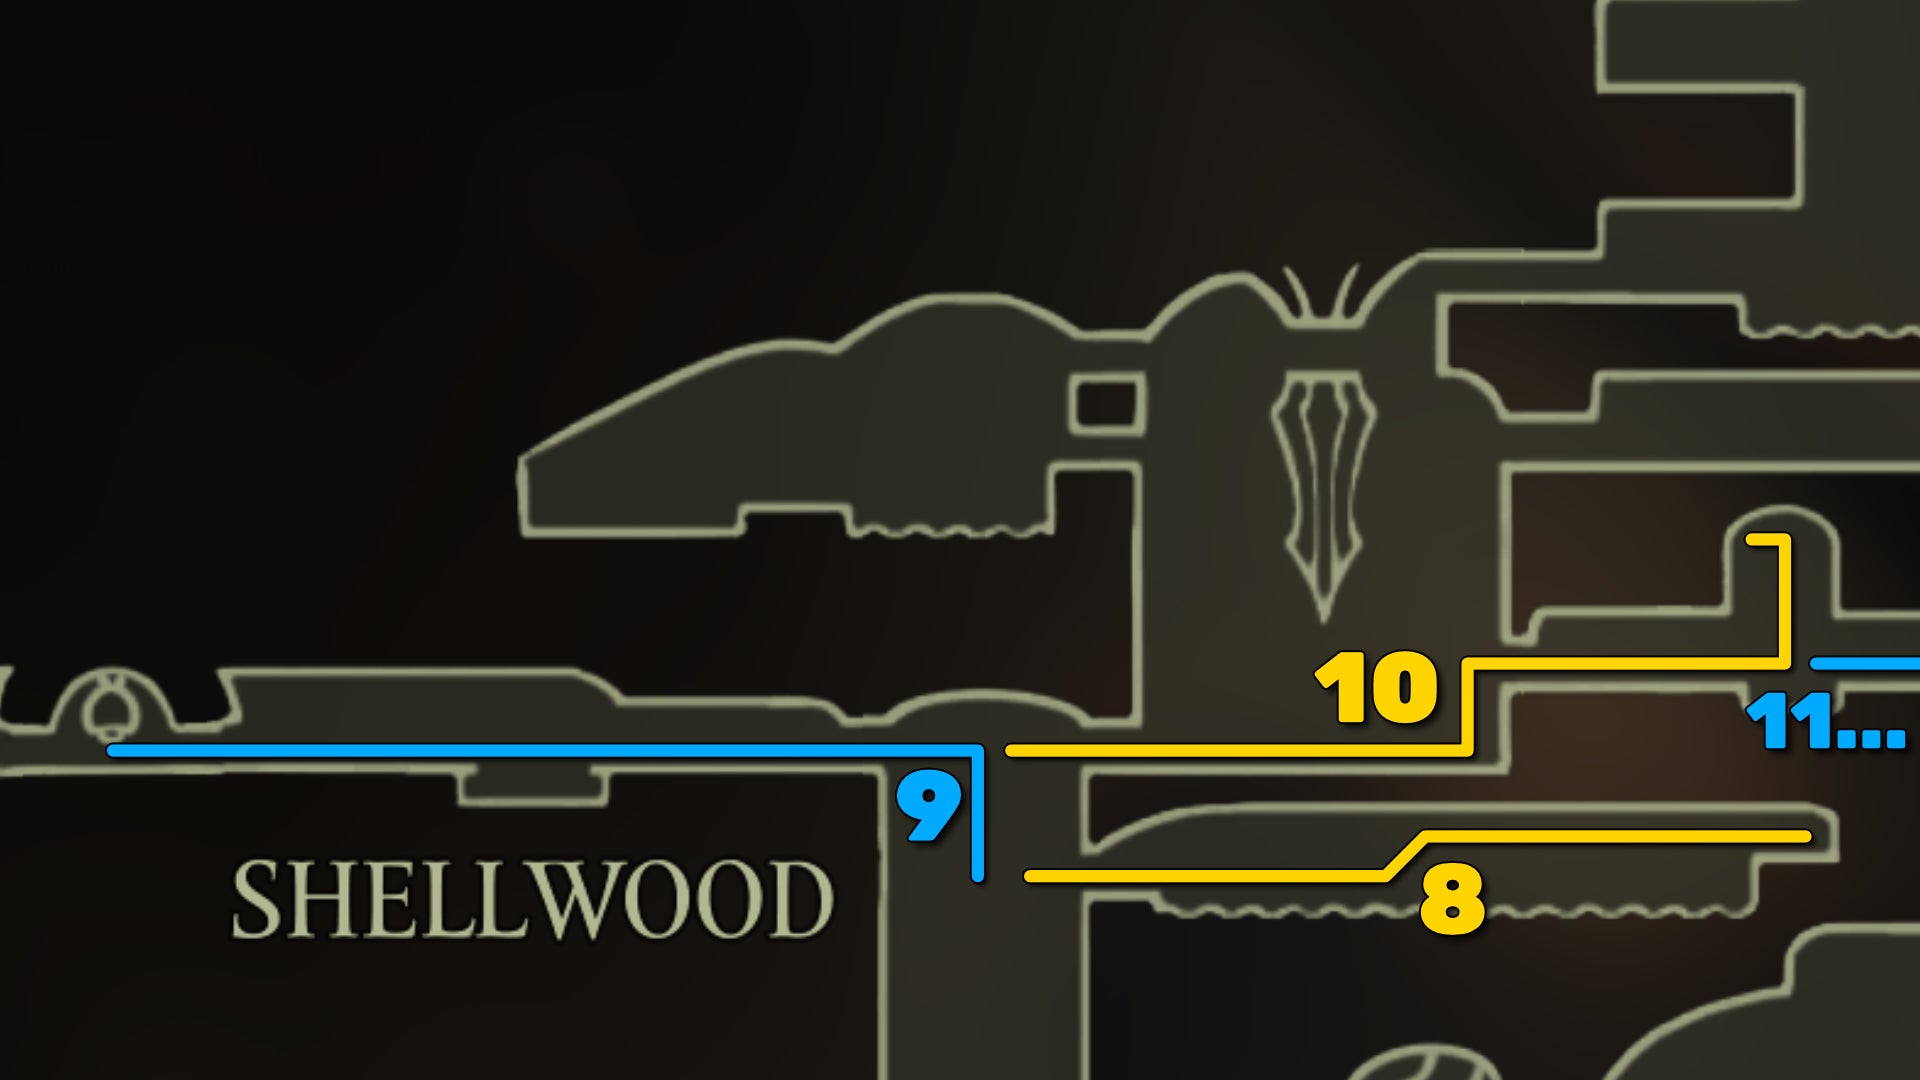
9. Unlock the Bellway.
Back in the vertical shaft, climb all the way to the top and take the exit on your left. Here you'll be able to pay 60 Rosaries to unlock the Shellwood Bellway.

Note that there's a locked door on the left side of the Bellway; you'll be able to reach the other side of it and unlock it in the final step of this part of our walkthrough.
10. Pollip Heart #2.
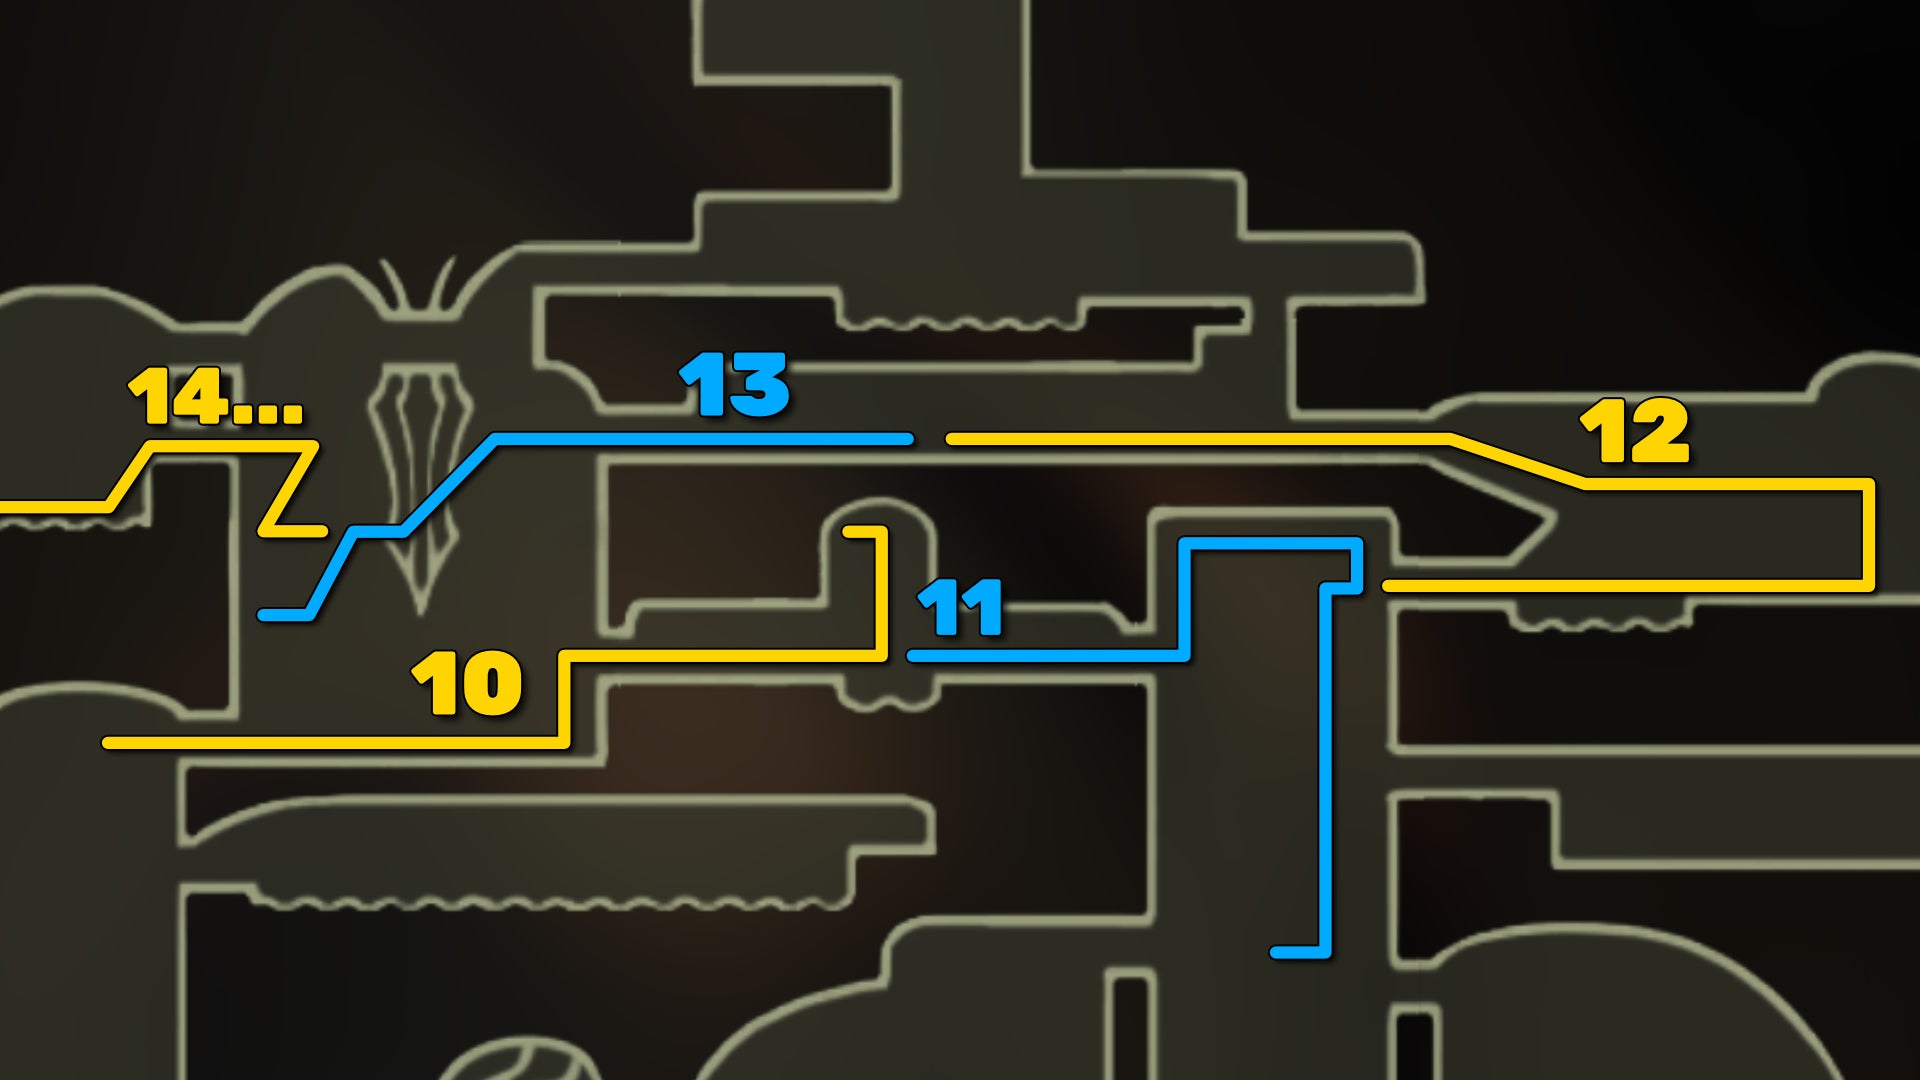
Head back into the main shaft and through to the room opposite the Bellway. At the far end is a group of ledges you can use to climb upwards to the next room.
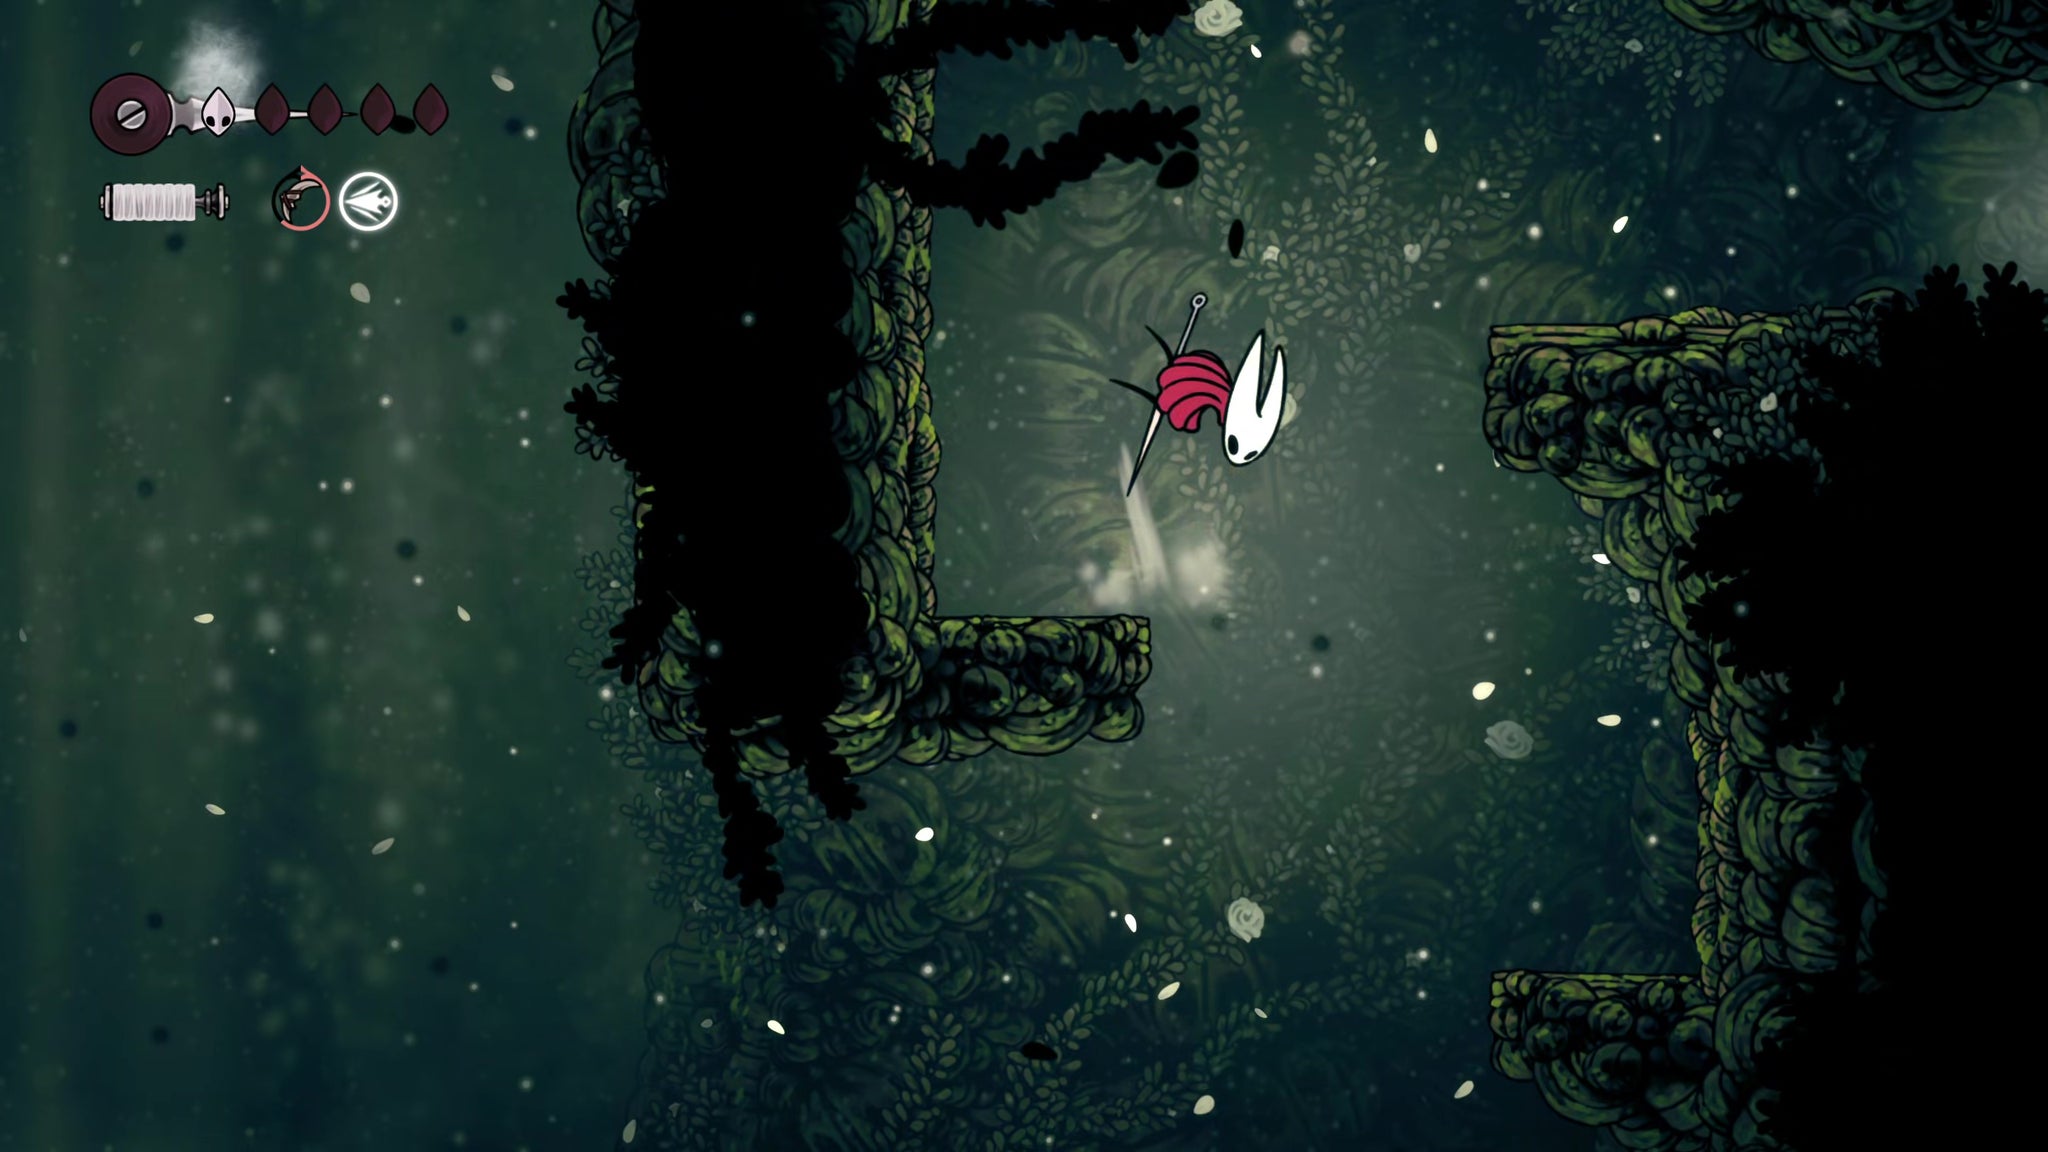
The next room is peaceful at least, but you'll need to do some good Pogo-parkouring to reach the second Pollip Heart embedded in the ceiling. If you haven't already, it's probably best to use the Wanderer Crest for its more straightforward downward-slash attacks.

11. Ride the elevator down and rest.
Exit the Pollip Heart room to the right, and start climbing upwards. Be aware of the white wall plants (called Gahlias) - they extend far outwards when they attack, so bait them before attacking.

Climb to the very top, kill the Phacia there, and drop down on the right to activate the elevator downwards. Ride the elevator down to the Bench you unlocked earlier, and rest there. You're about to face a boss.
12. Defeat Sister Splinter.
Ride the elevator back up to the top, and head right. Follow the path up the ledges in the next room, and after a couple of Pogos over some spikes, you'll come to the boss room. Walk into the centre of the arena to meet Sister Splinter.

Fortunately, Sister Splinter isn't too difficult. She sends spiked vines down at you which you must dodge, and her combo punches can catch you off-guard at first, but they're actually very easy to dodge and you can get multiple hits in afterwards each time she does it.

In her second phase she'll conjure some Splinterbark minions to hound and harry you, but as long as you don't panic, manoeuvring them in the way of Sister Splinter's ground attacks will make short work of them.
Eventually you'll cut Sister Splinter down, and then you can exit to the left.
13. Pollip Heart #3.
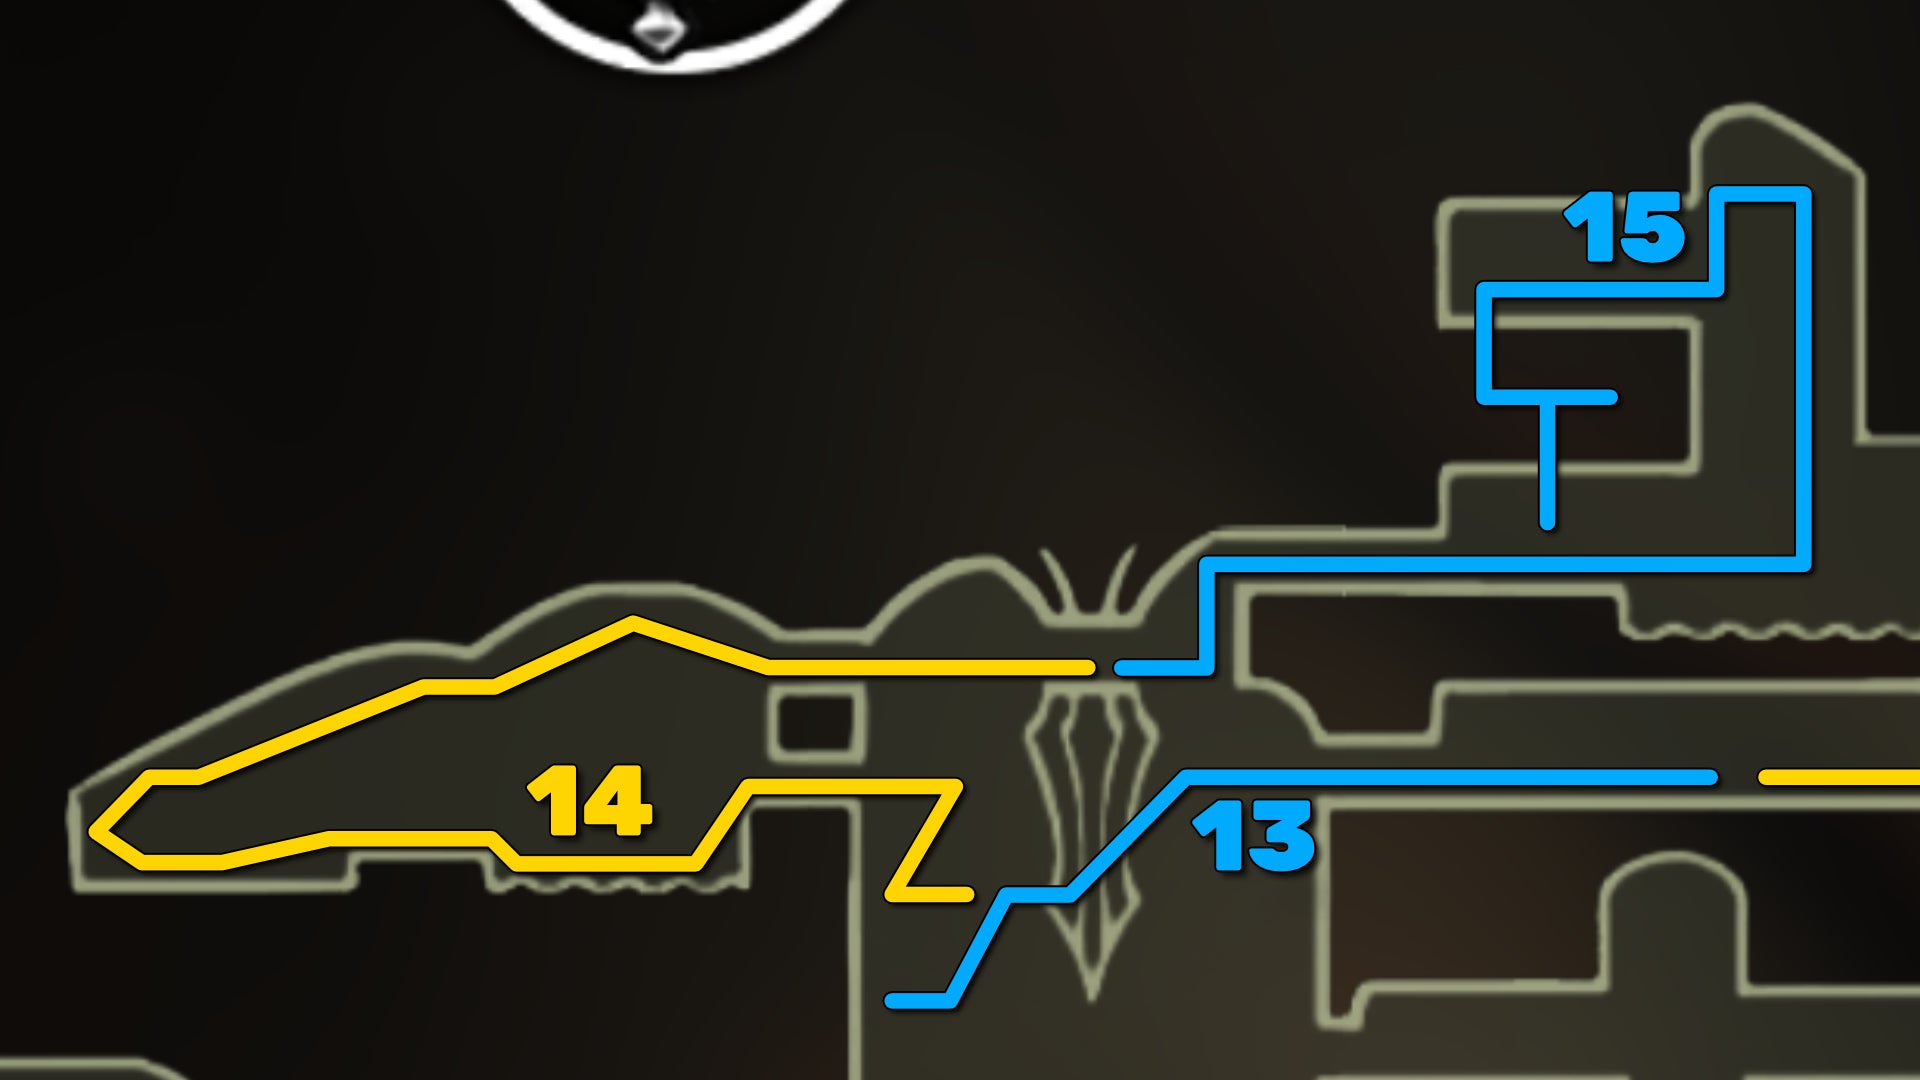
In the next room, head diagonally down and to the left, and kill the Gahlia in your way, then drop down the hole below it. Just below and to the left, you'll see the telltale sign of flowers in the left-hand wall, indicating the presence of another Pollip Heart nearby.


Drop down and glide to reach the lower ledge where you can destroy the purple flower and gain your third Pollip Heart. Then use the white Pogo-able flowers to bounce back up to where you were.
14. Obtain the Cling Grip skill.
Make your way past the next three Gahlias along the path above you, and then Pogo across the spikes to the room on your left. Swim to the other side of the room, and follow the parkour course upwards. Remember to bait the Gahlias before attacking; patience is the best policy with these irritating enemies.


Past the two Gahlias immediately atop one another, you can drop down the opposite side of the ledge to collect some Rosary Beads; then keep climbing upwards until you reach the top-right corner exit.

Now just jump across the gap and interact with the monument to receive another all-important skill: Cling Grip. With this ability, you can now wall-jump and climb flat walls with ease. The world of Silksong just got a whole lot bigger.
15. Pollip Heart #4.
Now that you have Cling Grip, you can reach the final Pollip Hearts. Head to the right of the monument, and jump over the large rectangular rock in the middle of the room. You can skirt beneath the ground level in the water to reach some Rosaries and a path downwards, but don't take it.
Go back and complete the fairly simple wall-climbing puzzle in this section to reach the top. Destroy the breakable wall in the top-left corner and then drop down into the water.


This bit's a little nasty; you'll need to contend with a nest of those purple Wood Wasps. Attack the nest as quickly as possible to destroy it, or it'll keep spitting out new Wasps. When they're all dead, pass through the doorway opened up by the destroyed nest, and drop down into the secret area below, where you'll find the fourth Pollip Heart. After that, you can drop to the bottom of the section and return to the monument.
16. Pollip Heart #5.
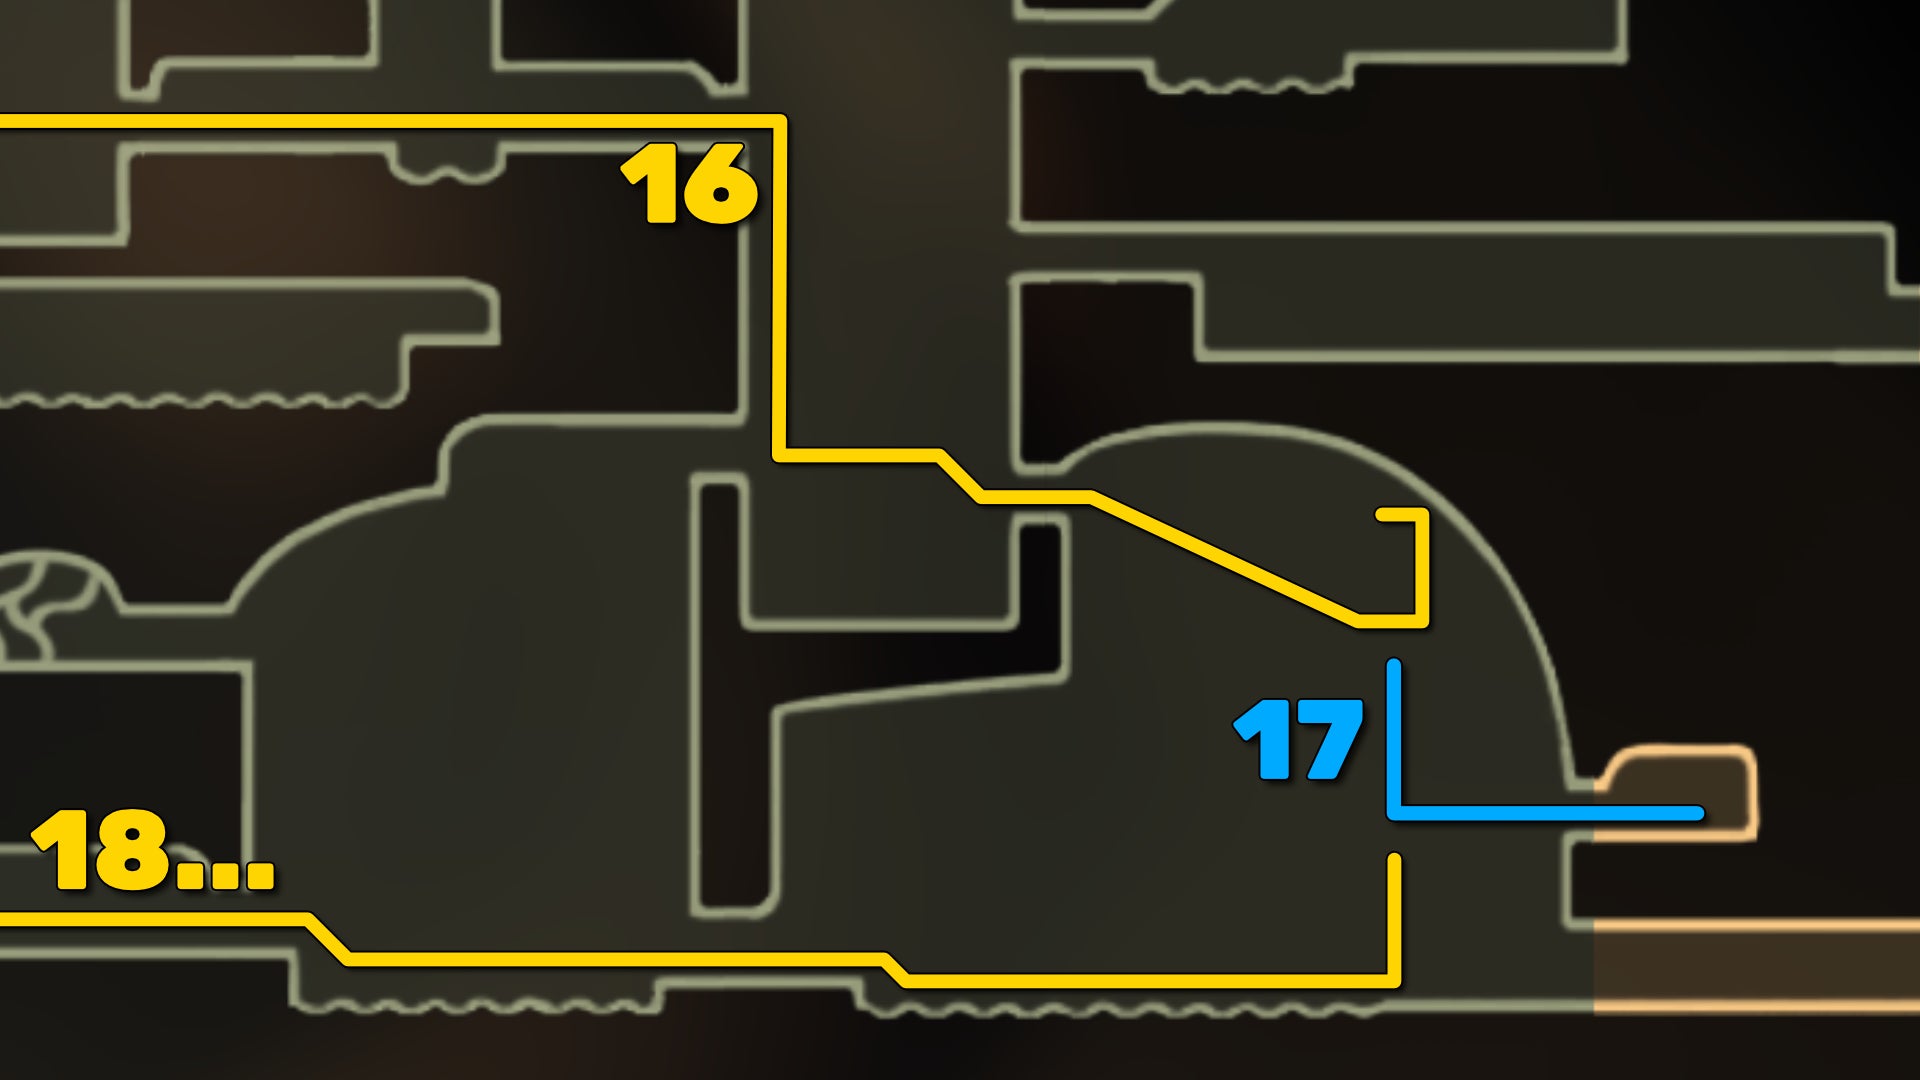
To reach Pollip Heart #5, drop to the bottom of the monument room, and exit to the right. Cross the next corridor, and drop down to the Bench by the elevator (you can rest here while you're at it).
Drop down the right-hand side, and exit into the room to your right. Glide over to the right-hand side, staying near the ceiling, and you'll see the purple flowers of the nearby Pollip. Claw Grip your way up the wall to the right, and you can reach the top area with the Pollip Heart. Wasps, too, so watch out.
But where is Pollip Heart #6?
17. Obtain the Longpin behind the Wasp Nest.

Drop down from the fifth Pollip Heart location, and hang a right as you descend. Halfway up the right-hand wall of the room you'll find another Wood Wasp nest. Destroy the nest, and you'll open up a passage into a small hidden room.
At the far end of the room is a weapon rack you can loot to obtain a very nice weapon tool - the Longpin. It's like the basic Straight Pin, except it penetrates through multiple foes with a single throw.
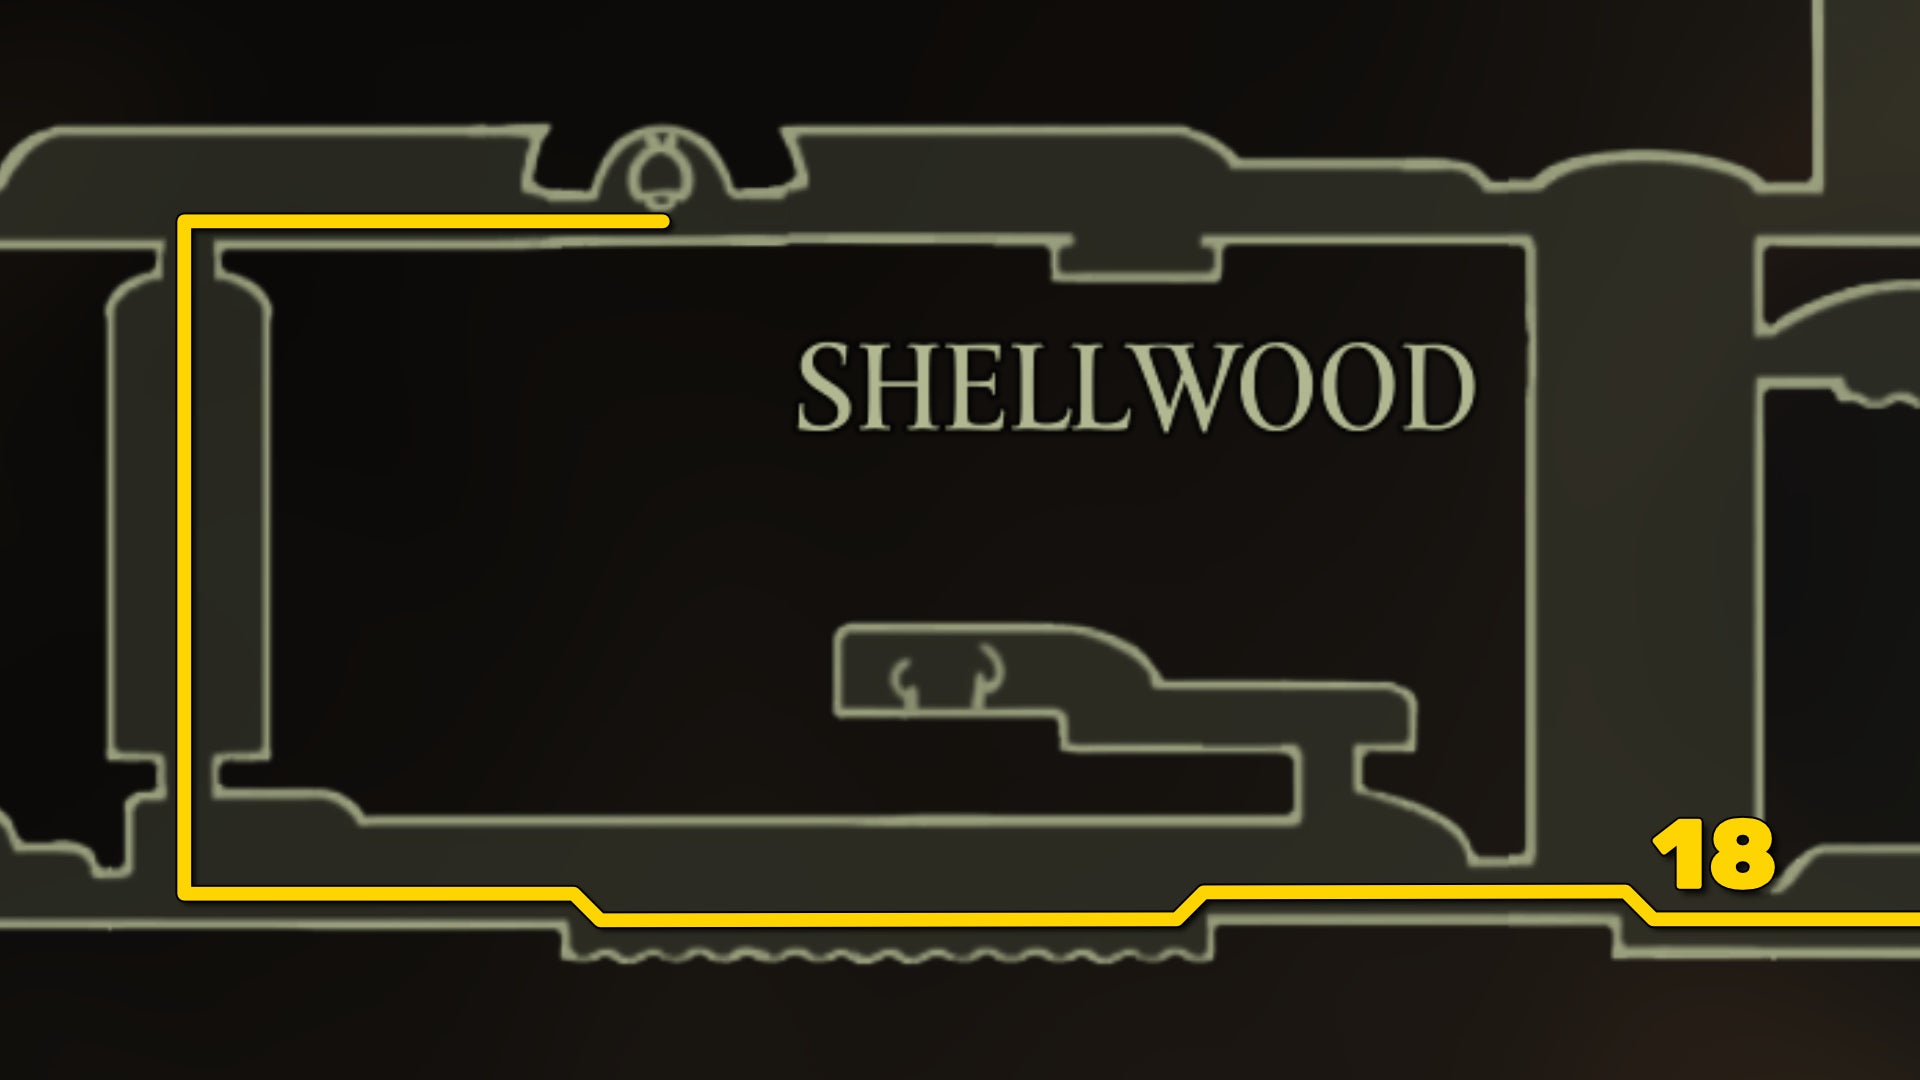
18. Unlock the Bench west of the Bellway.


The final step for this part of the walkthrough is to find your way back to the Bellway, this time from the other side. Retrace your steps to head all the way back to the very beginning of Shellwood, by the far western entrance.
You might recall that there were some big hanging blocks of rock near the entrance in that first Shellwood room, next to a gilded cart on the ground. Now that you have the Claw Grip skill, you can make your way up there and into the room above.
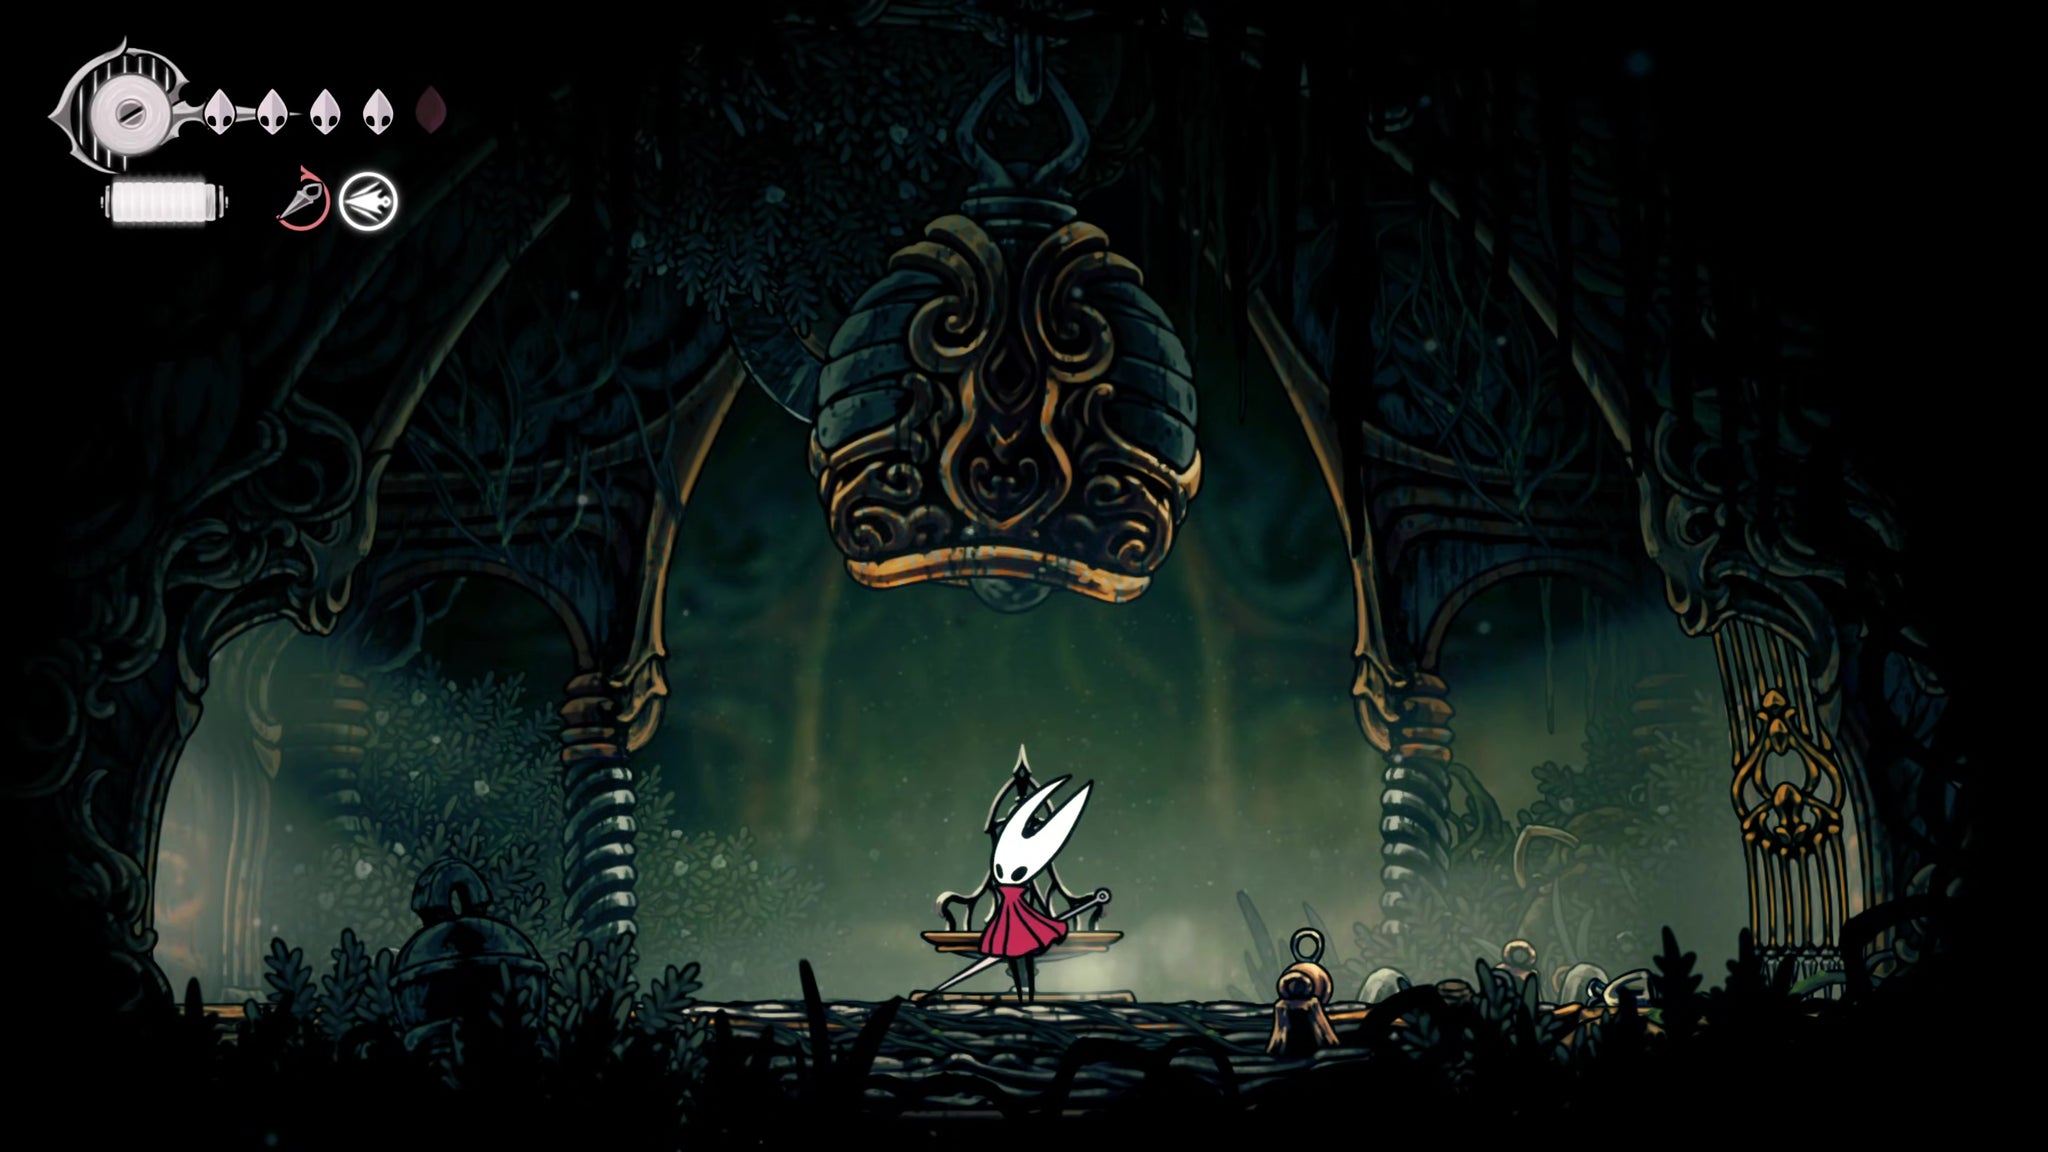
There's not much to explain here - just parkour and wall-climb your way up to the very top, evading or killing the Winged Pilgrim Bellbearers that approach you. Once you're in the room up above, you can head right to unlock a new Bench, and the doorway to the Bellway. To the left is a new (and very windy) biome, but we won't be entering it quite yet in this walkthrough.
Now that we've fully mapped the Shellwood (or near enough), it's time to venture further into the Bellhart and figure out how to save the town. Join us in Part 10 of our Silksong walkthrough for those next steps!
Read this next
- Ahead of Hollow Knight: Silksong's Sea of Sorrow expansion, Team Cherry have gotten their Traditional Chinese and German translation ducks in a row
- We may have glimpsed Silksong's Sea of Sorrow expansion in a six-year-old trailer
- Hollow Knight: Silksong's first big expansion, Sea of Sorrow, flows into our lives for free next year
